
Table of Contents
Try Testkube instantly in our sandbox. No setup needed.
Want to learn more about this topic? Check out our Office Hours session...


Table of Contents
Executive Summary
Asynchronous testing is a powerful practice for ensuring the reliability and performance of your software. By allowing tests to run independently of one another, asynchronous testing can greatly reduce the time and resources required to run test suites, while also providing more accurate results.
Although it can be challenging to orchestrate this practice while working with Kubernetes, there are tools that can aid in this process: such as Testkube.
Testkube is a Kubernetes-native testing framework for Testers and Developers that allows you to automate the executions of your existing testing tools inside your Kubernetes cluster, removing all the complexity from your CI/CD/GitOps pipelines.
Testkube v1.6 introduced support for Test Triggers for running application tests based on various Kubernetes events.
This article will explain in more depth how to test systems asynchronously using Testkube’s Test Triggers feature. First, I will cover setting up a Kubernetes cluster and installing Testkube, then we will deploy an example application, define some tests, and define test triggers for various use-cases.
Prerequisites
First, we will need a Kubernetes cluster and for the sake of this guide, we will use Minikube to deploy one locally.
- Download the minikube binary from the Get started! page.
- Run the following command to start a new Kubernetes cluster:
minikube start --kubernetes-version=1.24.9 --profile minikube-testkubes- Install the Testkube CLI from the Installation page.
- Use one of the following commands to install Testkube in your Kubernetes cluster:
OPTION 1: Install using Testkube CLI
testkube initOPTION 2: Install using Helm
helm repo add testkube https://kubeshop.github.io/helm-charts && \
helm repo update && \
helm install --create-namespace my-testkube testkube/testkube --namespace testkube
The Example App
I have written a simple Go webapp that will be used to showcase various use cases of Testkube’s Test Triggers. You can look at the source code here: dejanzele/testkube-triggers-example.
The Example app is a simple Go webapp that exposes a `/health` endpoint on port 8080, and reads a config file from a path provided by an environment variable called `CONFIG_PATH` .
The deployment for the Example app is also simple: it creates Kubernetes Deployment, Service and ConfigMap resources and the config file is defined as a YAML file in the ConfigMap resource and mounted as a volume in the Deployment resource.
The config file is pretty simple, it is a simple YAML file that contains a variable called `crash` which will be used to simulate failures in our application.
Deploying the Example App
Now let’s deploy the sample application by running:
kubectl apply -f https://raw.githubusercontent.com/dejanzele/testkube-triggers-example/master/deployment/k8s/example.yaml
We can validate the application was deployed successfully by running the following command:
<script src="https://gist.github.com/alelthomas/384923bee9c11a87b20f68947d6ddb7b.js"></script>
If everything is ok, the pod should be in Running status.
Tests
If you want to examine the test configurations which are used in this guide, head over to the test folder in the dejanzele/testkube-triggers-example repository.
Now we proceed to the fun part, defining some tests :)
Health-Check (cURL) test
Let’s define a simple health-check test that uses cURL as a test executor to send a GET request to the `/health` endpoint. The configuration file is the following:
{
 "command": [
   "curl",
   "http://testkube-triggers-example-service:8080/health"
 ],
 "expected_status": "200",
 "expected_body": "Everything is running smoothly :)"
}
We define the cURL command and set expectations on the HTTP response status (200) and body. Let’s now create a Test from this configuration file:
kubectl testkube create test --uri https://raw.githubusercontent.com/dejanzele/testkube-triggers-example/master/tests/curl.json --name healthcheck-test --type curl/test --namespace testkubePerformance (Artillery) test
Let’s define a simple performance test that uses Artillery as a test executor to send GET requests to the `/perf` endpoint over a period of time. Also, let’s say that the Example application has an SLA that the HTTP Response Time 95th percentile must be less than 200ms.
config:
plugins:
   ensure: {}
 ensure:
   thresholds:
     - "http.response_time.p95": 200
 target: "http://testkube-triggers-example-service.testkube:8080"
 phases:
   - duration: 6
     arrivalRate: 5
     name: Warm up
   - duration: 30
     arrivalRate: 5
     rampTo: 10
     name: Ramp up load
   - duration: 15
     arrivalRate: 20
     name: Sustained load
scenarios:
 - name: "Hit performance endpoint"
   flow:
rl: "/perf"
Let’s break down the Artillery configuration:
- import the ensure plugin so we can write assertions on HTTP metrics.
- define a threshold that our HTTP Response Time 95th percentile should be less than 200ms.
- define target and phases how the requests should be sent
- define a scenario with a flow where GET requests get sent to the /perf endpoint
Let’s now create a Test from this configuration file:
kubectl testkube create test --name performance-test --uri https://raw.githubusercontent.com/dejanzele/testkube-triggers-example/master/tests/artillery.yaml --type artillery/test --namespace testkubeTest Triggers
If you want to examine the test trigger configurations that are used in this guide, head over to the triggers folder in the dejanzele/testkube-triggers-example repository.
Now for the moment we've all been waiting for, let’s define triggers and run the tests we just created under certain conditions.
Trigger When Application Config is Updated
One scenario for which we could create a trigger is to run a health-check test when our application config changes.
We already know that our application config is defined in the ConfigMap, so let’s create a trigger which will run the healthcheck-test when the ConfigMap gets updated:
apiVersion: tests.testkube.io/v1
kind: TestTrigger
metadata:
 name: configmap-modified-trigger
 namespace: testkube
spec:
 resource: configmap
 resourceSelector:
   name: testkube-triggers-example-config
   namespace: testkube
 event: modified
 action: run
 execution: test
 delay: 30s
 testSelector:
   name: healthcheck-test
   namespace: testkube
We use `kubectl` to apply the Test Trigger:
kubectl apply -f https://raw.githubusercontent.com/dejanzele/testkube-triggers-example/master/triggers/configmap-modified-trigger.yaml
---
NOTE: By Kubernetes design, environment variables injected from a ConfigMap into a Deployment do not get automatically updated when a change happens to the ConfigMap until the Deployment pod(s) are manually restarted (there are tools to automate this scenario, one of them is stakater/Reloader, but that is out of scope for this article).
On the other hand, if we mount the file defined in the ConfigMap as a volume, kubelet will sync the new file changes in the kubelet’s regular sync interval. This is the reason why we set the delay field in the configmap-modified-trigger Test Trigger so test execution gets delayed in order to wait for the kubelet to sync the ConfigMap file changes.
---
There are a lot of ways that we could trigger our test in the current scenario. For the sake of this article, I have mounted a config file defined in a ConfigMap into my application’s Deployment resource.
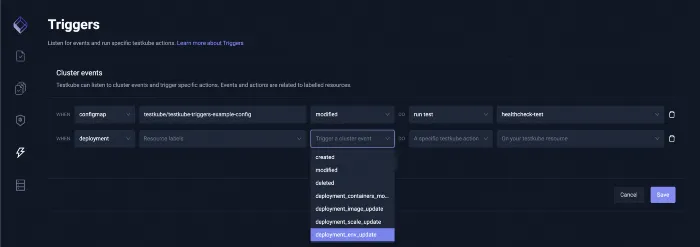
We could also define environment variables directly in the env block of our container definition in the Deployment resource and trigger based on that event. Head over to the Triggers section in the UI and checkout all possible combinations.
Trigger When Application Version is Updated
Applications change over time: new features get added, bugs get introduced, bugs get fixed… like in any software development lifecycle.
We already know our example application has an SLA (HTTP Response Time 95th percentile < 200ms) so we could define a trigger that will run our performance-test every time a new version of our application is deployed so we ensure each version satisfies the defined SLA.
We define a Test Trigger for the Deployment resource to run the performance test when a deployment_image_update event occurs:
apiVersion: tests.testkube.io/v1
kind: TestTrigger
metadata:
 name: deployment-image-update-trigger
 namespace: testkube
spec:
 resource: deployment
 resourceSelector:
   name: testkube-triggers-example
   namespace: testkube
 event: deployment_image_update
 delay: 30s
 action: run
 execution: test
 testSelector:
   name: performance-test
   namespace: testkube
We use `kubectl` to apply the Test Trigger:
kubectl apply -f https://raw.githubusercontent.com/dejanzele/testkube-triggers-example/master/triggers/deployment-image-update-trigger.yamlTestkube UI
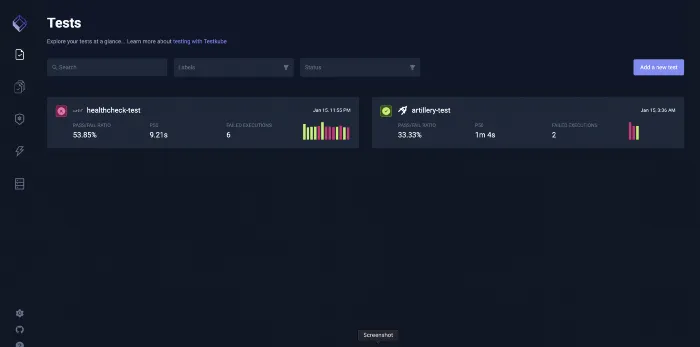
I don’t want to mislead you into thinking Testkube is an old-school tool that offers just a CLI, so it is time to start playing with the UI.
To access the Testkube UI, we need to have access to both UI and API components. We could port-forward to both components (`testkube-dashboard` & `testkube-api-server`), or we can use a neat command from the CLI which does the following for us:
testkube dashboardThis command should open the default browser and load the Testkube UI:
If we click on the Triggers tab in the sidebar (the icon which looks like Harry Potter’s forehead scar), we should see our triggers:
Triggering a Test
Updating Our App Config
We already said we want to trigger a test when our application config changes, and we have created our trigger so it schedules the healthcheck-test when a change occurs on our ConfigMap.
Let’s change the `crash` field in the config file from `false` to `true` by editing the ConfigMap:
kubectl edit configmap testkube-triggers-example-config --namespace testkube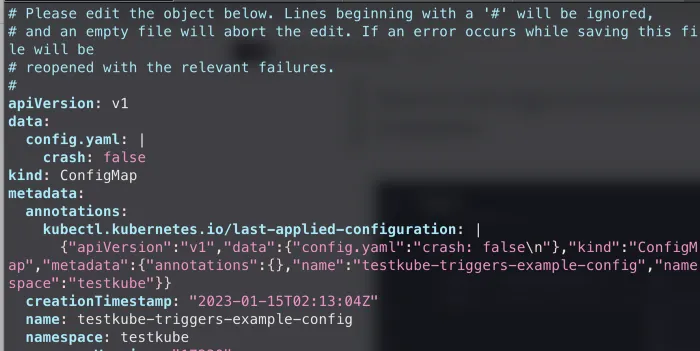
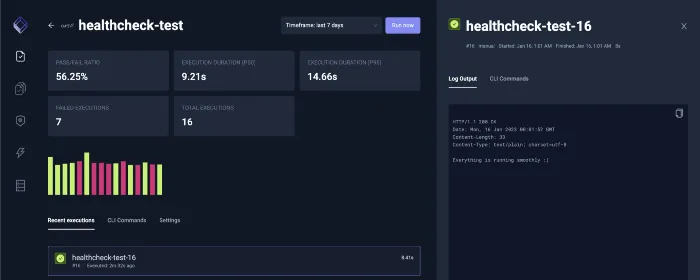
If we go back to the UI, after 30 seconds, we will see the test getting scheduled (remember we configured a delay of 30 seconds).

The test is expected to fail because we changed the `crash` parameter to `true`, which simulates an error in the application.

Health-check test failed successfully! But true QA Engineers will never allow a test to fail, so let’s revert the `crash` field to `false`, and again examine the UI:
Updating Our App Version
We already mentioned we have an SLA in our application for HTTP Response Time metrics (95th percentile < 200ms), and if we want to update our application, the new version must satisfy that SLA.
First, let’s check which version of the Example application is currently running:
kubectl get deployment testkube-triggers-example -o=jsonpath='{$.spec.template.spec.containers[:1].image}' --namespace testkubeWe are currently running version v1.0.12 and we see that a new version v1.0.13 was released so we decide to update our application.
kubectl set image deployment/testkube-triggers-example app=dpejcev/testkube-triggers-example:1.0.13 --namespace testkubeWe don’t trust the developer of the Example application too much, so we go to the Testkube UI and check the result of the performance test execution.

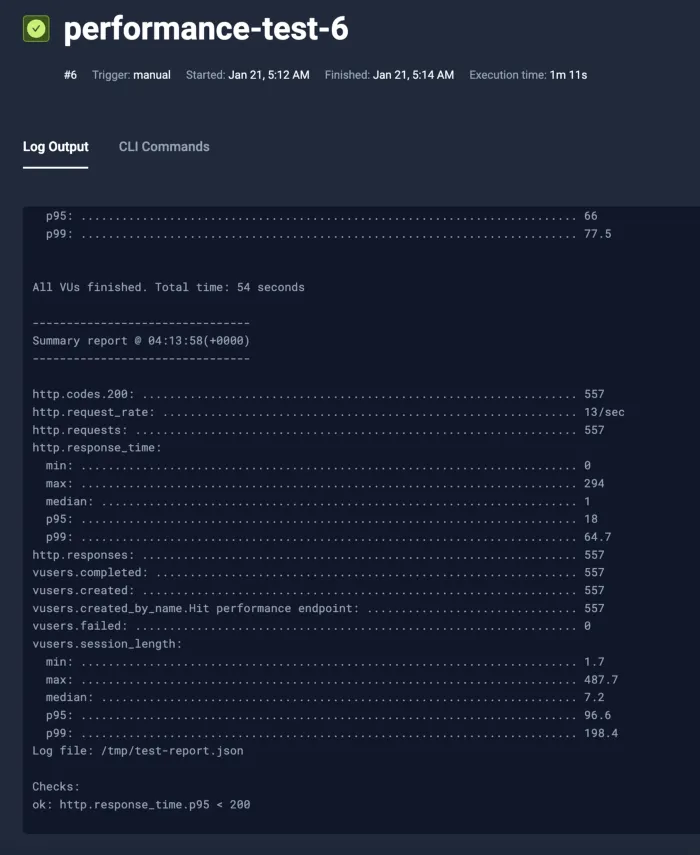
Looks like this version has an issue and does not meet the HTTP response time SLA. We cannot use this version of the application, so our options are either to revert to the last stable version or wait for the developer to fix the issue.
Let’s assume the developer identified what was causing the slowness issue after seeing failing tests in Testkube UI and implemented the /perf endpoint in a more performant manner in v1.0.14:
kubectl set image deployment/testkube-triggers-example app=dpejcev/testkube-triggers-example:1.0.14 --namespace testkubeWe go to the Testkube UI and we see that our performance test is now green and our SLA is met. We can proceed with using this version:
Success! You've set up your first Test Triggers using Testkube. If you’d like to learn more about Test Triggers and explore all the possible configuration options, head over to our docs page and learn more (I am pretty sure you will find more cool features there).
Conclusion
Test Triggers are a really interesting feature of Testkube and they allow engineers to asynchronously execute different kinds of tests based on various scenarios by leveraging Kubernetes events.
By adopting Testkube and adding Triggers, you will battle-harden your system, have better observability and insights about your system health & performance, and most importantly, have lots of fun by playing with Testkube.
Give it a go
Why not give it a go yourself? Sign up to Testkube and try one of our examples or head over to our documentation - if you get stuck or have questions, we’re here to help. Reach out to us on Slack. We’re eager to hear how you use our integrations.
You can find Dejan on LinkedIn, Medium, or X for more announcements and cool daily programming tips & tricks.


About Testkube
Testkube is a cloud-native continuous testing platform for Kubernetes. It runs tests directly in your clusters, works with any CI/CD system, and supports every testing tool your team uses. By removing CI/CD bottlenecks, Testkube helps teams ship faster with confidence.
Explore the sandbox to see Testkube in action.


