
Table of Contents
Start your free trial.
Unlock Better Testing Workflows in Kubernetes — Try Testkube for Free

Unlock Better Testing Workflows in Kubernetes — Try Testkube for Free


Table of Contents
Executive Summary
Webhooks Intro
The significance of webhooks cannot be overstated. They help bridge the gap between different tools & platforms to enable swift and streamlined communication. Webhooks empower developers and operations teams to seamlessly integrate testing, deployment, and incident response workflows.
Webhooks are automated HTTP callbacks sent from one application to another at specific events or when specific changes occur. They enable real-time information exchange and trigger actions in response to those events. Webhooks play a vital role in automation testing as well as they allow for seamless communication between testing tools, CI framework, and Kubernetes.
In today’s post, we’ll look at Webhooks in Testkube and how they further enhance your testing capability by helping you integrate with other critical systems.
Webhooks in Testkube
Testkube uses webhooks to integrate with external systems, allowing you to synchronize your testing workflows with other tools and platforms effortlessly. These webhooks are designed to carry critical information regarding your test workflows as HTTP POST payloads. The information can include the execution and real-time status depending on how you configure it.
To leverage webhooks, you must ensure that the platform you want to send information to has an HTTPS endpoint to receive the events. Testkube also allows you to customize the payloads to add additional data for your test workflows.
You can create a webhook from the dashboard, use the CLI, or create it as a custom resource. Before we show how it’s done, let’s understand a few scenarios where Webhooks in Testkube shine:
- Incident Management & Response: Webhooks can be used to create incidents and alert on-call teams when a critical test fails. This ensures a timely response and avoids any potential disruption due to failures and bugs. With Testkube, you can configure incident management tools like PagerDuty and OpsGenie to receive alerts based on critical events for your tests.
- Communication and Collaboration: You can configure Webhooks in Testkube to send alerts to your teams in your communication tool. This will notify your team of any critical event that needs attention and attend to it before the issue escalates. Some of the popular communications tools like Slack and MS Teams can be configured to receive alerts from Testkube.
- Monitoring and Observability: Webhooks can also be used to send alerts and notifications to your monitoring and observability tools like Prometheus and Grafana. This provides visibility into your tests, alerts you, and ensures that timely corrective actions can be taken.
Components of Webhooks
To successfully create and configure a webhook in Testkube, you need to understand how it works and its associated components. These components, comprising events, resources, and destinations, collectively form the backbone of webhook functionality.
- Name: The name of the webhook which allows you to differentiate and manage webhooks.
- Resource Identifier: These are the objects that can trigger an event. You can select test workflows based on their name and label. Testkube allows you to select multiple resources for a single webhook as well.
- Triggered Events: These are test events that can trigger webhooks. These cover important events in the testing process, such as execution, completion, success, and failure.
- URI: These specify where the event data is to be delivered. Testkube allows you to configure webhook endpoints for various platforms.
Refer to our Webhook documentation to learn more about the components of webhooks.
Using Webhooks in Testkube
As discussed above, Webhooks are a great way to extend your testing to other platforms. We will now explain how to use webhooks in Testkube.
To begin, we’ll design a simple cURL test that sends a request to an HTTP endpoint that returns the IP address of our host. We’ll configure webhooks that trigger on success and failure events of tests. We’ll showcase two scenarios:
- Incident Management and Response: By configuring test failure events to be sent to a Grafana endpoint.
- Communication and collaboration: By configuring test successful events to be sent to Slack.
We also have a video that explains the steps to creating a webhook in Testkube. You can either read the blog post or watch the video.
Pre-requisites
Below are the prerequisites required to perform/replicate the steps mentioned in the blog post. Feel free to skim through without configuring these if you plan to just read and understand the blog post.
- Kubernetes cluster - we’re using Minikube
- Testkube Cloud Account
- Testkube CLI & Testkube agent configured
- Set up an environment on the Testkube cloud
- Slack Account
- Grafana
Create cURL Test Workflow
Create a cURL test workflow that sends a request to jsontest, and check the response code to be 200. Below is the yaml test workflow specification:
kind: TestWorkflow
apiVersion: testworkflows.testkube.io/v1
metadata:
  name: curl-test-workflow
  namespace: testkube
  labels:
	test-type: curl-test
spec:
  steps:
  - name: Run curl
	container:
  	image: curlimages/curl:8.7.1
	shell: |
  	response=$(curl -s http://ip.jsontest.com/ \
  	-H "Accept: application/json")

  	# Check if the status code is 200
  	if [ "$(curl -s -o /dev/null -w "%{http_code}" http://ip.jsontest.com/)" != "404" ]; then
    	echo "Expected status 200 but got $(curl -s -o /dev/null -w "%{http_code}" http://ip.jsontest.com/)"
    	exit 1
  	fi
status: {}
Configure Destination
We’ll be creating two webhooks and configure them:
- Slack: this will send a notification to a Slack channel when a test passes.
- Grafana: this will update Grafana’s incident dashboard when the test fails.
This section will show how to configure Grafana and Slack to receive notifications.
Setting Up Grafana Integration
We’ll be using Grafana cloud for this blog post; you can also use a self-hosted Grafana instance. The steps would mostly be the same. Create a Grafana Cloud account if you don’t already have one. The free account is all you’ll need for this blog post.
Once logged in, navigate to Alerts & IRM -> Incidents -> Integrations. Grafana will provide you with many integration options. Choose Incoming Webhooks. Click the Install Integration button, and Grafrana will set the endpoint and provide details.
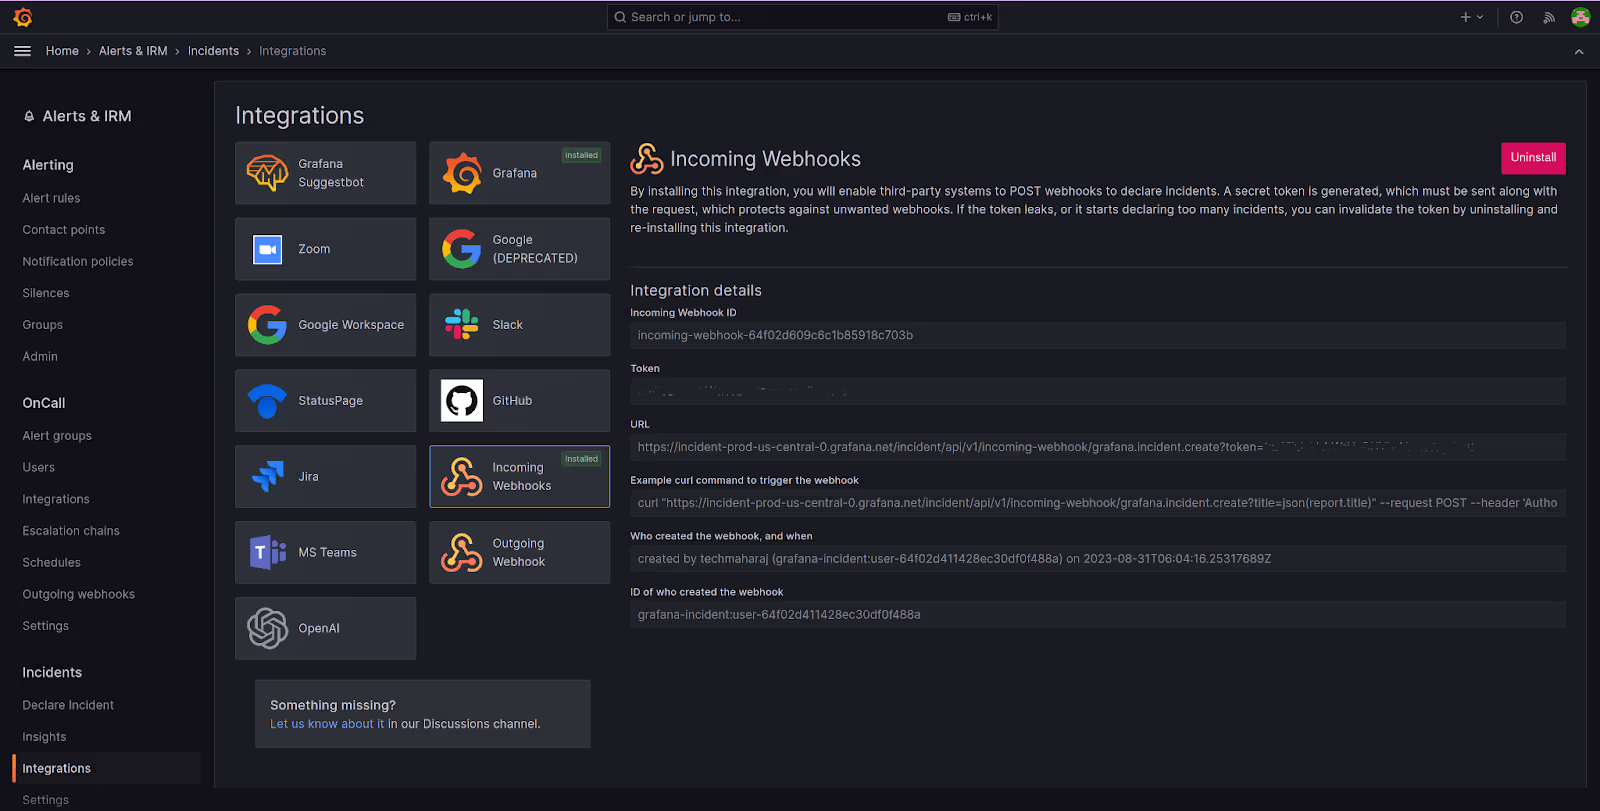
Note down the URL for the endpoint. You’ll need this while configuring the webhook in Testkube.
Creating Webhook for Grafana
We’ll set up a webhook for Grafana using the dashboard. This webhook will trigger the test-end-failure event and send the data to the Grafana webhook incident we configured.
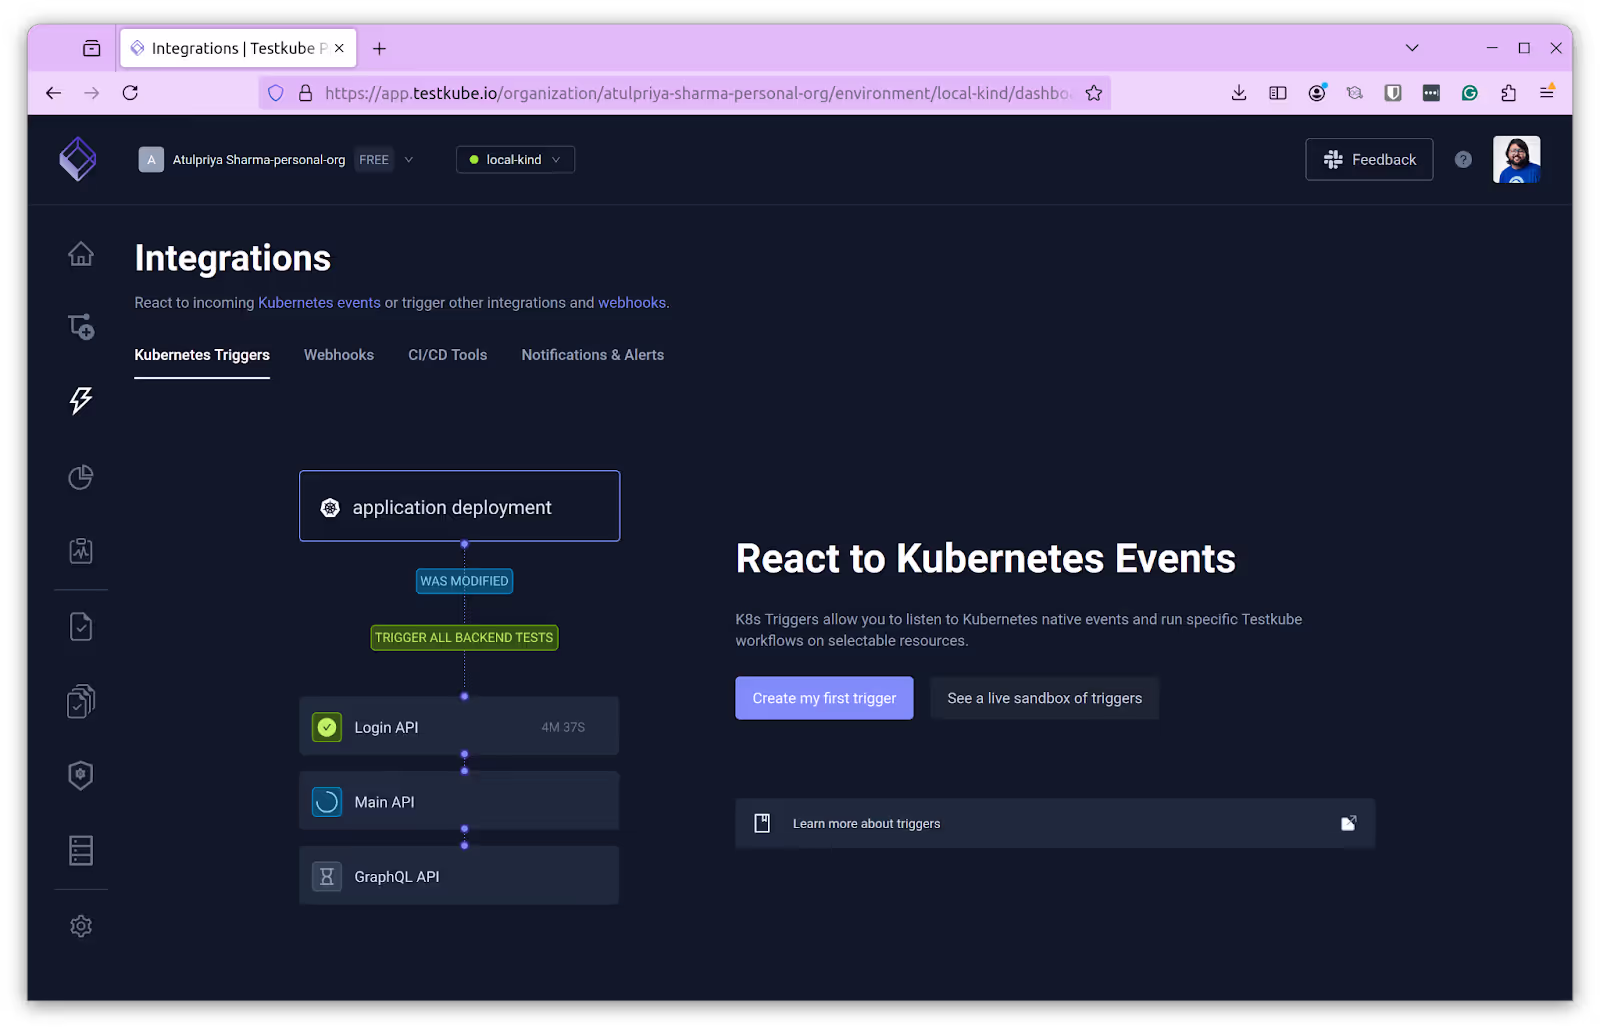
Launch the Testkube dashboard and click “Integrations” in the left menu. On the Integrations screen, navigate to the “Webhooks” tab and click “Create my first webhook”.
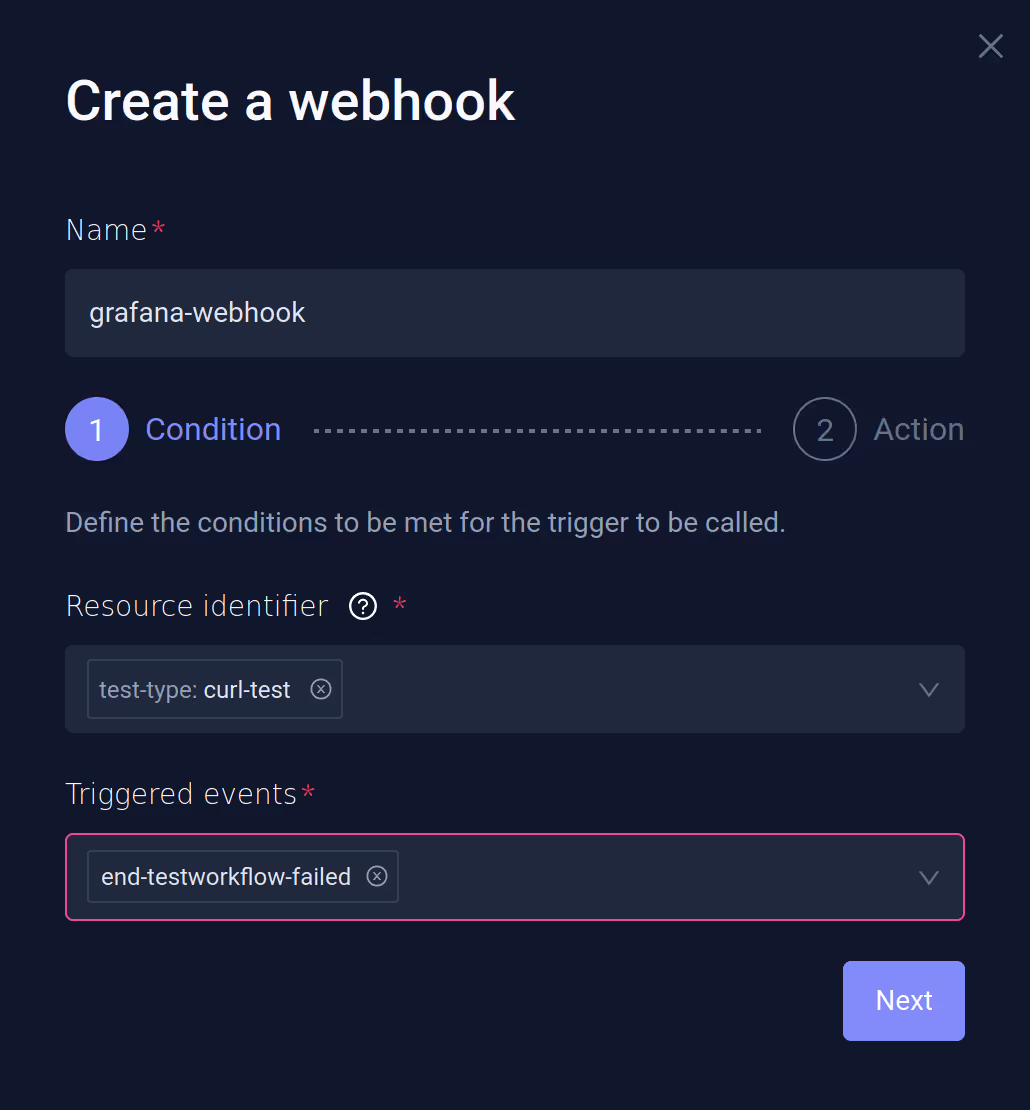
Provide a name and choose the “Resource Identifier” as test-type: curl-test, which refers to the cURL test. For “Triggered events”, choose end-testworkflow-failed.
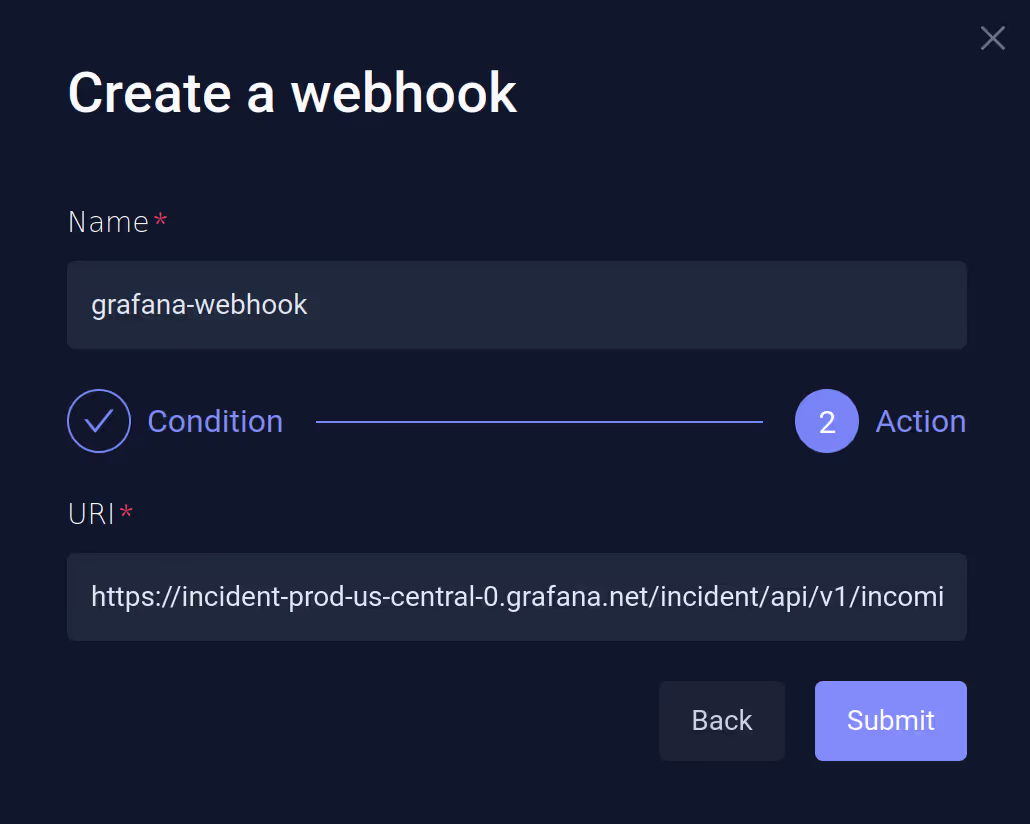
On the next screen, provide the Grafana endpoint URL you generated while setting up Grafana integration. Now, we have a successfully configured Grafana webhook.
Slack
Setting Up Slack Integration
Testkube provides a Slack integration where you can configure a Testkube bot in your Slack workspace. If your Slack workspace doesn’t allow you to install a bot, you can follow the steps mentioned in this section.
You can configure Slack to receive notifications via a channel or direct message. We’ll configure a private channel for this blog post. You can refer to this article to create a private Slack channel.
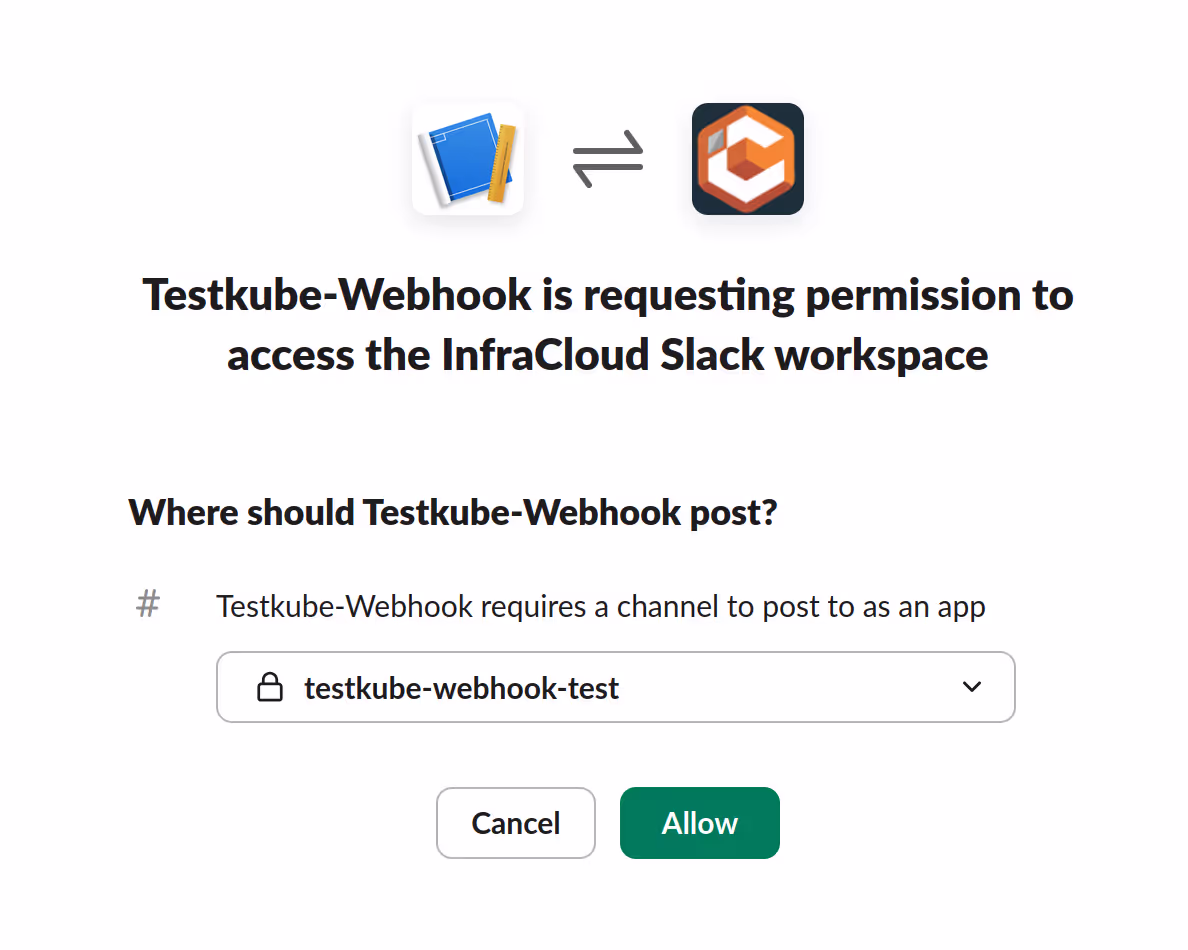
Once that is done, we will create a Slack app for a workspace to receive the incoming events via webhook. To do that, navigate to https://api.slack.com/apps and “Create a New App”. In the open modal, choose “From Scratch”, provide the name, and choose the workspace where you want to create this app.

Create the app, navigate to the “Add Features and Functionality” section, and click on “Incoming Webhooks.” By default, this is turned off, so you need to turn it on.
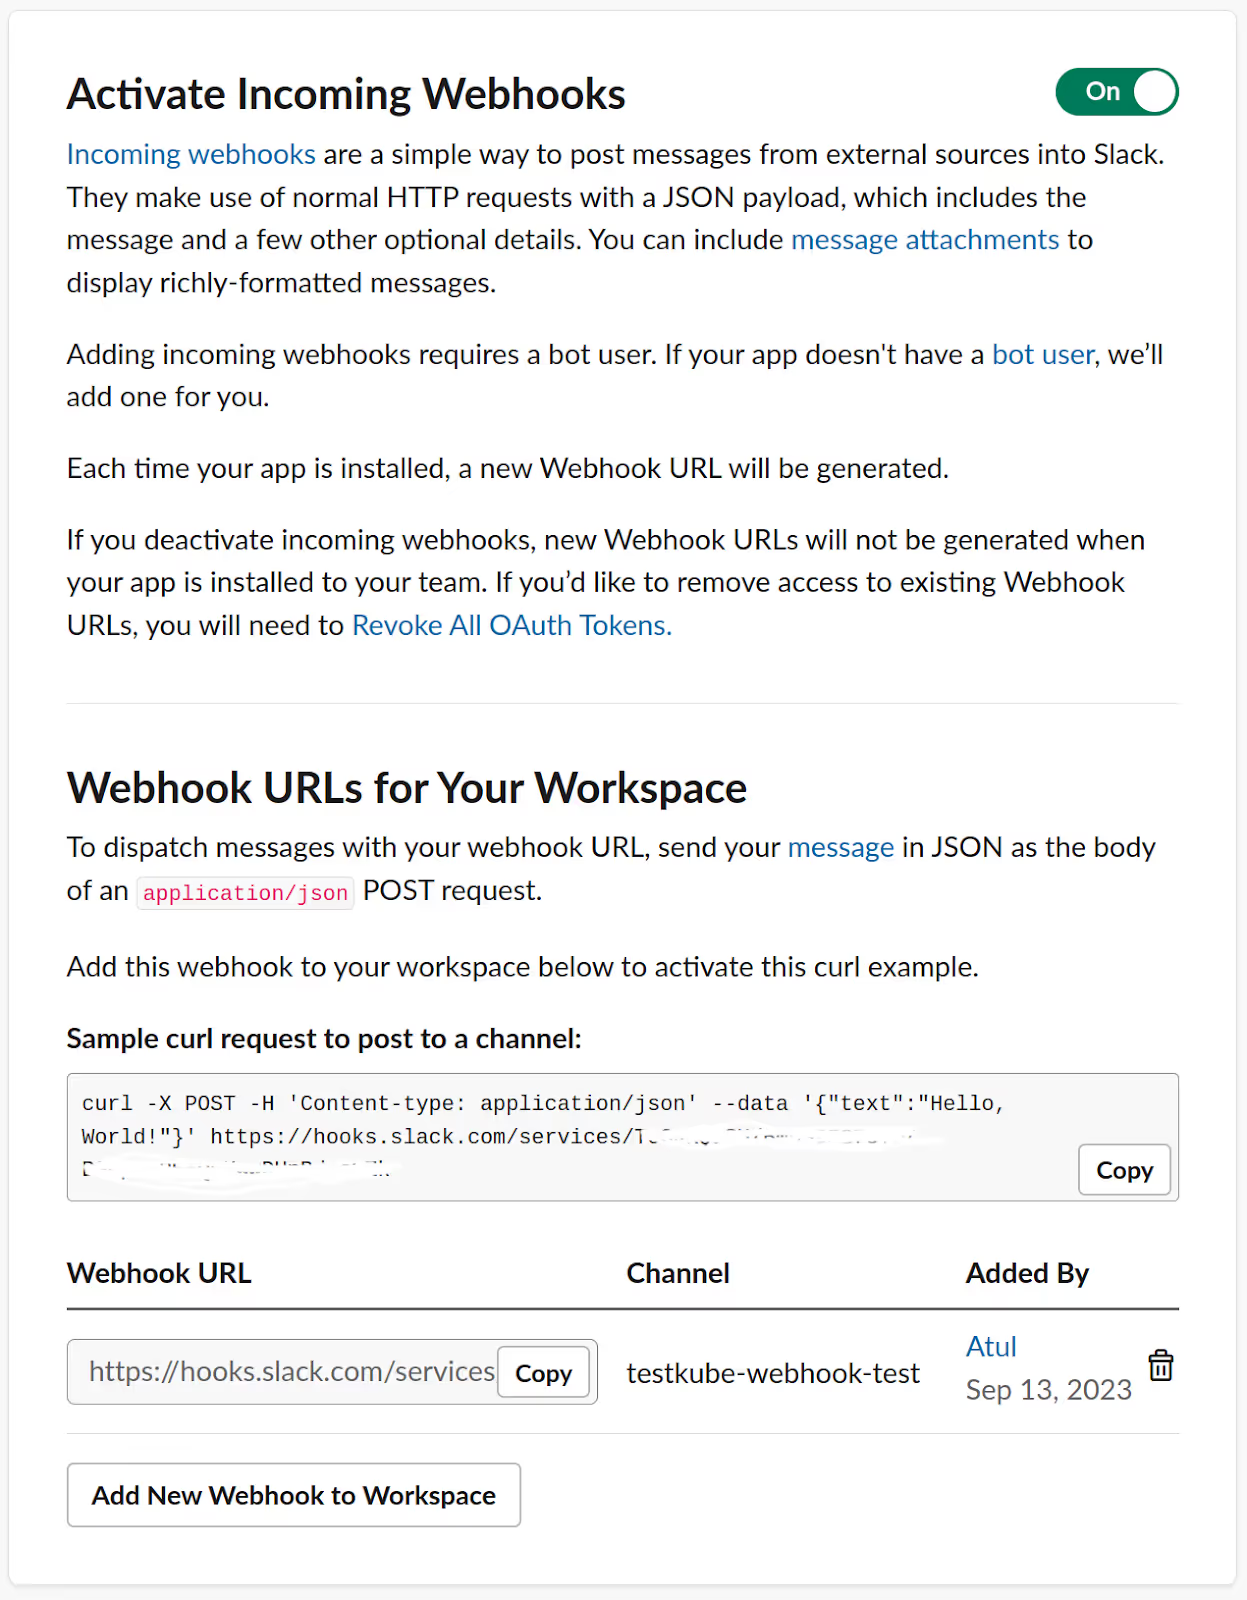
Click “And New Webhook to Workspace” on the next screen and select the private channel we created earlier.
Copy the webhook URL from the next screen and keep it handy, as we’ll need it while creating a webhook in Testkube.
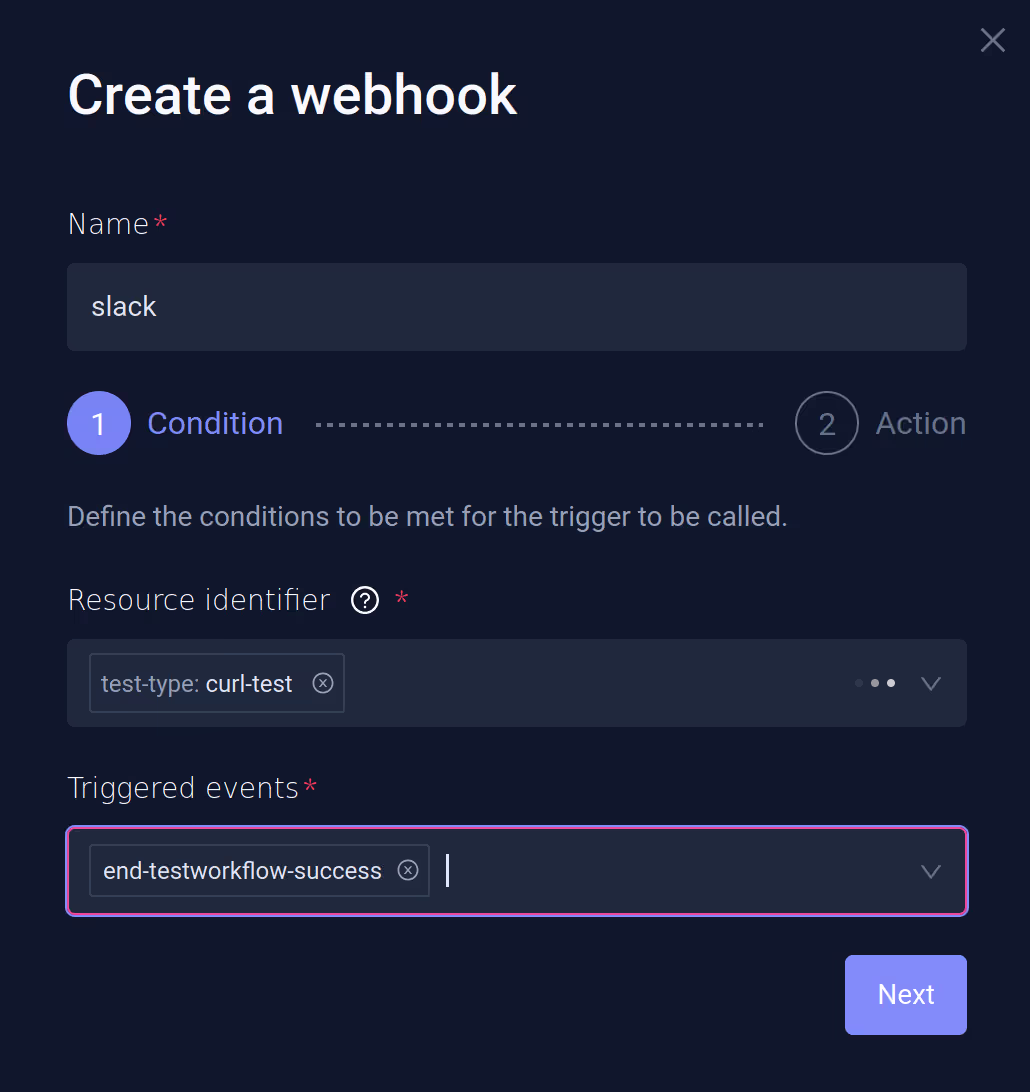
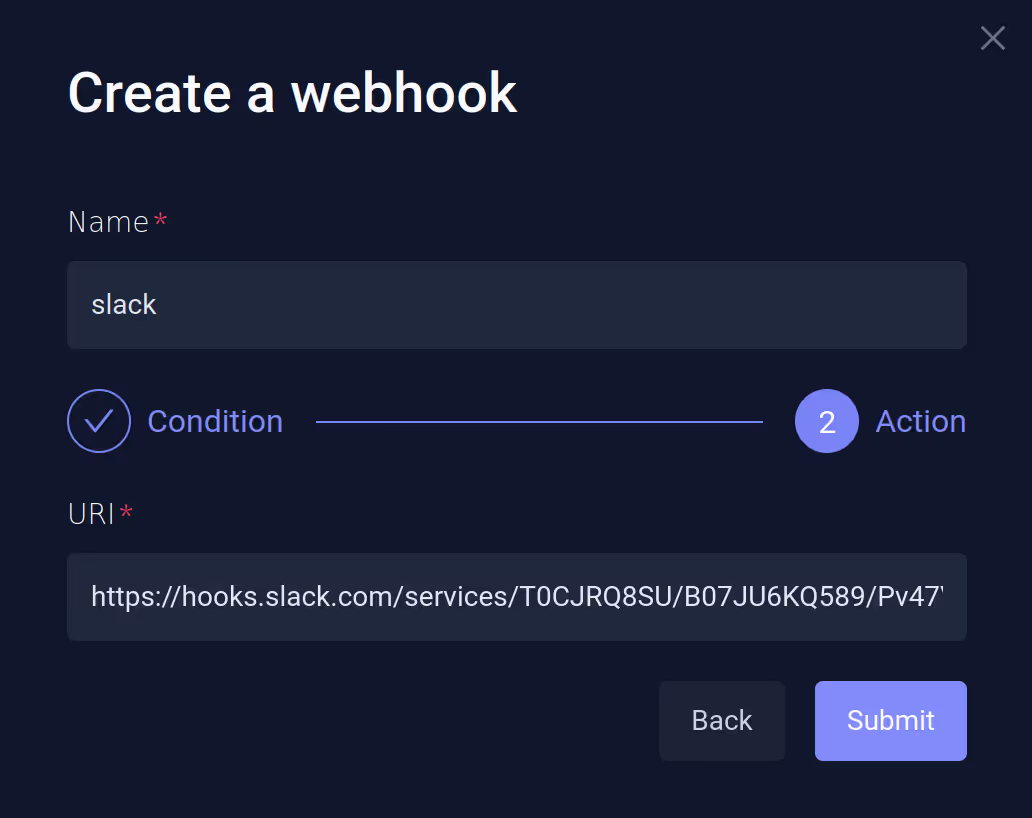
Creating Webhook for Slack
Navigate to the “Webhooks” tab on the “Integrations” page and “Create a new webhook”. Provide a name and choose the “Resource Identifier” as test-type: curl-test which refers to the cURL test workflow. For “Triggered events”, choose end-testworkflow-success.
On the next screen, provide the incoming webhook URL you generated while setting up Slack integration.
The last step is to configure the payload that will be sent to the Slack Webhook. After creating the webhook, you can navigate to Integrations -> Webhooks and click “Slack”. Navigate to the “Action” tab, and under the “Custom Payload” add the following text:
{
	"text": ":alert: Testkube Test Status \n *TestWorkflowName*: {{.TestWorkflowExecution.Name}} \n *Status*: {{ .Type_ }} \n *Logs*: https://app.testkube.io/organization/{{ index .Envs "TESTKUBE_PRO_ORG_ID" }}/environment/{{ index .Envs "TESTKUBE_PRO_ENV_ID" }}/dashboard/test-workflows/{{ .TestWorkflowExecution.Workflow.Name }}/executions/{{ .TestWorkflowExecution.Id }}
"
}
Here, we’re adding custom text that includes the Name of the Test Workflow, the status, and a link to the execution log of that particular test workflow. To build the URL, we access the environment variables “TESTKUBE_PRO_ORG_ID” and “TESTKUBE_PRO_ENV_ID”, which are your organization and environment variables that you get when you create an environment in Testkube.
We have successfully configured the Slack webhook and will receive events in the Slack channel when any event is sent to this endpoint.
Creating Webhooks Using CLI
Testkube also allows you to create a webhook using CLI. If not using the dashboard, you can create a webhook for the Slack integration using the Testkube CLI, which is simple. Open a terminal and use the testkube create webhook command to create a webhook.
testkube create webhook --name slack-cli --events end-test-success --selector test-type=curl-test --header Content-Type=application/json --uri https://hooks.slack.com/services/ABCDEFGHJKL/MNOPQRSTUVW
Below are the parameters used in the create webhook command:
name: Name of the webhook.events: The event on which the webhook will trigger. In this case, we giveend-test-success.selector: The resource for which the webhook will be configured. In this case, it’s the curl-test that we’ve created.header: The header parameters for the request, application/json in this case.uri: Slack endpoint URL.
The webhook is created after you execute the above command.
$ testkube create webhook --name slack-cli --events end-test-success --selector test-type=curl-test --header Content-Type=application/json --uri  https://hooks.slack.com/services/ABCDEFGHJKL/MNOPQRSTUVW

Context: cloud (2.0.8)   Namespace: testkube   Org: Atulpriya Sharma-personal-org   Env: local-kind
---------------------------------------------------------------------------------------------------
Webhook created slack-cli 🥇
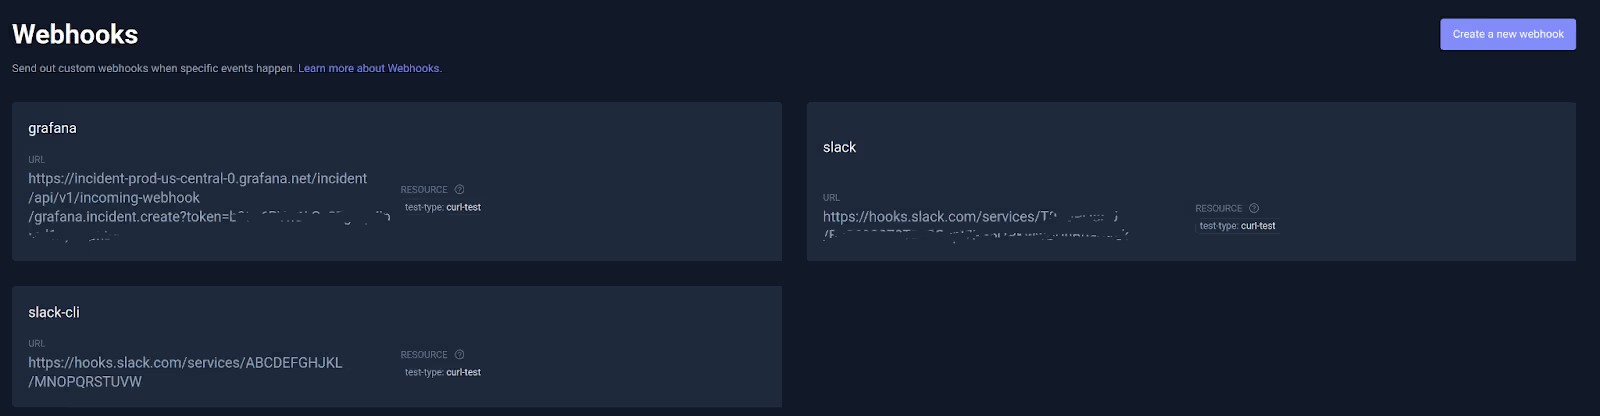
At this point, we have three webhooks created. One is for Grafana, which we created from the dashboard, and the other is for Slack, which we created using CLI and the dashboard. We can confirm this on the dashboard as well.
Testing the Webhook
Now that we have configured the webhooks, it’s time to test them. To do that, simply run the curl-test test workflow that we’ve created.
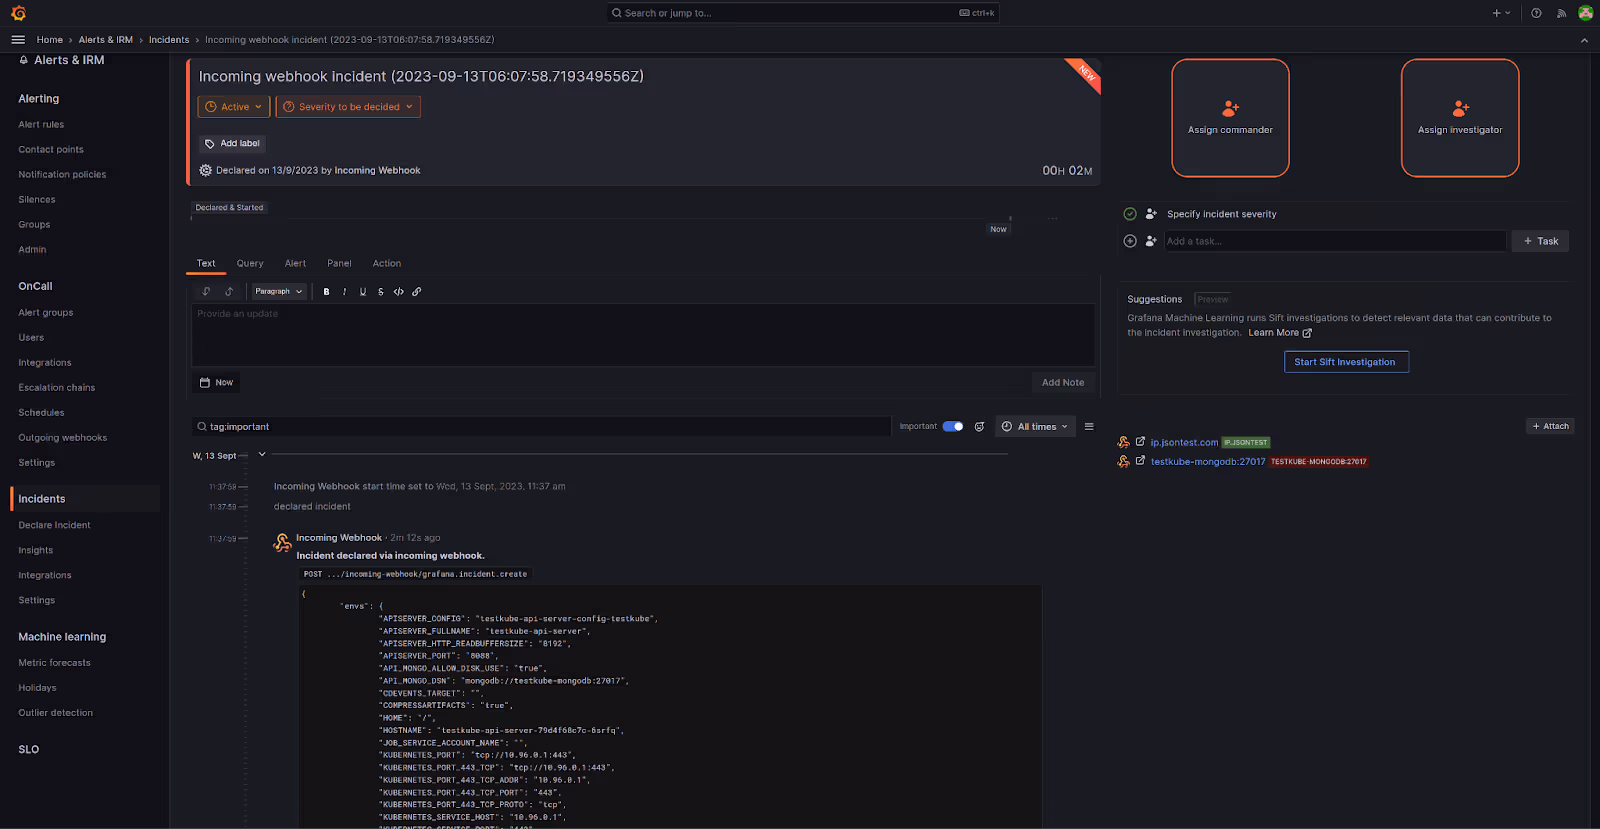
When the test workflow fails, you’ll see an incident on the Grafana incident dashboard. You can click on the individual incident to get more details, assign it to other members, etc.
When the test workflow passes, you’ll get a notification in the Slack channel with the message based on the custom payload we provided.

That’s how easy it is to configure webhooks in Testkube. We learned to integrate with Grafana and Slack and send event notifications on test failures and successes. You can similarly configure it for other applications and utilize the benefits of webhooks.
Summary
Testkube changes how you test with webhooks to test more efficiently. Webhooks in Testkube provide you with real-time insights and automation capabilities that streamline your Kubernetes testing workflows. You can inform your applications about test status updates, prompting immediate response and swift actions when needed.
Moreover, Webhooks allow you to seamlessly integrate with your preferred incident management and communication tools without the need for complex configuration. This helps streamline collaboration and adds automation to make your testing more efficient and effective.
Get started with Testkube and Try out Webhooks in Testkube for your use cases to see how they help you integrate with other tools and improve collaboration. You can also join our Slack community for guidance and support.
About Testkube
Testkube is the open testing platform for AI-driven engineering teams. It runs tests directly in your Kubernetes clusters, works with any CI/CD system, and supports every testing tool your team uses. By removing CI/CD bottlenecks, Testkube helps teams ship faster with confidence.
Get Started with a trial to see Testkube in action.