Table of Contents
Start your free trial.
Start your free trial.

Start your free trial.


Table of Contents
Executive Summary
Modern cloud native applications require more robust, fast, scalable, and reliable testing workflows that can ensure quality while accelerating release cycles. Traditional testing techniques often come with many challenges, like running tests sequentially, complex configurations for parallel testing, opening new browser instances for each test, and maintaining standalone Selenium Grid clusters.
These are much more visible in cross-browser testing, resulting in resource inefficiencies, slower feedback loops, and scaling issues for test infrastructure. To accomplish this, we can combine two dynamic tools, Testkube, a cloud native test orchestrator, and Selenium Grid, allowing teams to deliver faster test runs and more efficient and broader testing, resulting in higher quality applications and a shorter time-to-market.
In this blog post, we will learn how to deploy Selenium Grid in a Kubernetes environment using Testkube so that test execution can be seamless and efficient in cloud native applications.
How Testkube Enhances Selenium Grid for Cloud-Native Testing
Testkube is a cloud native testing platform that is built to make test execution management easier. Selenium Grid is a tool that allows running multiple Selenium tests on multiple machines, browsers, and operating systems simultaneously using a hub-node architecture.
By integrating Testkube and Selenium Grid, teams can create an environment that reuses the same Selenium Grid for all test executions time and saving resources utilized when for each iteration Selenium has to be deployed.
Here are several key benefits that teams will achieve:
- Enable reusability in the testing environment and reduce resource overutilization.
- Execute parallel Selenium tests on multiple browsers and machines.
- Centralize test management and reporting with Testkube Dashboard and CLI.
- Streamlining test execution in Kubernetes without advanced configurations.
Let us now understand the process of integrating Selenium grid with Testkube with the help of a use case.
Use Case: Running a Python Selenium Test with Testkube
On a Kubernetes cluster, we are going to run a Python Selenium test that will check the search feature of google.com using Selenium Grid with Testkube. In this use case, Testkube will help create a workflow from which you can configure the Selenium Grid and ensure that the Python test uses the same for test execution.
Prerequisites for Selenium Grid and Testkube Integration
- A Kubernetes cluster - we’re using a local Minikube cluster
- Helm installed
- kubectl installed
- Test scripts (Selenium tests)
- A Testkube account
- The Testkube Agent is configured on the cluster.
Integrating Selenium Grid with Testkube Test Workflows
1. Deploy a standalone Selenium Grid within your Kubernetes cluster using its Helm chart. This establishes a Hub and default browser nodes. Add docker-selenium helm repository and update charts.
helm repo add docker-selenium https://www.selenium.dev/docker-selenium
helm repo update
2. Install Selenium Grid. You will see the output as shown below.
helm install selenium-grid-testkube docker-selenium/selenium-grid --namespace testkube --create-namespace
NAME: selenium-grid-testkube
LAST DEPLOYED: Tue Apr 1 16:49:05 2025
NAMESPACE: testkubeSTATUS: deployed
REVISION: 1TEST SUITE: None
NOTES:Selenium Grid Server deployed successfully.
1. Ingress is enabled, but hostname doesn't set. All inbound HTTP traffic will be routed to the Grid by matching any host.
Please keep in mind that it is rarely necessary, and in most cases, you shall provide `ingress.hostname` in values.yaml.
To access Selenium from outside of Kubernetes:
- open the IP of any node with Ingress, or
- any hostname pointing to the node with Ingress
2. Within Kubernetes cluster, you can use following Service endpoint: http://selenium-grid-testkube-selenium-hub.testkube.svc:4444In the above output, you can see the endpoint where Selenium is running (http://selenium-grid-testkube-selenium-hub.testkube.svc:4444). Please note this because we will need to pass this in our Python test and Testkube TestWorkflow
3. Verify that Testkube and Selenium Grid services and pods are running.
Here is how the status of pods should look:
kubectl get pods -n testkube

NAME READY   STATUS    RESTARTS   AGE
selenium-grid-testkube-selenium-hub-7dd8ccdbdf-bbcnv            1/1     Running   0          87m
selenium-grid-testkube-selenium-node-chrome-8677b4cb76-2tkv7    1/1     Running   0          87m
selenium-grid-testkube-selenium-node-edge-74947b56f-rqmsc       1/1     Running   0          87m
selenium-grid-testkube-selenium-node-firefox-6bf6bcdd9c-bcgzj   1/1     Running   0          87m
testkube-api-server-677f7dfdb5-fp8dt                            1/1     Running   0          89m
testkube-nats-0                                                 2/2     Running   0          89m
testkube-operator-controller-manager-58889f6444-mnghv           1/1     Running   0          89m
Here is how the status of services should look:
kubectl get svc -n testkube
NAME                                                   TYPE        CLUSTER-IP       EXTERNAL-IP   PORT(S)                      AGE
selenium-grid-testkube-selenium-hub                    ClusterIP   10.111.166.143   <none>        4444/TCP,4442/TCP,4443/TCP   81m
testkube-api-server                                    ClusterIP   10.99.105.157    <none>        8088/TCP,8089/TCP            83m
testkube-nats                                          ClusterIP   10.106.126.82    <none>        4222/TCP                     83m
testkube-nats-headless                                 ClusterIP   None             <none>        4222/TCP,8222/TCP            83m
testkube-operator-controller-manager-metrics-service   ClusterIP   10.110.23.10     <none>        8443/TCP                     83m
testkube-operator-webhook-service ClusterIP 10.99.155.166 <none> 443/TCP 83m- Here is the Python test we have created and saved in test_google.py. This will navigate to google.com and test Google search.
import os
import pytest
import logging
from selenium import webdriver
from selenium.webdriver.common.by import By
from selenium.webdriver.common.keys import Keys
import time
# Configure logging
logging.basicConfig(level=logging.INFO, format="%(asctime)s - %(message)s")
results_dir = "/data/test-results"
os.makedirs(results_dir, exist_ok=True)
@pytest.fixture(scope="session")
def driver():
hub_url = os.getenv('SELENIUM_HUB_URL', 'http://selenium-grid-testkube-selenium-hub.testkube:4444/wd/hub')
logging.info(f"Connecting to Selenium Grid Hub at: {hub_url}")
options = webdriver.ChromeOptions()
driver = webdriver.Remote(command_executor=hub_url, options=options)
yield driver
driver.quit()
def test_google_search(driver):
logging.info("Navigating to Google.com")
driver.get("https://www.google.com")
search_box = driver.find_element(By.NAME, "q")
search_box.send_keys("Testkube Selenium Grid")
search_box.send_keys(Keys.RETURN)
time.sleep(3)
assert "Testkube" in driver.page_source
# Capture and save a screenshot screenshot_path = os.path.join(results_dir, "google_screenshot.png")
driver.save_screenshot(screenshot_path)
logging.info(f"Screenshot saved at {screenshot_path}")
# Save test output to a file
output_path = os.path.join(results_dir, "test_output.txt")
with open(output_path, "w") as f:
f.write(driver.page_source)
logging.info(f"Test output saved to {output_path}")In the above test, we have added the Selenium Grid URL to make sure that the test uses the same for execution.
5. Create Test Workflow as shown below and save in selenium-grid-testworkflow.yaml. In this workflow, we have configured the Selenium Grid service that will be used for test execution.
apiVersion: testworkflows.testkube.io/v1
kind: TestWorkflow
metadata:
  name: selenium-grid-test
  namespace: testkube
  labels:
    docs: example
spec:
  content:
    git:
      uri: https://github.com/cerebro1/selenium-testkube.git
      paths:
        - selenium-grid # git repo and path that contains Selenium test
  steps:
    - name: Install Dependencies and Run Selenium Test
      workingDir: /data/repo/selenium-grid # Mount point for the repo
      run:
        image: python:3.9
        env:
          - name: SELENIUM_HUB_URL
            value: 'http://selenium-grid-testkube-selenium-hub.testkube:4444/wd/hub' # Selenium Grid URL available as K8s service
        command: ["sh"]
        args:
          - "-c"
          - |
            pip install selenium pytest pytest-html
            pytest test_google.py --html=/data/test-results/selenium-report.html --self-contained-html --log-cli-level=INFO
      artifacts:
        paths:
          - /data/test-results/selenium-report.html
          - /data/test-results/google_screenshot.png
Here is the detailed summary of essential configurations:
- spec.content.git.uri: Path to Git repository that contains the Selenium test.
- spec.content.git.paths: Specifies the directory (selenium-grid) inside the repository where the tests are located.
- spec.steps[0].name: Defines a step to install dependencies and run the Selenium test.
- spec.steps[0].workingDir: Mount point for the cloned Git repository inside the container (/data/repo/selenium-grid).
- spec.steps[0].run.image: Uses python:3.9 as the base image for running the test.
- spec.steps[0].run.env: Sets SELENIUM_HUB_URL as an environment variable to point to the Selenium Grid service in Kubernetes.
- spec.steps[0].run.command & args: Executes shell commands to install dependencies (selenium, pytest, pytest-html) and run pytest with an HTML report.
- spec.steps[0].artifacts.paths: Stores the test report (selenium-report.html) and a screenshot (google_screenshot.png) as artifacts for later retrieval
6. Apply the TestWorkflow on the Kubernetes cluster.
kubectl apply -f selenium-grid-testworkflow.yaml
testworkflow.testworkflows.testkube.io/selenium-grid-test configured
This will create the TestWorkflow “selenium-grid-test” in Testkube. Let us verify this in the Testkube Dashboard.

You can execute the Test Workflow from the Testkube Dashboard by selecting the Test Workflow and clicking on “Run now”, or make use of Testkube CLI.
7. Execute the Test Workflow using CLI and check the status.
kubectl testkube run testworkflow selenium-grid-test -n testkube
Test Workflow Execution:
Name: selenium-grid-test
Execution ID: 67ed70694f690d181d1e9134
Execution name: selenium-grid-test-1
Execution namespace:
Execution number: 1
Requested at: 2025-04-02 17:14:17.499627066 +0000 UT
CDisabled webhooks: false
Running context:
Interface:
Type: cli
…
Type: user
Status: queued
$ Watch test workflow execution until complete \
kubectl testkube watch twe 67ed70694f690d181d1e9134
$ Use following command to get test workflow execution details \
kubectl testkube get twe 67ed70694f690d181d1e91348. View the execution logs using the commands in the above output.
kubectl testkube watch twe 67ed70694f690d181d1e9134
…
test_google.py::test_google_search
-------------------------------- live log setup --------------------------------
INFO root:test_google.py:17 Connecting to Selenium Grid Hub at: http://selenium-grid-testkube-selenium-hub.testkube:4444/wd/hub
-------------------------------- live log call ---------------------------------
INFO root:test_google.py:24 Navigating to Google.com
INFO root:test_google.py:36 Screenshot saved at /data/test-results/google_screenshot.png
INFO root:test_google.py:43 Test output saved to /data/test-results/test_output.txt
PASSED
[100%]
---- Generated html report: file:///data/test-results/selenium-report.html
-----============================== 1 passed in 7.35s ===============================
• passed in 23.705s
• (2/2) Upload artifacts
Root: /data
Patterns:
- /data/test-results/selenium-report.html
- /data/test-results/google_screenshot.png
test-results/selenium-report.html (32 kB)
test-results/google_screenshot.png (55 kB)
Found and uploaded 2 files (88 kB).
Took 1.465s.
• passed in 3.726s- On successful execution, you will see the Dashboard updated and test logs created.

- Click on Run to view the execution logs of the Selenium test.

The test has been successfully passed, and artifacts have been uploaded. You can view more details using the following commands:
kubectl testkube get twe <execution-id>
- Verify Test Workflow Status. Once the execution is complete, you can verify the test status by running the following command:
kubectl testkube get testworkflows
NAME           	| DESCRIPTION | CREATED                   	| LABELS   	| STATUS | EXECUTION ID
---------------------+-------------+-------------------------------+--------------+--------+---------------------------

selenium-grid-test |         	| 2025-04-02 17:14:17 +0000 UTC | docs=example | passed | 67ed70694f690d181d1e9134
The Test Workflow has been successfully executed.
This demo provides a comprehensive list of steps that you can perform to integrate Selenium Grid into Testkube. We have shown how you can make use of Testkube CLI as well as Testkube Dashboard to manage your tests.
Monitoring the Test Workflow using Testkube Dashboard
Testkube manages the artifacts collected from test execution and offers you the capability to access them easily. In the Testkube Dashboard, select the selenium-grid-test Test Workflow and click on Artifacts.
Here, you can see the artifacts generated by the test:
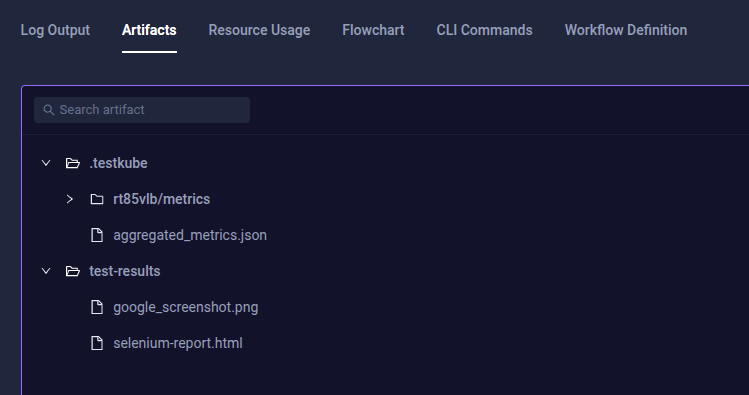
- Select the test-results->google_screenshot.png.

This is a screenshot of the execution of the test that was performed. You can see here the URL that shows the search text.
- Select the test-results->selenium-report.html to view the complete Selenium test details.

This has the summary of the environment and execution of the test. Along with this, Testkube offers the feature to monitor the resources utilized in the execution of the test.
- Select Resource Usage to view the metrics collected by Testkube for resource utilization.

The image presents real-time graphs that visualize container resource consumption across four key metrics:
- CPU Usage: The graph tracks the container's CPU consumption in millicores (m), showing the actual usage over time. It compares the usage at the time of test execution against the container’s allocated CPU limit, highlighting any significant changes in processing demand.
- Memory Usage: This graph illustrates the container's memory consumption during test execution in mebibytes (Mi), displaying the memory used versus the predefined memory limit. It helps monitor memory efficiency and detect potential memory leaks or spikes.
- Network Traffic: The network traffic graph measures both incoming and outgoing traffic in megabits per second (Mb/s). Spikes in traffic indicate periods of high data transfer, which is due to test execution requests, logs, or other network activities.
- Disk Usage: This section monitors read and write operations in megabytes per second (MB/s), providing insight into storage interactions. A spike in read operations suggests increased disk access, which might be due to high data processing or logging activities.
These visualizations help in analyzing the test performance, identifying resource bottlenecks, and ensuring optimal workload management within a Kubernetes environment.
Conclusion: Scalable Selenium Testing with Testkube and Kubernetes
In this post, we learned that deploying Testkube with Selenium Grid offers multiple benefits. This integration is both cost-effective and scalable, enabling quicker test execution. It also ensures efficient resource utilization and provides flexibility. Additionally, Testkube creates a centralized hub for managing Test Workflows, logs, and outputs, which enhances the overall testing experience.
With the deployment of a Selenium Grid in the Kubernetes cluster and the execution of a Test Workflow via Testkube, it is feasible to create a robust, flexible, and reliable testing environment that seamlessly utilizes cluster resources.
So what are you waiting for? Take it a step further and combine the two to expand your testing processes and create reliable releases faster.
Get started today and discover how Testkube can transform your testing strategy. You can also join our Slack community to start a conversation or read Testkube documentation to see how Testkube can enhance your testing workflow, ensuring seamless, efficient, and automated testing within the Kubernetes environments.
About Testkube
Testkube is the open testing platform for AI-driven engineering teams. It runs tests directly in your Kubernetes clusters, works with any CI/CD system, and supports every testing tool your team uses. By removing CI/CD bottlenecks, Testkube helps teams ship faster with confidence.
Get Started with a trial to see Testkube in action.