Table of Contents
Start your free trial.
Start your free trial.

Start your free trial.


Table of Contents
Executive Summary
Modern distributed systems, built on containers, microservices, and dynamic infrastructure, offer flexibility, scalability, and cost-efficiency but also increase significant complexity. These systems consist of complex networks of interdependent components, making it difficult to predict their behaviour under failure scenarios.
Traditional testing approaches like unit, integration, and load testing operate in controlled environments with predefined inputs and expected outputs. However, they often fail to answer a critical question: “What happens when things go wrong in production?” Real-world scenarios like network partitions, pod crashes, infrastructure outages, etc., do not follow predictable patterns, and this gap can lead to system instability, prolonged outages, and degraded user experiences.
To address this, chaos engineering comes into the picture. Instead of waiting for unexpected failures, chaos engineering introduces them in a safe, controlled environment. Consider it like intentionally killing a pod, slowing the network, or disconnecting storage to test how your system behaves before it is used in production.
In this blog post, we'll discuss chaos engineering, what it is, and why it matters. We will cover common use cases, benefits, and available tools, focusing on Chaos Mesh and its seamless integration with Testkube for orchestrated testing.
What is Chaos Engineering?
Chaos engineering is the practice of experimenting on distributed systems to gain confidence in their resilience. Instead of waiting for incidents to expose vulnerabilities, chaos engineering enables teams to uncover failures and weaknesses in advance and improve system reliability.
Netflix popularized the concept in the early 2010s with Chaos Monkey, a tool that randomly terminated production instances. Netflix required a mechanism to test if their systems were resilient to sudden failures after moving to the cloud. This led to chaos engineering involving intentional failure injection and resilience testing.
Why Does It Matter?
This practice addresses multiple critical needs in modern system operations, such as
- Enables proactive resilience discovery by exposing weaknesses and vulnerabilities before they impact users.
- Enhances the team's ability to manage failure points in controlled environments. This practice allows teams to familiarize themselves with failure scenarios, enabling faster response to fix and reducing Mean Time to Recovery (MTTR).
- Exposes hidden dependencies and highlights architectural bottlenecks.
Key Benefits
The practice of chaos engineering offers measurable benefits that help teams improve system resilience and a culture of continuous improvement:
- Reduced blast radius: Identifies bottlenecks and failures in advance, limiting potential impact.
- Enhanced observability: Enables teams to find gaps under failure states using monitoring and alerting mechanisms.
- Cultural shift: Promotes a cultural transition by creating an atmosphere of learning from failure rather than fear of it.
Common Use Cases
Chaos engineering experiments focus on several significant use cases, including:
- Pod failure simulation tests involve intentionally terminating or removing pods to mimic real-world occurrences such as crashes and node failures.
- Experiments with network partitioning confirm system behaviour when services are unable to connect to one another.
- Resource exhaustion measures application performance under stress by intentionally depleting CPU, memory, or disk resources.
- Dependency failure scenarios replicate the breakdown of external dependencies like databases, APIs, or message queues by making them unavailable or inserting errors.
Multiple tools are available for chaos testing. Some popular ones are Litmus Chaos, Chaos Mesh, Chaos Monkey, and Pumba. This post will focus on Chaos Mesh as a cloud-native tool and how it integrates with Testkube and introduces structured resilience testing into modern cloud-native environments.
Chaos Mesh: Kubernetes-Native Chaos Engineering
Chaos Mesh is an open-source cloud-native chaos engineering platform built mainly with Kubernetes environments. It offers a range of fault injection capabilities working natively with Kubernetes orchestration, allowing teams to test different failure scenarios within their Kubernetes clusters.
Why Choose Chaos Mesh
Chaos Mesh is especially well-suited to Kubernetes-based chaos engineering for various reasons. A few factors, such as its Kubernetes-native design, which defines experiments as custom resources, enable declarative configuration and GitOps integration. This platform provides multiple experiment types, including pod failures, network problems, stress testing, I/O delays, and kernel faults, while also prioritizing safety, with experiment scoping, duration limits, and automatic cleanup to prevent runaway failures. The declarative approach facilitates the generation of reproducible experiments across environments, peer review, and version control.
Key Benefits
Chaos Mesh provides several advantages over its primary failure injection capabilities, including:
- Easy Helm installation: Installation via Helm charts is fast and straightforward, simplifying deployment.
- Granular targeting: Enables experiments to target specific namespaces, labels, or types of resources with a low blast radius.
- Scheduled experiments: Allow for automated, periodic chaos testing as part of continuous validation pipelines.
- Web dashboard UI: Offers an easy-to-use interface for experiment creation, management, and monitoring and thus enables chaos engineering to be made easily available to team members with various backgrounds.
Testkube: Elevating Chaos Engineering with Orchestration
Testkube is a Kubernetes-native testing framework that orchestrates and automates a wide range of test types, including functional, performance, and chaos tests, directly in the cluster.
It transforms how teams execute, orchestrate, and manage tests in cloud-native environments.
Why Integrate Testkube with Chaos Mesh
Integrating Testkube with Chaos Mesh creates a robust framework for orchestrating systematic chaos engineering, addressing several limitations of standalone chaos testing. It includes:
- Orchestration layer for systematic testing: Defines series of actions such as pre-checks, chaos injection, monitoring, post-checks, and cleanup.
- CI/CD integration: Allows chaos testing to become part of deployment pipelines, ensuring new releases are validated against failure scenarios.
- Centralized execution: Provides a single platform for managing all testing activities.
- Result aggregation: Captures results and logs from each step, providing a unified view of the experiment’s outcome.
Chaos Testing the Online Boutique Application
Google’s Online Boutique is a microservices-based e-commerce demo app, composed of eleven independent services. For this use case, we’ll target the adservice, which is responsible for serving advertisements on the storefront.
Before we begin integrating Chaos Mesh with Testkube to carry out our chaos experiment, let’s review the essential setup and prerequisites.
Prerequisites
- A Kubernetes cluster
- Helm installed
- kubectl installed
- Online Boutique deployed
- Chaos Mesh Installed
- A Testkube account
- The Testkube Agent is configured on the cluster.
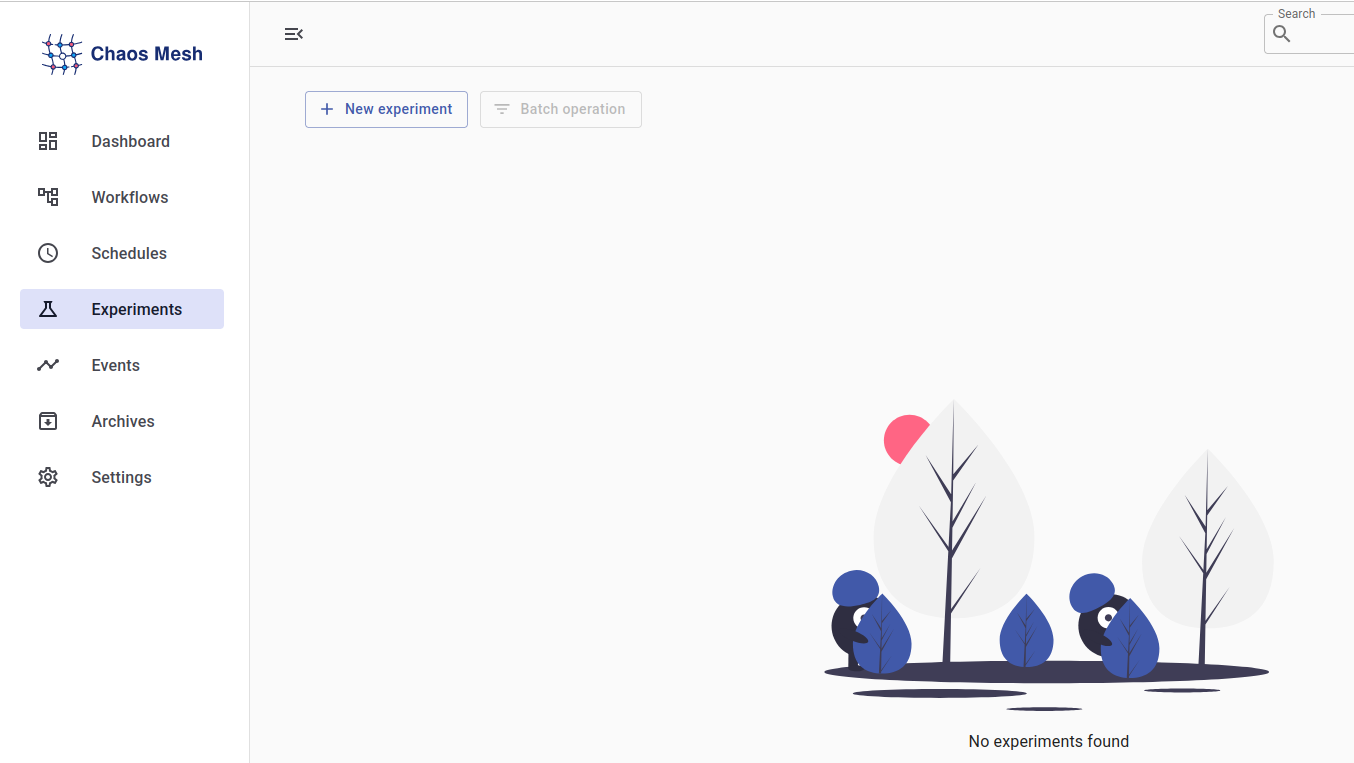
Chaos Mesh Dashboard Visualization
Assuming that you have installed Chaos Mesh using the official Helm chart or manifests, you can access the Chaos Dashboard by port-forwarding the service:
kubectl port-forward -n chaos-mesh svc/chaos-dashboard 2333:2333Depending on your Kubernetes environment, you can access the dashboard by opening your browser and visiting the link provided.
Chaos Mesh provides an easy-to-use, single-point interface for creating and organizing chaos experiments. The dashboard gives an extensive overview of all chaos experiments, including their current status, overall experiment status, workflows, schedules, timelines, etc. Users can easily locate ongoing experiments, check timelines, and save custom experiments for quick execution.

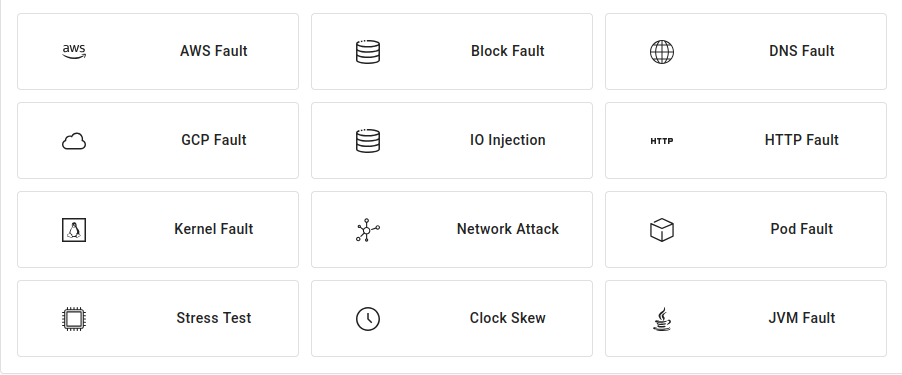
Experiment Types
Chaos Mesh supports a wide range of experiment types, including:
- PodChaos: Pod killing, pod failure, and container killing.
- NetworkChaos: Network partitioning, packet loss, packet duplication, and latency injection.
- StressChaos: CPU and memory stress testing.
- IOChaos: Disk I/O delays and failures.
- KernelChaos: Kernel-based fault tolerance injection.
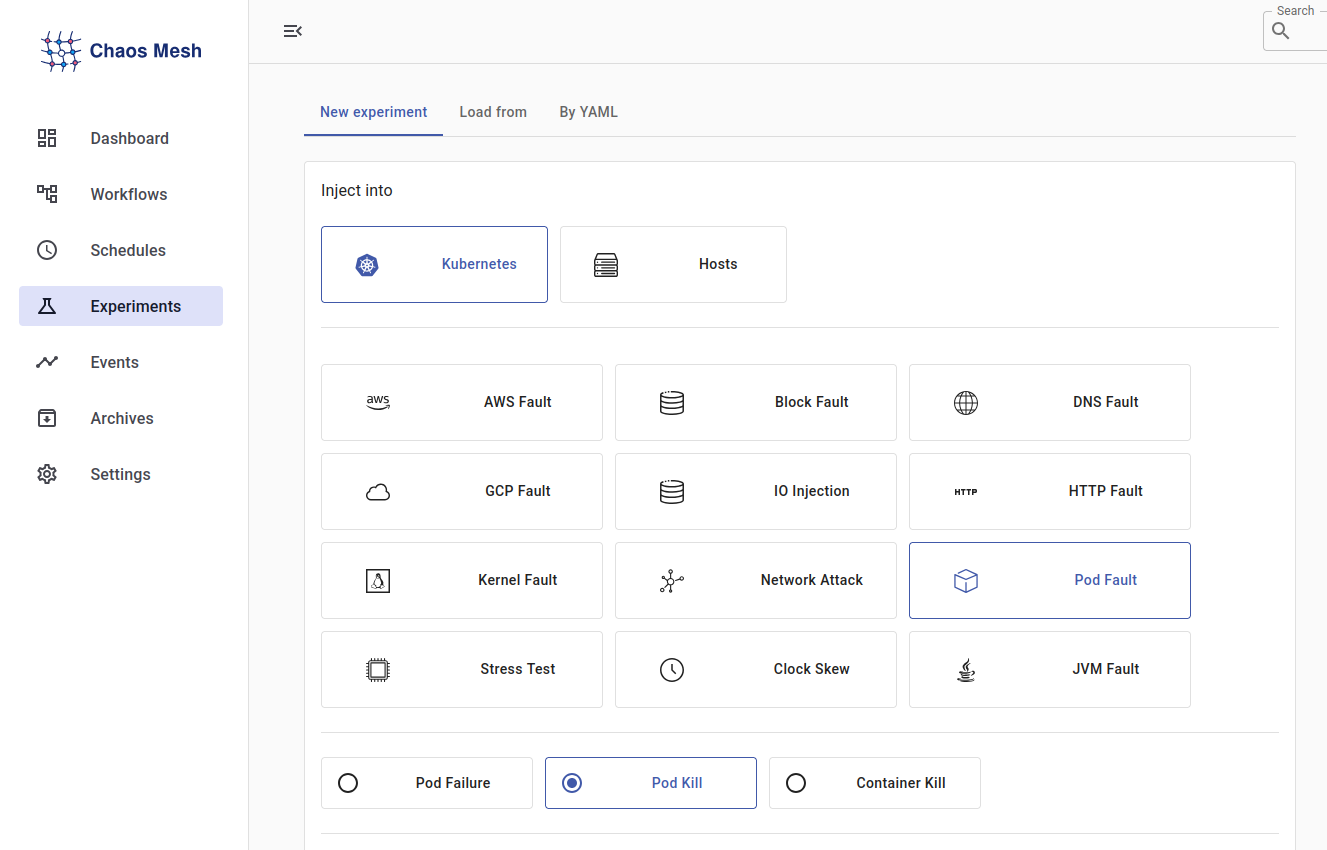
Based on specific requirements, these types of experiments can be easily configured and created through the Chaos Mesh dashboard by selecting the target environment (Kubernetes or physical Hosts), choosing the fault type, defining its parameters, and applying chaos to the intended resources. Here, we will demonstrate a pod killing scenario experiment using the dashboard.
Create an Experiment
After navigating to the Chaos Mesh dashboard, you can select the Experiments menu from the left navigation panel to create an experiment.
Open the Chaos Mesh Dashboard and:
- Click Experiments → New Experiment.
- Choose Pod Fault → POD KILL.
- Set the grace period, enter experiment details, such as:
- Select the namespace in which the target pods are deployed from the Namespace Selectors. It should be set as default here since our online boutique application is running in the default namespace.
- Under Label Selectors, enter the label used by the pods into which you want to inject chaos. Here, it should be an app: adservice.
- Based on the Namespace Selectors and Label Selectors, specific pod(s) you want the experiment to target will be selected. Here, the chosen target pod is: adservice-69df5b86db-hz7I4.
- Keep Mode set to All to kill all pods that match the selector.
- Set the Metadata Name to pod-killings.
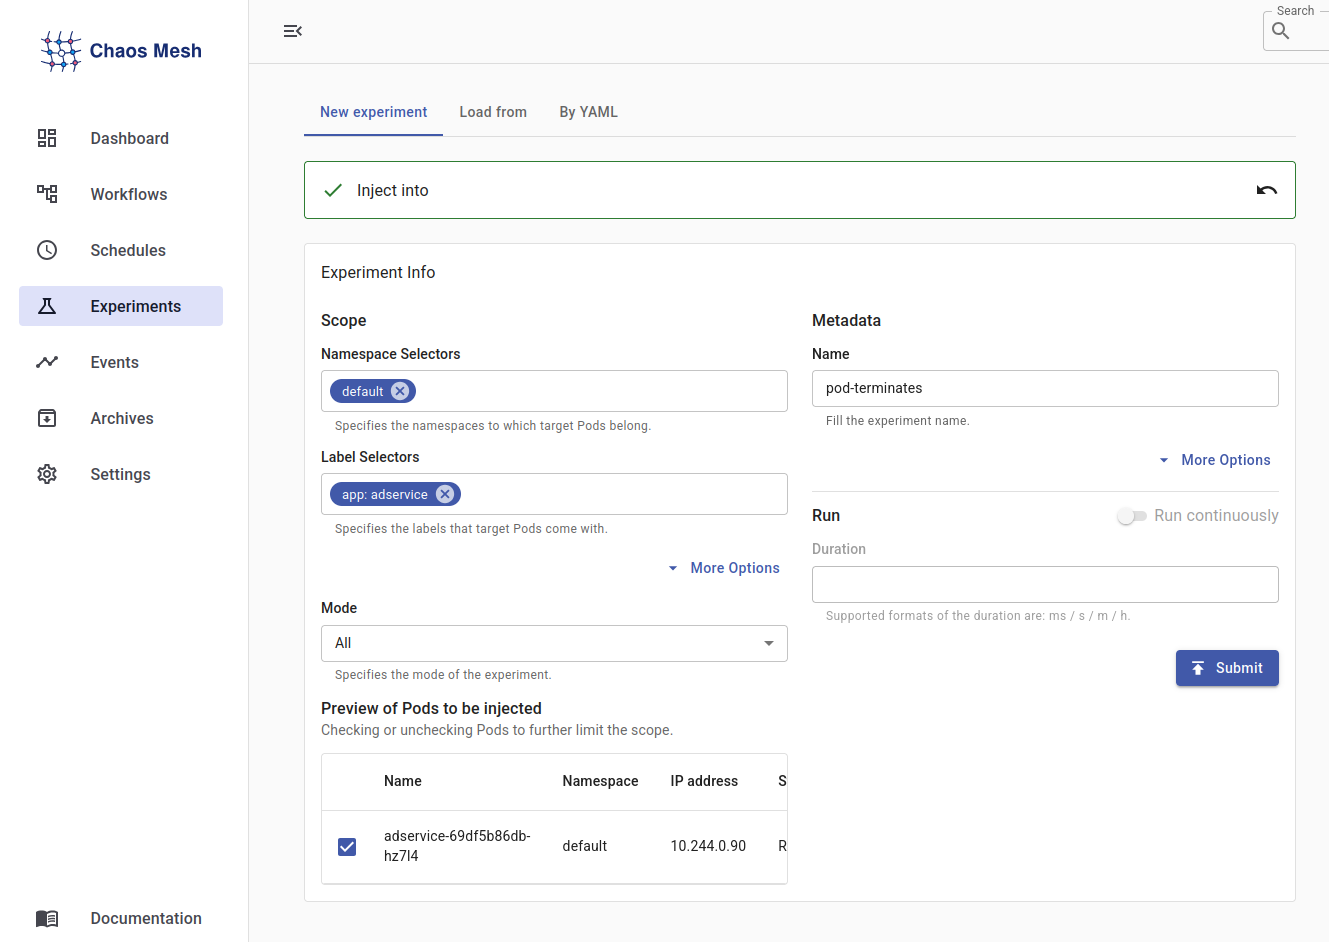
- Click Submit.
- Once created, open the experiment and click Download YAML to export the configuration.
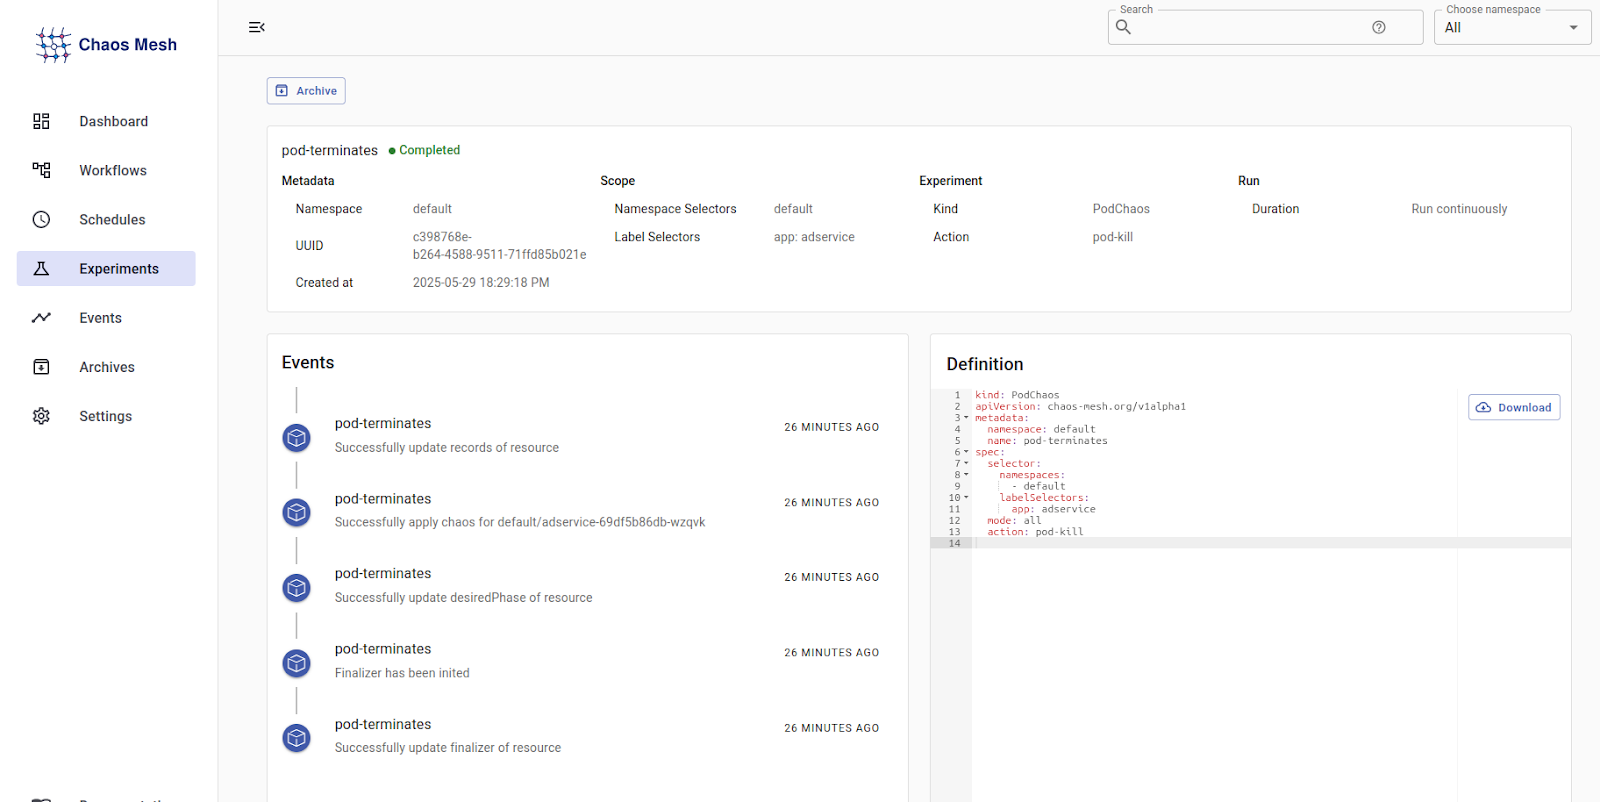
YAML Configuration
kind: PodChaos
apiVersion: chaos-mesh.org/v1alpha1
metadata:
  namespace: default
  name: pod-killing
spec:
  selector:
    namespaces:
      - default
    labelSelectors:
      app: adservice
  mode: all
  action: pod-kill
You can execute chaos experiments from the dashboard or download the YAML specification generated and use kubectl to run them on the cluster.
Configuring RBAC for Testkube to Run Chaos Experiments
When running chaos experiments using Testkube, you must set up Role-Based Access Control (RBAC) to allow Testkube components, e.g., the API server and test executor pods, to interact with Chaos Mesh resources.
TestWorkflows involving chaos injection will otherwise fail because of permissions issues if proper RBAC policies are not established. This configuration makes Testkube capable of securely creating and handling chaos tests within the Kubernetes cluster.
Service Account Creation
apiVersion: rbac.authorization.k8s.io/v1
kind: ClusterRole
metadata:
  name: testkube-chaos-testing
rules:
- apiGroups: [""]
  resources: ["pods", "events", "namespaces"]
  verbs: ["get", "list", "watch", "describe"]
- apiGroups: ["chaos-mesh.org"]
  resources: ["podchaos", "networkchaos", "iochaos", "stresschaos", "timechaos"]
  verbs: ["get", "list", "create", "delete", "patch", "update", "watch"]
- apiGroups: ["apps"]
  resources: ["deployments", "replicasets"]
  verbs: ["get", "list", "watch"]
---
apiVersion: rbac.authorization.k8s.io/v1
kind: ClusterRoleBinding
metadata:
  name: testkube-chaos-testing
roleRef:
  apiGroup: rbac.authorization.k8s.io
  kind: ClusterRole
  name: testkube-chaos-testing
subjects:
- kind: ServiceAccount
  name: testkube-api-server-tests-job
  namespace: testkube
Apply these RBAC configurations in the cluster where the Testkube Agent that will be running your tests is deployed:
```kubectl apply -f testkube-chaos-sa.yaml```
Expected output
clusterrole.rbac.authorization.k8s.io/testkube-chaos-testing created
clusterrolebinding.rbac.authorization.k8s.io/testkube-chaos-testing created
Creating the Chaos Testing TestWorkflow
Before creating the workflow, download the pod-killing.yaml file from the Chaos Mesh dashboard after a PodChaos experiment is set up. The file holds the YAML definition of the chaos action (e.g., pod-killing). This workflow will manage a five-step process.
- Pre-validation: Before incorporating chaos, make sure the ad service is healthy.
- Chaos Injection: Run the adservice-pod-kill chaos experiment.
- Recovery Monitoring: Wait for the system to recover after the pod has been killed.
- Post-validation: Confirm that the adservice (or its replacement) is functional again.
- Cleanup: Remove the chaos experiment.
Complete TestWorkflow YAML
Here’s a sample of a TestWorkflow targeting the adservice microservice:
kind: TestWorkflow
apiVersion: testworkflows.testkube.io/v1
metadata:
 name: chaos-mesh-pod-kill
 namespace: testkube
 labels:
   target: adservice
   test-type: chaos-engineering
   test-workflow-templates: "yes"
   tool: chaos-mesh
spec:
 content:
   files:
   - path: manifests/pod-chaos-template.yaml
     content: |
       kind: PodChaos
       apiVersion: chaos-mesh.org/v1alpha1
       metadata:
         namespace: default
         name: CHAOS_NAME_PLACEHOLDER
       spec:
         selector:
           namespaces:
             - default
           labelSelectors:
             app: adservice
         mode: all
         action: pod-kill
         duration: "30s"
 container:
   workingDir: /data
   resources:
     limits:
       cpu: 200m
       memory: 256Mi
     requests:
       cpu: 100m
       memory: 128Mi
 pod:
   serviceAccountName: testkube-api-server-tests-job
 execution:
   tags:
     chaos-engineering: "true"
     tool: chaos-mesh
 steps:
 - name: debug-environment
   run:
     image: bitnami/kubectl:latest
     shell: |
       echo "=== Environment Debug ==="
       echo "User ID: $(id)"
       echo "Service Account: testkube (from mount)"
       echo "Token exists: $(test -f /var/run/secrets/kubernetes.io/serviceaccount/token && echo YES || echo NO)"


       echo -e "\n=== Connectivity Test ==="
       kubectl version --client
       kubectl get namespaces | head -5


       echo -e "\n=== Permission Test ==="
       kubectl auth can-i list pods -n default && echo "✅ Can list pods" || echo "❌ Cannot list pods"
       kubectl auth can-i create podchaos.chaos-mesh.org -n default && echo "✅ Can create chaos" || echo "❌ Cannot create chaos"
 - name: pre-chaos-verification
   run:
     image: bitnami/kubectl:latest
     shell: |
       echo "=== Pre-chaos verification ==="
       echo "Looking for adservice pods in default namespace..."


       # First try: direct pod listing
       echo "All pods in default namespace:"
       kubectl get pods -n default


       echo -e "\nFiltering for adservice:"
       kubectl get pods -n default -l app=adservice


       # Check if any adservice pods exist
       POD_COUNT=$(kubectl get pods -n default -l app=adservice --no-headers 2>/dev/null | wc -l)
       echo "Found $POD_COUNT adservice pods"


       if [ "$POD_COUNT" -eq 0 ]; then
         echo "ERROR: No adservice pods found!"
         echo "Available pods with labels:"
         kubectl get pods -n default --show-labels
         exit 1
       fi


       echo "✅ Target pods found, ready for chaos!"
       kubectl get pods -n default -l app=adservice -o wide
 - name: apply-chaos-experiment
   run:
     image: bitnami/kubectl:latest
     shell: |
       echo "=== Applying Chaos Experiment ==="


       # Generate unique chaos name using timestamp
       CHAOS_NAME="pod-kill-$(date +%s)"
       echo "Chaos experiment name: $CHAOS_NAME"


       # Create chaos experiment YAML from template
       sed "s/CHAOS_NAME_PLACEHOLDER/$CHAOS_NAME/g" manifests/pod-chaos-template.yaml > chaos.yaml


       echo "Chaos experiment YAML:"
       cat chaos.yaml


       # Apply the chaos experiment
       kubectl apply -f chaos.yaml
       echo "✅ Chaos experiment applied"


       # Store chaos name for cleanup
       echo $CHAOS_NAME > chaos-name.txt
 - name: monitor-chaos-effects
   run:
     image: bitnami/kubectl:latest
     shell: "echo \"=== Monitoring Chaos Effects ===\"\nCHAOS_NAME=$(cat chaos-name.txt)\necho
       \"Monitoring chaos experiment: $CHAOS_NAME\"\n\n# Monitor for 60 seconds\nfor
       i in {1..12}; do\n  echo -e \"\\n--- Check $i/12 ($(date)) ---\"\n  \n  #
       Show current pod status\n  echo \"Current adservice pods:\"\n  kubectl get
       pods -n default -l app=adservice -o wide\n  \n  # Show chaos experiment status\n
       \ echo \"Chaos experiment status:\"\n  kubectl get podchaos $CHAOS_NAME -n
       default -o wide 2>/dev/null || echo \"Chaos experiment not found\"\n  \n  sleep
       5\ndone\n"
 - name: cleanup-and-verify
   condition: always
   run:
     image: bitnami/kubectl:latest
     shell: |-
       echo "=== Cleanup and Recovery Verification ==="


       # Get chaos name for cleanup
       CHAOS_NAME=$(cat chaos-name.txt 2>/dev/null || echo "unknown")


       # Wait for pods to be ready
       echo "Waiting for adservice pods to recover..."
       kubectl wait --for=condition=Ready pods -l app=adservice -n default --timeout=120s || echo "Some pods still recovering"


       # Show final state
       echo -e "\nFinal adservice pod state:"
       kubectl get pods -n default -l app=adservice -o wide


       # Cleanup chaos experiment
       if [ "$CHAOS_NAME" != "unknown" ]; then
         echo -e "\nCleaning up chaos experiment: $CHAOS_NAME"
         kubectl delete podchaos $CHAOS_NAME -n default --ignore-not-found=true
       fi


       echo "✅ Chaos engineering test completed successfully!"
status: {}Key Workflow Components
- Chaos Injection Logic: Dynamically builds and applies a Chaos Mesh PodChaos resource to kill all pods label app=adservice for 30 seconds.
- Observability & Safety: Checks are performed before and after chaos injection to confirm that the target exists and can be successfully recovered.
- Self-Cleaning: To prevent cascading failures or orphaned chaos experiments, the cleanup-and-verify phase deletes the chaos resource and evaluates the health of the pod.
Creating a Test Workflow
Let's look at how to create a Test Workflow in the Testkube dashboard to orchestrate and automate your chaos testing process.
- Navigate to the test workflow section and click the “Add New Test Workflow” button.
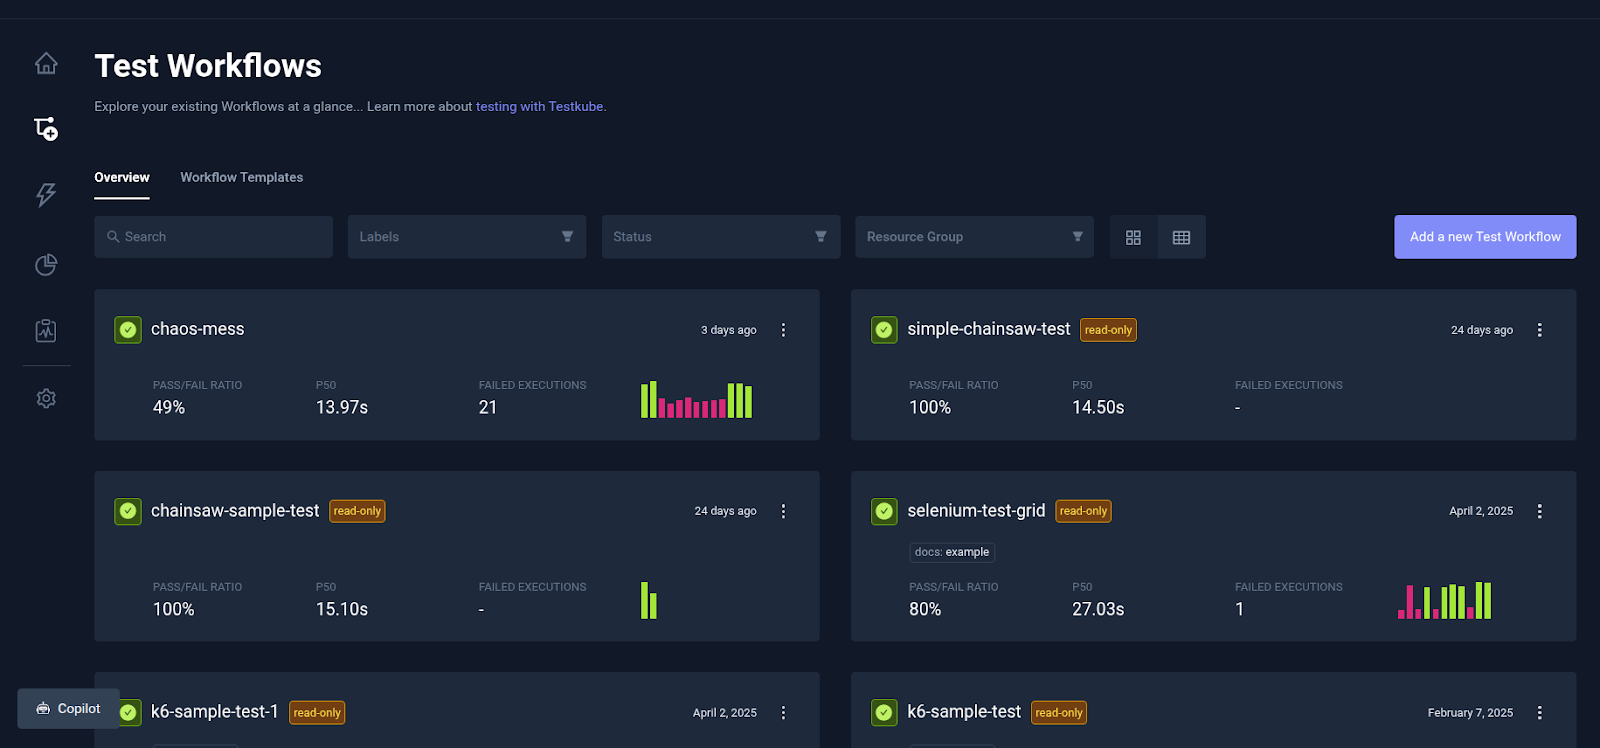
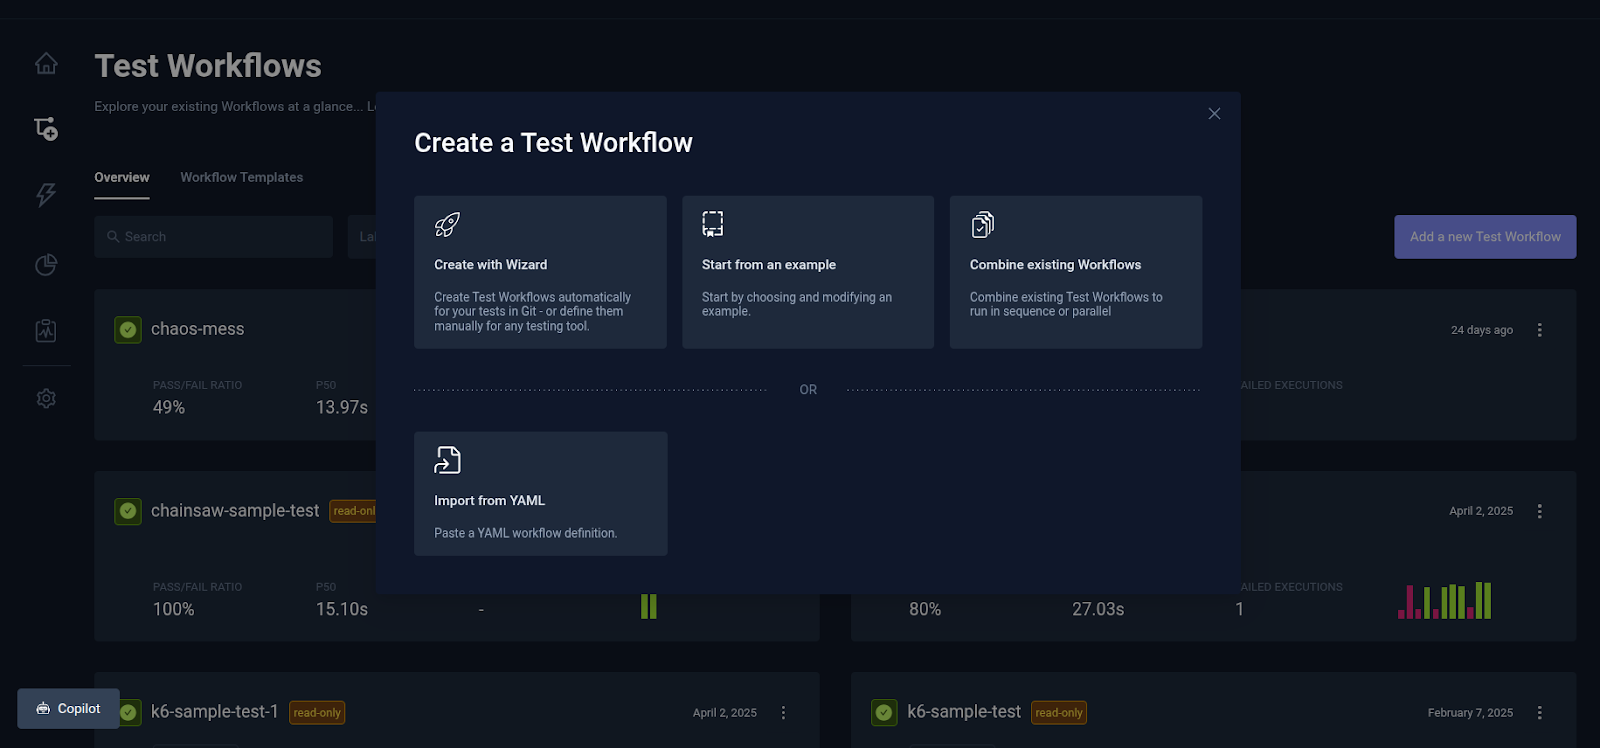
- A “Create a Test Workflow” dialog appears, providing four options to create a test workflow.
- Create with Wizard: This option opens a dialog that walks you through the process of creating a new test workflow.
- Start with an Example: This option allows you to work with a pre-configured template (e.g., for Postman, Playwright, k6, etc) to quickly get started..
- Combine Existing Workflows: This option allows you to run multiple existing test workflows sequentially or simultaneously.
- Import from YAML: This option enables you to paste a YAML file containing the workflow definition for direct import and execution.
- Choose Import from YAML and paste the YAML TestWorkflow definition.
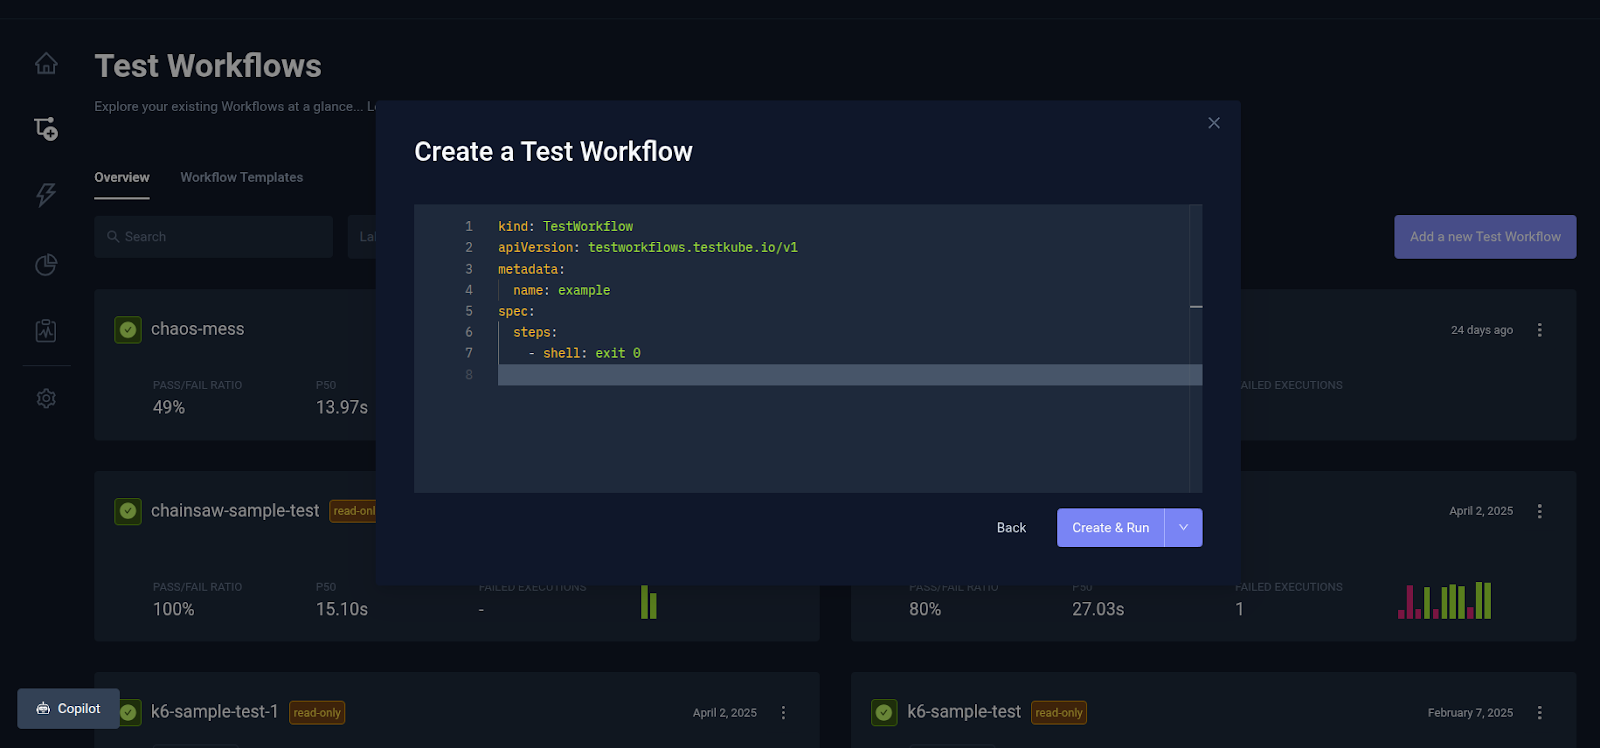
- Copy and paste the test workflow YAML file into the text field.
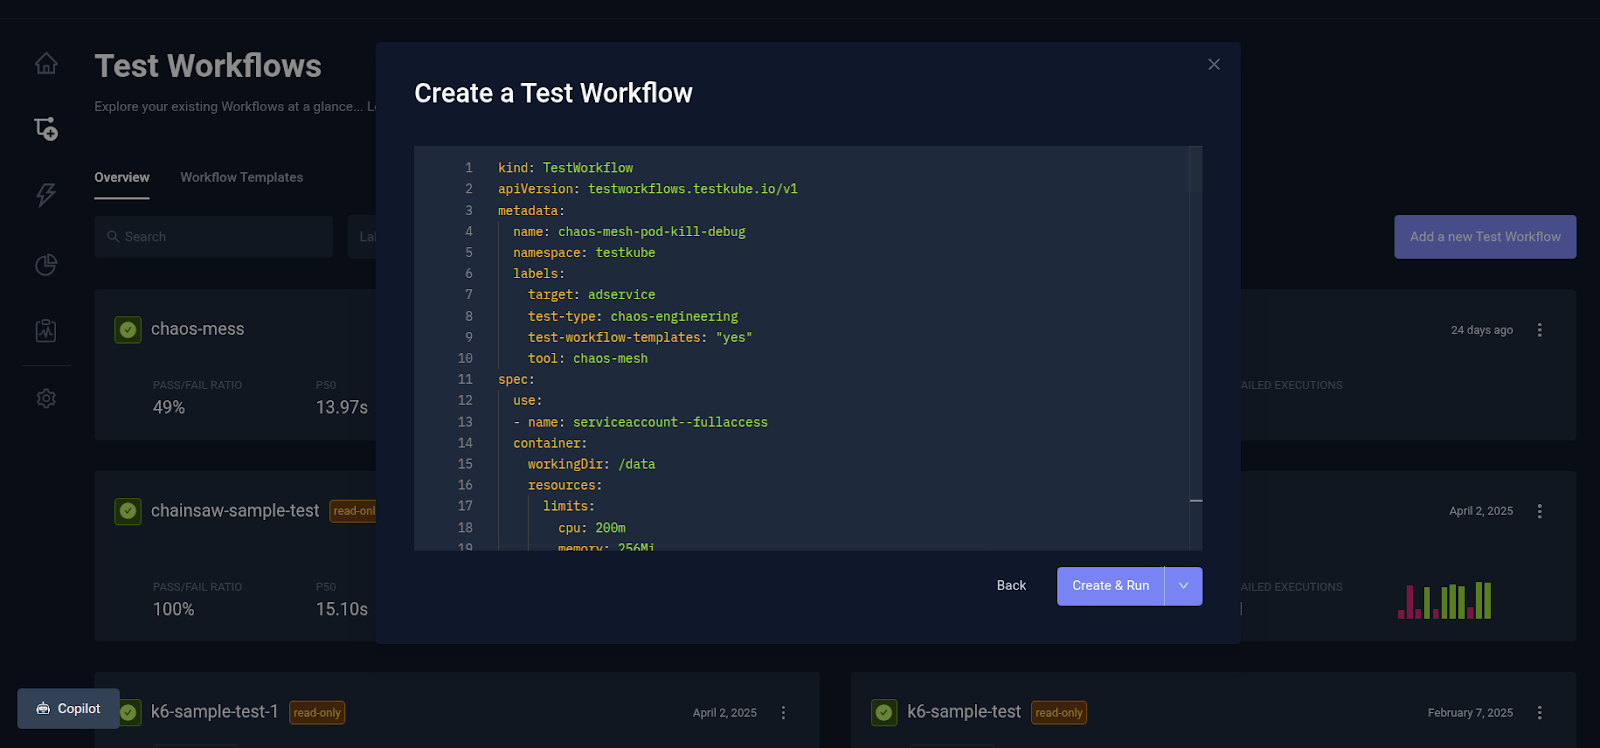
Executing the Chaos Testing Workflow
Click Create & Run to create and run the test workflow. The test workflow will execute, and depending on the result of each stage, the execution logs for each step will show success or failure.
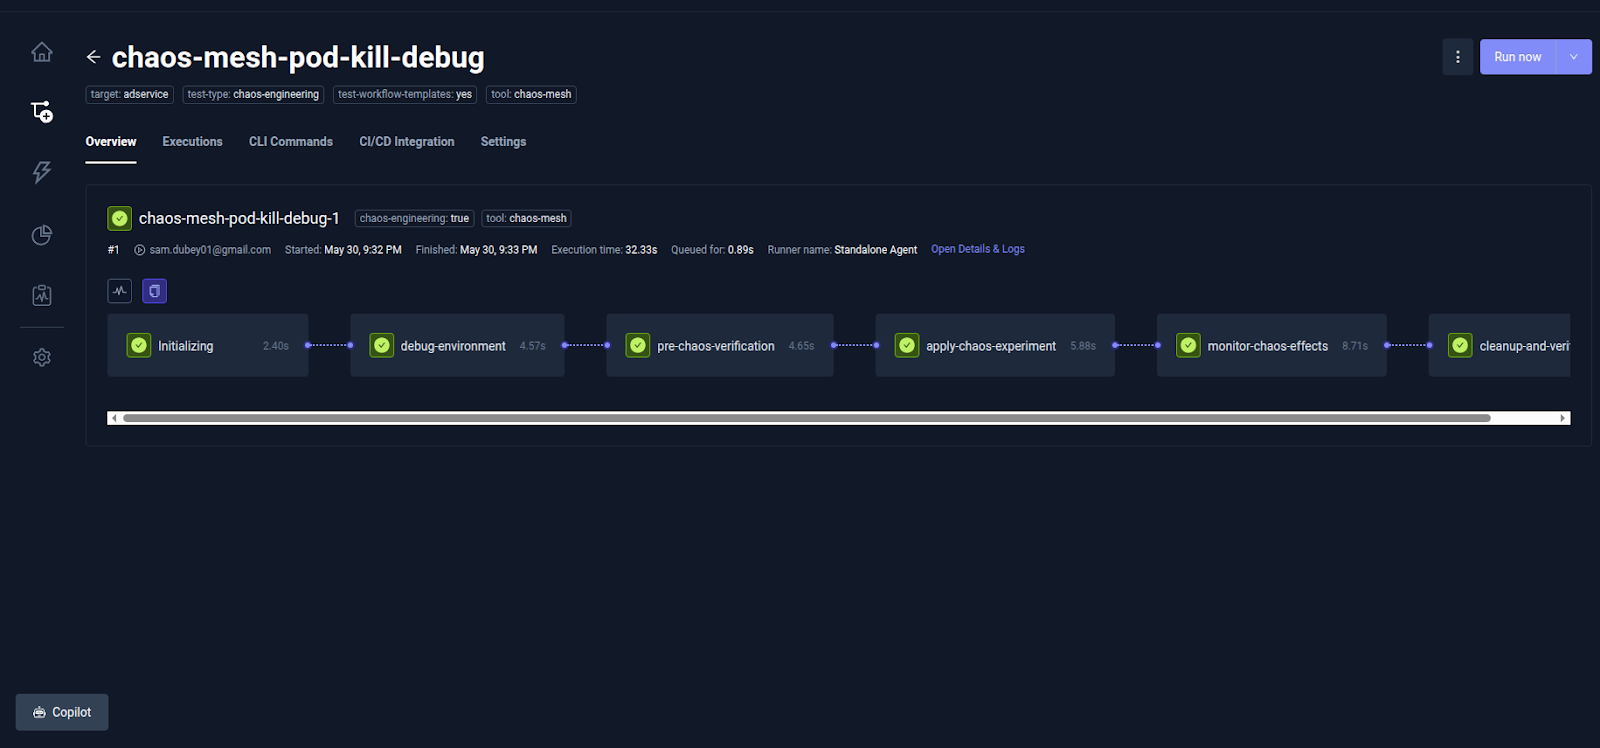
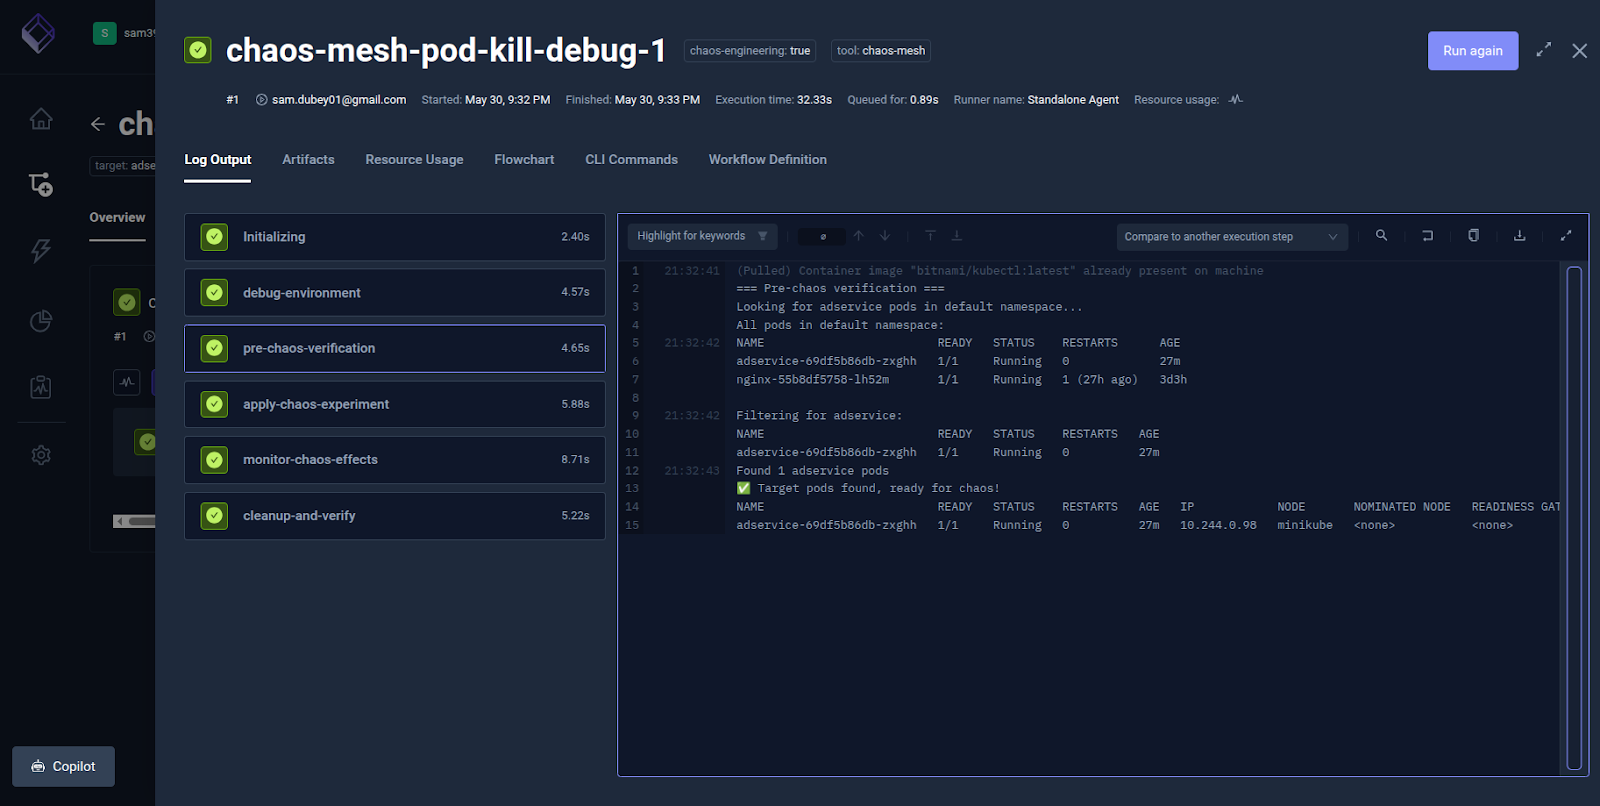
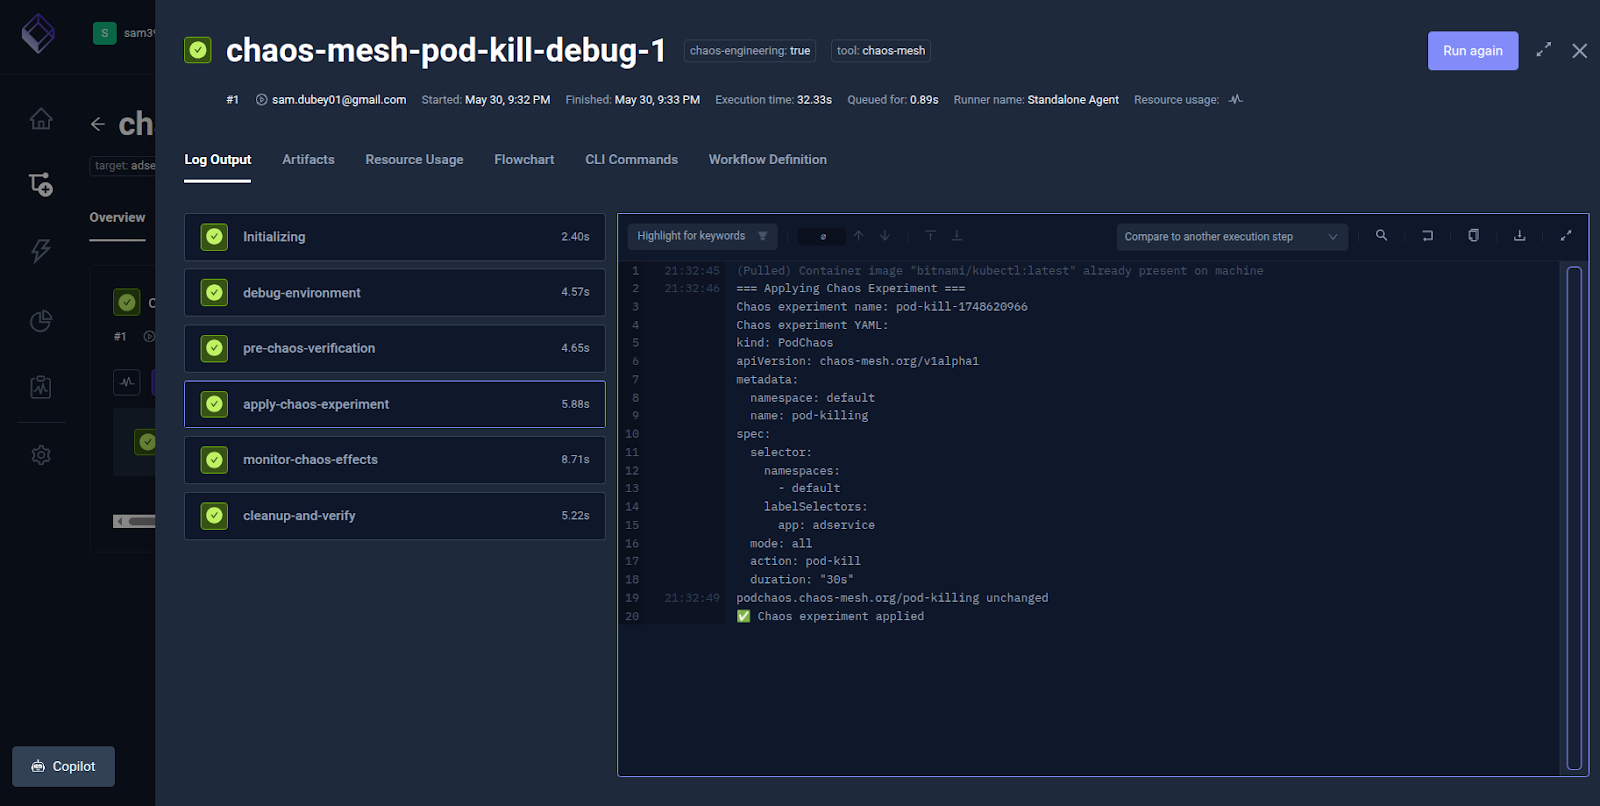
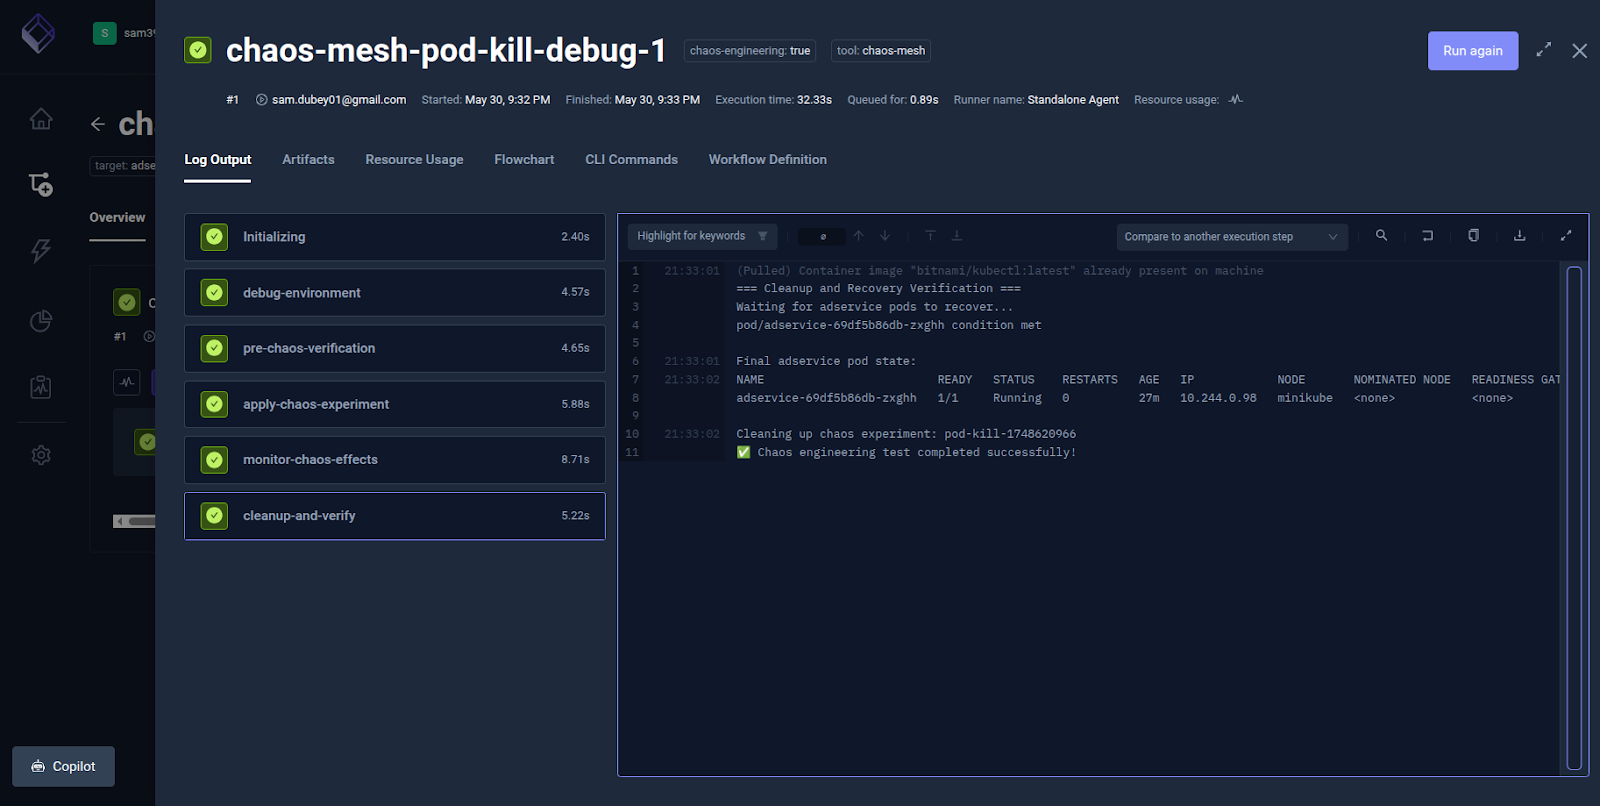
Each defined phase in the workflow is executed sequentially and can be seen in real time. You can view the logs for each step by clicking on the corresponding step
The Pre-Chaos Verification step executes a preliminary health check or readiness probe to validate the target application's state before injecting chaos.
The Apply Chaos Experiment step to shows the detailed execution log.
The Clean-up-Verify step deletes the chaos experiment and verifies system recovery (e.g., restarting pods, service stability, etc.
During or after the execution of the TestWorkflow, you can check the status of the adservice pod in the cluster as well. Execute the following command to see the status.
```kubectl get pods –watch -n default```

NAME                         READY   STATUS    RESTARTS      AGE
adservice-69df5b86db-ncrcg   1/1     Running   0             24m
nginx-55b8df5758-lh52m       1/1     Running   1 (18h ago)   2d18h
adservice-69df5b86db-ncrcg   1/1     Terminating   0         24m
adservice-69df5b86db-ncrcg   1/1     Terminating   0         25m
adservice-69df5b86db-zxghh   0/1     Pending       0         0s
adservice-69df5b86db-zxghh   0/1     Pending       0         0s
adservice-69df5b86db-zxghh   0/1     ContainerCreating   0   0s
adservice-69df5b86db-zxghh   1/1     Running             0   3s
You can see here that the adservice pod was terminated due to the chaos experiment and was recreated. This confirms that our TestWorkflow executed the pod-kill chaos experiment correctly.
This was a simple example of creating a chaos experiment. You can create more complex chaos experiments that mimic real-world scenarios.
Chaos Test Automation
In the above example we ran the chaos test manually via the Testkube Dashboard, but in reality you will might want to run this test automatically
- On a schedule - for example every 4 hours in your staging environment to ensure operation resilience. This is easily done using Testkubes scheduling functionality.
- From your CI/CD pipelines - for example after you’ve deployed an update to your application or infrastructure. This is straightforward with Testkube CI/CD integrations or by directly automating the Testkube CLI or REST API.
Running Chaos Tests with Other Tests
Another interesting use-case for chaos testing is to run them alongside traditional tests (load, E2E, etc) to ensure that your system can handle failures and still function and perform correctly. Testkube makes this straight-forward with the possibility to run any combination of tests both in sequence and parallel, for example the following Testkube Workflow would run our Chaos Test above alongside a k6 load-test, helping us understand how system performance is affected by the corresponding chaos experiment.
kind: TestWorkflow
apiVersion: testworkflows.testkube.io/v1
metadata:
  name: chaos-load-test
  namespace: testkube
spec:
  steps:
  - execute:
      workflows:
      - name: chaos-mesh-pod-kill
      - name: k6-baseline-test
Conclusion
This blog post discussed how integrating Testkube and Chaos Mesh revolutionizes resilience testing for cloud-native applications. By shifting from reactive incident response to proactive failure injection, teams can gain confidence in their systems' capacity to withstand real-world chaos without compromising operational excellence.
Get started today by integrating these two robust tools to introduce resilience testing into your Kubernetes pipeline. Explore how Testkube can revolutionize your testing approach by orchestrating chaos engineering with functional and performance testing.
You can also join our Slack community to start a conversation or read Testkube documentation on how to create a fault-tolerant, automated testing pipeline that adopts failure as an opportunity to learn.
About Testkube
Testkube is the open testing platform for AI-driven engineering teams. It runs tests directly in your Kubernetes clusters, works with any CI/CD system, and supports every testing tool your team uses. By removing CI/CD bottlenecks, Testkube helps teams ship faster with confidence.
Get Started with a trial to see Testkube in action.