.webp)
Table of Contents
Start your free trial.
Start your free trial.

Start your free trial.


Table of Contents
Executive Summary
You've probably starred a few open source repos with the intention of contributing "someday." The project looks interesting, the community seems active, but most of these projects feel like a black box the first time you look at them. You clone the repo, stare at a directory tree with 40 folders, and quietly close the tab.
But this post is your excuse to finally do it because Testkube is different. Testkube is a Go codebase that includes the API server, the CLI, and the runtime components that execute Test Workflows inside your clusters.
By the end of this blog post, you'll have a real code change running inside a local Kubernetes cluster in under 10 minutes using Tilt - no cloud account, no Docker rebuilds, no waiting for pods to reschedule. Just a fast, local dev loop that makes contributing feel less like a project and more like an afternoon siesta.
What you will need
Before we dive in, make sure you have these five tools installed. If you're already doing Kubernetes development, chances are you have most of these.
The one new addition is Tilt - an open-source framework for local development of Kubernetes/Docker-based solutions, which makes it straightforward to compile and contribute to the Testkube codebase.
Deploys the Testkube chart into the cluster
You do not need a cloud Kubernetes cluster or a Testkube account. Everything runs locally.
Clone and build
Start by cloning the repository and verifying that the toolchain works:
git clone https://github.com/kubeshop/testkube.git
cd testkube
go build ./...   # verify compilation
make lint        # run golangci-lint
If both commands pass, your Go environment is ready. Take a moment to orient yourself in the codebase - here are the main entry points:
- cmd/api-server/ - the Testkube agent API server (the component you will run locally)
- cmd/kubectl-testkube/ - the Testkube CLI (testkube or kubectl testkube)
- cmd/testworkflow-init/ - init container that bootstraps Test Workflow execution pods
- cmd/testworkflow-toolkit/ - runtime utilities available inside Test Workflow containers
The ARCHITECTURE.md file has a detailed map of every package if you want to dig deeper.
Spin up the dev environment with Tilt
The repository ships with a complete local development setup powered by Tilt. Two commands and you are up and running.
One-time: create the cluster
./scripts/tilt-cluster.shThis creates a k3d Kubernetes cluster named testkube-dev along with a local container registry on localhost:5001. The registry is important - the API server needs to pull Test Workflow images (init and toolkit) during execution, and the local registry makes that work without pushing to Docker Hub.
Start the dev loop
➜  testkube git:(main) tilt up
Tilt started on http://localhost:10350/
v0.37.0, built 2026-03-04
(space) to open the browser(s) to stream logs (--stream=true)
(t) to open legacy terminal mode (--legacy=true)
(ctrl-c) to exit
Running the tilt up command will:
- Detect your Go toolchain and enable live reload automatically.
- Build three container images:
testkube-api-server,testworkflow-init, andtestworkflow-toolkit. - Deploy the full Testkube Helm chart - API server, PostgreSQL, MinIO (artifact
storage), and NATS (event bus) - into thetestkube-devnamespace. - Set up port forwards so you can reach everything from
localhost.
Open the Tilt UI at http://localhost:10350 to watch the deployment progress. When all resources turn green, you are ready.
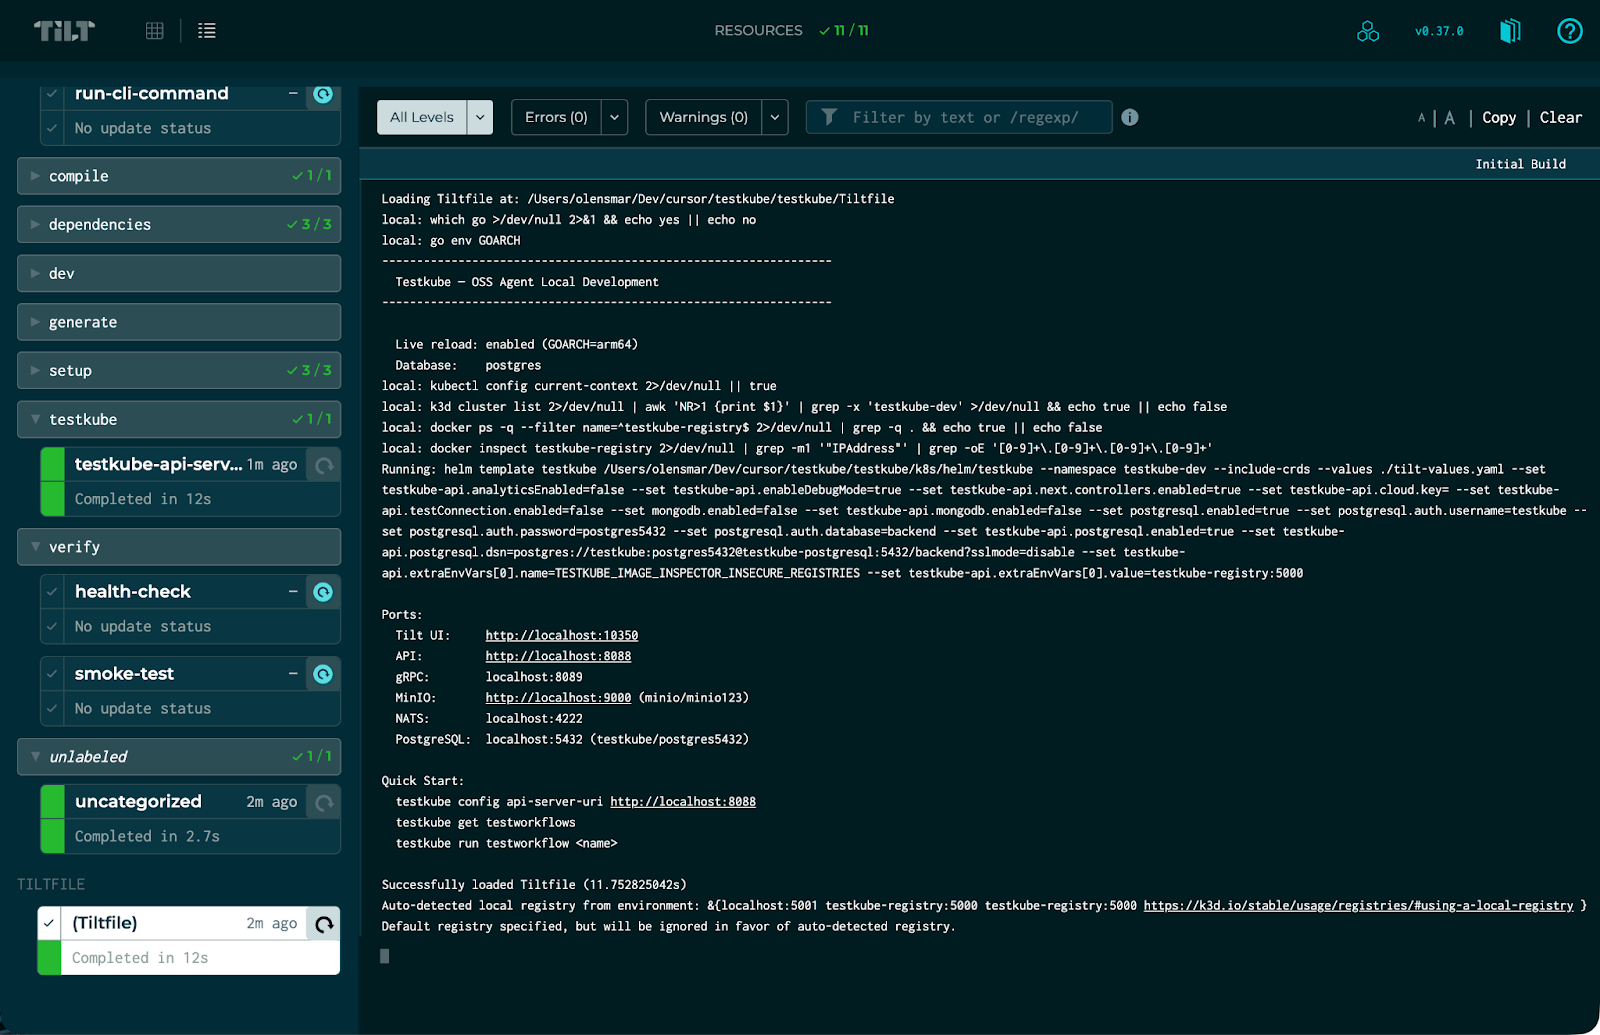
The DEVELOPMENT.md file has a detailed description of the Tilt setup and how it works, if you want to dig deeper.
Verify it works
Tilt also compiles the Testkube CLI for your host OS. Point it at the local API server by triggering the configure-cli resource in the Tilt UI, then try:
./build/_local/kubectl-testkube get testworkflows
Or just hit the API directly:
curl http://localhost:8088/health
# => OK 👋!
That OK 👋! response is coming from the API server running inside your cluster. Let's change it.
Your first code change: the health endpoint
The /health endpoint is defined in a single file - pkg/server/endpoints.go - and it could not be simpler:
package server

import "github.com/gofiber/fiber/v2"

// HealthEndpoint for health checks
func (s HTTPServer) HealthEndpoint() fiber.Handler {
    return func(c *fiber.Ctx) error {
        return c.SendString("OK 👋!")
    }
}
That is the entire file. Let's make a change and see the Tilt dev loop in action.
Step 1: Confirm the current behavior
curl http://localhost:8088/health
You should see:
OK 👋!
Step 2: Edit the file
Open pkg/server/endpoints.go in your editor and change the response string:
func (s HTTPServer) HealthEndpoint() fiber.Handler {
    return func(c *fiber.Ctx) error {
        return c.SendString("OK 👋! Testkube is alive and well.")
    }
}
Save the file.
Step 3: Watch Tilt do its thing
Switch to the Tilt UI (or watch the terminal). Within roughly two seconds, you will see Tilt:
- Detect the file change.
- Run a local
go buildto compile the API server binary. - Sync the new binary into the running container.
- Restart the process.
No Docker image rebuild. No Helm upgrade. No waiting for pods to reschedule. The binary is compiled on your machine using Go's fast incremental builds and copied straight into the container.
Step 4: Verify the change
curl http://localhost:8088/health

OK 👋! Testkube is alive and well.
That's it. Save, wait two seconds, curl. The entire inner development loop is that fast.
Going further: the /v1/info endpoint
The health endpoint was a great way to see the dev loop in action, but it's not the kind of change you'd actually open a PR for.
Here's a more realistic example - one that touches multiple parts of the codebase the way a real contribution would. Take a look at the /v1/info endpoint in internal/app/api/v1/handlers.go:
func (s *TestkubeAPI) InfoHandler() fiber.Handler {
    // ... setup ...
    return func(c *fiber.Ctx) error {
        return c.JSON(testkube.ServerInfo{
            Commit:           version.Commit,
            Version:          version.Version,
            Namespace:        s.Namespace,
            // ... more fields ...
        })
    }
}
This endpoint returns structured JSON about the running agent - version, commit, namespace, cluster ID, and more. Adding a new field here would touch the handler, the ServerInfo type definition, and potentially the OpenAPI spec - a realistic small feature that exercises several parts of the codebase.
Before you open a PR
Once you are happy with your change, run the standard checks:
make lint              # golangci-lint - catches style and correctness issues
go test ./pkg/server/... -v   # run tests for the packages you touched
make test              # full test suite (takes longer)
You can also trigger make lint and make test directly from the Tilt UI under the ci label.
If your change touches generated code (OpenAPI models, mocks, SQL client code), regenerate before committing:
make generate          # runs all generators
# or target a specific one:
make generate-openapi
make generate-mocks
make generate-sqlc
Submitting your PR
Testkube follows Conventional Commits for PR titles. CI will reject a PR whose title does not start with a type prefix:
feat: Add readiness detail to health endpoint
feat: Add readiness detail to health endpoint
fix: Return 503 when database is unreachable
chore: Update golangci-lint to v1.62
docs: Clarify webhook retry behavior
The workflow:
- Fork the repository on GitHub.
- Branch from main - always. Do not branch from another feature branch.
- Commit your changes with a descriptive message.
- Push and open a pull request against main.
- Fill in the PR template - CI runs lint, build, and tests automatically.
See CONTRIBUTING.md for the full checklist, including the CLA sign-off.
Cleaning up
When you are done for the day:
tilt down                          # tear down deployed resources
When you are done with the cluster entirely:
./scripts/tilt-cluster.sh --delete  # remove k3d cluster + registry
Using AI to contribute
You are of course welcome to use AI tooling to generate fixes and improvements for the Testkube codebase. Just make sure to review these just as meticulously as you would with human-authored code - we promise that we will!
To help Agents work on the codebase, it contains an AGENTS.md file that provides high-level structure and guidance for contributing to the codebase.
Where to go next
- CONTRIBUTING.md - overview of how to contribute to Testkube on GitHub.
- ARCHITECTURE.md - deep dive into the agent's components, storage layer, event system, and API structure.
- DEVELOPMENT.md - advanced Tilt options:
--debugfor Delve debugger support,--db=mongoto switch database backends,tilt cifor automated smoke tests. - Testkube Documentation - user-facing docs covering Test Workflows, the REST API, webhooks, and integrations.
- Slack - join the community to ask questions and share ideas.
- GitHub Issues - find something to work on. Issues labeled good first issue are a great starting point.
The first contribution is always the hardest - not because of the code, but because of the unknown. We’ve removed that now with this post. The Testkube codebase is well-structured, the environment works, the tooling is fast, and the community is welcoming.
Looking forward to your first PR.
About Testkube
Testkube is the open testing platform for AI-driven engineering teams. It runs tests directly in your Kubernetes clusters, works with any CI/CD system, and supports every testing tool your team uses. By removing CI/CD bottlenecks, Testkube helps teams ship faster with confidence.
Get Started with a trial to see Testkube in action.