Table of Contents
Start your free trial.



Table of Contents
Executive Summary
Introduction: Challenges to GitOps Cloud Native Testing
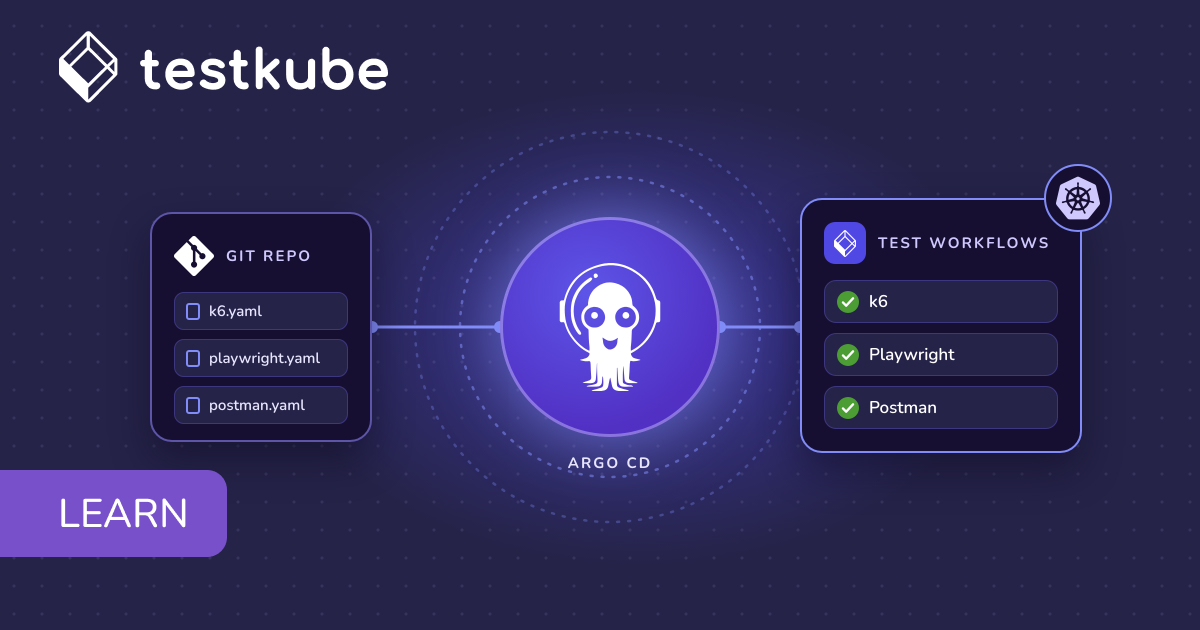
GitOps-powered testing with ArgoCD and Testkube stores your Test Workflows in Git, lets ArgoCD sync them to your Kubernetes cluster, and runs them automatically after each sync. GitOps itself is one of the major trends in cloud native application development: managing the state of your Kubernetes cluster(s) in Git, with all the bells and whistles provided by modern Git platforms like GitHub and GitLab regarding workflows, auditing, security, tooling, etc.
Tools like ArgoCD or Flux are used to do the heavy lifting of keeping your Kubernetes cluster in sync with your Git repository; as soon as a difference is detected between Git and your cluster, it is deployed to ensure that your repository is the source of truth for your runtime environment.
In this blog post, we will set up GitOps-powered testing using ArgoCD and Testkube. We’ll look at:
- Creating Test Workflows.
- Configuring ArgoCD on a cluster to sync the Test Workflows from a GitHub repository.
- Configuring a post-sync hook in ArgoCD to trigger the Test Workflows.
By the end of this post, you should be able to leverage GitOps for your testing requirements using Testkube and ArgoCD.
What Is the GitOps Approach to Testing?
GitOps is a modern approach to managing and deploying applications and infrastructure using Git as the single source of truth. You put all your configuration files and application manifests in a Git repository, which is version-controlled and keeps track of all changes made. You then configure this Git repository with automation tools like ArgoCD or Flux that continuously monitor this repository and apply any changes to the live environment, ensuring that the current state matches the desired state mentioned in the Git repository.
You can also integrate your tests as part of the GitOps workflow to catch issues early and ensure that your application and infrastructure are functioning as expected. Testkube allows you to automate and execute tests directly in your GitOps flow, enabling you to enforce a test-driven approach for newer deployments.
Benefits of the Testkube GitOps approach:
- Since your tests are included in the state of your cluster, you can always validate that your application components/services work as required.
- Since Testkube executes tests from inside your cluster, there is no need to expose services under test externally to be able to test them.
- Tests in your cluster are always in sync with the external tooling used for authoring.
- Test execution is not tied to CI but can be triggered by Kubernetes events or GitOps pipelines and tooling, ensuring that newly deployed or updated applications are always tested.
- You can leverage all your existing test automation assets from k6, Playwright, and Postman and any other testing tool or script.
Testkube GitOps Tutorial
Let’s see Testkube and GitOps in action. To understand this, we’ll configure ArgoCD on a Kubernetes cluster, configure a GitHub repository with all our Test Workflows for Postman, k6, and Playwright, and create an ArgoCD application. ArgoCD will constantly monitor the Git repo and the cluster and ensure that both are always in sync.
Prerequisites
- Get a Testkube account.
- Kubernetes cluster (we’re using a local Minikube cluster).
- Testkube runner with the GitOps capability configured on the cluster.
- ArgoCD configured on the cluster.
For a visual walkthrough of this tutorial, you can watch the accompanying video below before diving into the written instructions and prerequisites.
Creating Test Workflows
Testkube Test Workflows are an easy way to define and execute your tests in a Kubernetes cluster. These YAML-based specifications allow you to define your test, including resource configurations, images, artifacts, and the test itself in one single file. It allows you to create multi-step test workflows to cover your entire end-to-end requirement and gives you more control over your tests. Read more about Test Workflows.
The first step is to create Test Workflows we want to manage through ArgoCD. The easiest way to do this is by using the Testkube dashboard. Log in to your dashboard and click the “Add a new Test Workflow” button. For simplicity, we’re using the “Start From an Example” option to generate the test workflows for Postman, k6, and Playwright.
Here’s what creating a Test Workflow from an example looks like:

Here’s a sample Test Workflow that we generated for Playwright.
kind: TestWorkflow
apiVersion: testworkflows.testkube.io/v1
metadata:
  name: basic-playwright-workflow
  namespace: testkube
  labels:
    docs: example
spec:
  content:
    git:
      uri: https://github.com/kubeshop/testkube
      revision: main
      paths:
      - test/playwright/executor-tests/playwright-project
  container:
    workingDir: /data/repo/test/playwright/executor-tests/playwright-project
    image: mcr.microsoft.com/playwright:v1.32.3-focal
    resources:
      requests:
        cpu: 2
        memory: 2Gi
  steps:
  - name: Install dependencies
    shell: npm ci
  - name: Run tests
    shell: npx --yes playwright@1.32.3 test --trace on
    artifacts:
      paths:
      - playwright-report/**/*
status: {}
Once you’ve created all the required test workflows, save their YAML specifications in a GitHub repository. We’ll use this ArgoCD folder from the Testkube-Examples repository:

ArgoCD Setup
You can follow the ArgoCD installation guide to install ArgoCD on your cluster. It’s a fairly simple process. Once installed, choose the “Port Forwarding” method to access the ArgoCD application, as that’s the easiest way.
After the installation and port forward is successful, you can access the ArgoCD server at localhost:8080. You might get a certificate error since we’ve not installed the certificates. You can ignore that warning and proceed to log in. Use the credentials as described in the installation guide to access ArgoCD.

Configure a Testkube ArgoCD Application
Click on the “Create Application” button to create an ArgoCD application and configure it with a GitHub repository.
Provide the following details to create your ArgoCD application:
- General
- “Name”: Name for your ArgoCD application
- “Project Name”: this is a “default” project in Argo under which your application will be created.
- “Sync Policy”: How do you want ArgoCD to sync the changes between your GitHub repository and Kubernetes cluster? Choose “Automatic” and leave everything else unchecked for now.
- Source
- “Repository URL”: provide the Git Repository URL you want to configure for this application. We’ll use the Testkube-Examples repository.
- “Path”: location where the test workflows reside. In this case, it’s the “ArgoCD” folder.
- Destination
- Cluster URL: select the URL for your local cluster, usually kubernetes.default.svc
- Namespace: select the namespace where you installed the Testkube runner, usually testkube
- The “Directory” option lets you exclude certain files from being synced to the cluster. We’ll write “*.md” in the provided field to exclude the markdown file in the folder.


Click on the “Create” button, and your ArgoCD application will be created successfully if everything is correct.

GitOps in Action
Click on the application to see all the resources it has deployed to the cluster. In this case, you’ll find the three test workflow files synced to our cluster. While the application’s status is “Healthy,” the Sync status will be “OutOfSync.”

You can validate the creation of the said test workflows in the CLI and dashboard as well. Notice the “Labels” field for the newly created test workflows. It has an “app.kubernetes.io/instance=testkubedemo” label, which refers to the ArgoCD application we created.

You’ll see the test workflows are added on the Testkube dashboard as well.
Triggering Synced Test Workflows
Once the Test Workflows are synced to your cluster, you will want to run them. Testkube allows you to trigger them in multiple ways: using the Testkube CLI, Dashboard, Kubernetes triggers, and even ArgoCD post-sync hooks.
Let’s look at triggering tests using the Testkube Dashboard and ArgoCD post-sync hooks.
Triggering Tests with the Testkube Dashboard
Let’s start with the Testkube dashboard. Be sure to have the Environment selected that you installed in your local cluster and navigate to the Test Workflows section on your dashboard.
You should see the synced Test Workflows shown above. Click “Run Now” for each Test Workflow to execute them. Click on any of the Test Workflows to check their status and logs.


At this point, when you check the ArgoCD dashboard, you’ll see that the “Sync Status” turns to “Synced”, and there are checkboxes alongside each of the synced test workflows.

The beauty of ArgoCD is that it ensures that everything between your cluster and the GitHub repository is always in sync. To validate that, delete a test workflow from your dashboard. You’ll notice that the “Sync Status” has immediately changed to “OutOfSync”, and the respective workflow has a different status.

Using an Argo Post-Sync Hook
Triggering your tests manually via the Dashboard is convenient but probably not what you want to do as part of your automated GitOps pipelines. Let’s look at how to use an Argo Post-Sync Hook instead.
Post-sync hooks are executed by Argo after it has successfully synced resources within an Application. Read more about post-sync hooks. We’ll use the Job capability in Argo to define a Hook that uses the Testkube CLI to run the three Workflows that were synced above automatically.
The Job is defined together with our Workflows in the Git Repository in the https://github.com/kubeshop/testkube-examples/blob/main/ArgoCD/job.yaml file, so it can be synced into our cluster by ArgoCD together with our Test Workflows.
This Job first sets the Testkube CLI context and then simply runs the testkube run command for each Workflow that was synced, with the -f option to capture the output:
apiVersion: batch/v1
kind: Job
metadata:
  generateName: testkube-execute-testworkflows-
  namespace: default
  annotations:
    argocd.argoproj.io/hook: PostSync
    argocd.argoproj.io/hook-delete-policy: HookSucceeded
spec:
  template:
    spec:
      containers:
      - name: execute-testworkflows
        image: kubeshop/testkube-cli:2.1.19
        env:
        - name: API_TOKEN
          valueFrom:
            secretKeyRef:
              name: testkube-secrets
              key: apiToken
        - name: ENVIRONMENT_ID
          valueFrom:
            secretKeyRef:
              name: testkube-secrets
              key: environmentId
        - name: ORGANIZATION_ID
          valueFrom:
            secretKeyRef:
              name: testkube-secrets
              key: organizationId
        - name: ROOT_DOMAIN
          valueFrom:
            secretKeyRef:
              name: testkube-secrets
              key: rootDomain
        command:
        - /bin/sh
        - -c
        - |
          testkube set context \
            --api-key ${API_TOKEN} \
            --root-domain ${ROOT_DOMAIN} \
            --org-id ${ORGANIZATION_ID} \
            --env-id ${ENVIRONMENT_ID}

          testkube run tw basic-k6-workflow -f
          testkube run tw basic-playwright-workflow -f
          testkube run tw basic-postman-workflow -f
      restartPolicy: Never
  backoffLimit: 2
We have defined env variables for the testkube set context command arguments:
- api-key needs to be an admin-scoped API token. Read more.
- root-domain is the root domain of the Testkube instance you are using, use testkube.io for Testkube Cloud
- env-id is the ID of the Testkube environment configured for your local cluster.
- org-id is the ID of the organization containing your Environment.
You can find the environment and organization IDs in the Testkube Dashboard under the Environment Settings for your environment.

We’ll need to create a Secret in the default namespace (the same as where the Job is running) to provide these values:
kubectl create secret generic testkube-secrets \
  --from-literal=apiToken=tkcapi_7 \
  --from-literal=environmentId=tkcenv_5 \
  --from-literal=organizationId=tkcorg_3 \
  --from-literal=rootDomain=testkube.io
With the post-sync hook in place, Argo will run our tests after the sync is successful. We can see the results for those executions both in the Dashboard (as shown above) and in the ArgoCD UI while the Job is running.

When you click on the executing job, you can view the detailed logs as shown below:

Notifying Failed Tests in Slack
Finally, you might want to notify your team on Slack if one of these Tests fails. That is outside the scope of this blog post, but fortunately, there is documentation that shows you how to do just that: check it out.
And that’s how you can configure Testkube with ArgoCD and leverage the benefits of GitOps for testing!
GitOps Takeaways
Once fully realized, using GitOps for testing of Kubernetes applications as described above provides a powerful alternative to a more traditional approach where test orchestration is tied to your current CI/CD tooling and not closely aligned with the lifecycle of Kubernetes applications.
In this post, we looked at using ArgoCD and Testkube to supercharge your Kubernetes testing. By leveraging ArgoCD, you can enable consistency and streamline test workflows in your clusters. This approach enhances reliability and simplifies managing and deploying tests on Kubernetes clusters.
We’d love to get your thoughts on this approach. Over-engineering done right? Waste of time? Let us know!
Check out Testkube and let us know if you’re missing anything we should add to make your enterprise application testing easier. If you face any issues, the entire Testkube team, plus a vibrant community of fellow Kubernetes testers, are on Slack. You can also follow us on X at @testkubeio.
Frequently Asked Questions
{{banner-get-started}}
About Testkube
Testkube is the open testing platform for AI-driven engineering teams. It runs tests directly in your Kubernetes clusters, works with any CI/CD system, and supports every testing tool your team uses. By removing CI/CD bottlenecks, Testkube helps teams ship faster with confidence.
Get Started with a trial to see Testkube in action.