
Table of Contents
Try Testkube instantly in our sandbox. No setup needed.
See how to orchestrate YOUR tests with YOUR tools


Table of Contents
Executive Summary
Container testing is ensuring that your containerized application is working properly, not only in your local development environment, but in an actual Kubernetes cluster where things like network policies, RBAC, and resource limitations have a way of breaking your application, unless you take these into consideration.
Kubernetes also enables us to implement realistic constraints such as network policies, limited resources, and RBAC authorization that are not necessarily simple to replicate locally, even with solutions or tools like k3s or minikube.
A lot of companies operate production workloads on Kubernetes already, but being able to scale your app is worth little when it fails to deploy. The misconfigured services, resource constraints, or dynamic environments can creep in until it is too late without in-cluster testing.
In this guide, we will explore methods to test containers within Kubernetes, since success in local tests does not equate to stability once your application goes into a production environment.
What Is Container Testing in Kubernetes?
Local tests might give you a comforting green checkmark, but Kubernetes isn’t your development environment. Between service discovery quirks and network policies you didn’t know existed, the real surprises only appear when your containerized application hits the cluster.
Kubernetes brings features your local development setup doesn't usually mirror completely, like inter-service communication, RBAC, resource quotas, and real cluster configurations. Local tests like unit tests validate logic in isolation, but your local development setup doesn't usually mirror your production cluster completely and might not have the same quotas and cluster configurations. Unlike local development setups, in-cluster testing runs your containers in the actual Kubernetes runtime, surfacing issues that only show up under production-like conditions.
Example
Your API may locally pass health checks. However, when your containerized app is deployed on a Kubernetes cluster, a missing network policy within Kubernetes blocks the traffic, and your application will become inaccessible to users. These issues are detected through in-cluster tests before being detected by your users.
Types of Container Tests in Kubernetes
Not all tests catch the same problems. Unit tests might help you sleep better until your services mysteriously stop talking to each other during production. That’s why covering multiple test layers matters.
Combine basic health checks with integration and load tests for reliable results:
- Where: Staging environments and CI/CD pipelines
- When: Post-deployment validation and pre-release testing
- How: Run health checks first (30s), then integration tests (5-10min), followed by load tests (15-30min) to catch issues early while ensuring comprehensive validation
Why Test Inside Kubernetes Instead of Locally?
Local unit tests catch code-level issues like syntax errors and broken logic, but integration testing requires Kubernetes-like orchestration to reveal real-world deployment problems. Local environments can't replicate the complex interactions between admission controllers, custom resource definitions (CRDs), init containers, and pod disruption budgets that govern how your applications actually behave in production.
Kubernetes introduces layers of complexity that simply don't exist locally: RBAC policies that might block service accounts, node affinity rules that could leave pods unschedulable, security contexts that restrict container capabilities, and network policies that silently drop traffic between services. Resource quotas can throttle your workloads, while missing ConfigMaps or Secrets can prevent containers from starting entirely.
By testing inside a real Kubernetes cluster, you're validating against the same orchestration engine, admission webhooks, and runtime constraints your application will face in production. This catches critical issues like storage provisioning failures, service mesh misconfigurations, and resource contention scenarios that turn into 3 AM production alerts when discovered too late.
How to Run Container Tests Inside Kubernetes?
Testing in Kubernetes isn’t one-size-fits-all. The right approach depends on your testing goals, whether you're validating a single service or orchestrating complex, multi-step workflows across clusters.
Option 1: Kubernetes Jobs + Custom Scripts
You package your test as a container image and run it as a Kubernetes Job, which spins up an ephemeral Pod to execute the test and clean up after it finishes. It’s a lightweight, native way to run tests directly in the cluster.
When to Use
- Running basic, one-off tests (like a curl health check)
- Simple Kubernetes container test automation via scripts or CI/CD pipelines
- Small teams without heavy orchestration needs
- Database migrations
- Integration testing with real services
- Batch data processing tests
- Security scanning
Example YAML
apiVersion: batch/v1
kind: Job
metadata:
  name: api-health-check
spec:
  template:
    spec:
      containers:
      - name: curl-test
        image: curlimages/curl
        command: ["curl", "-f", "http://my-service/health"]
      restartPolicy: Never
Pros
- Native Kubernetes integration - Leverages K8s scheduling, resource quotas, and node affinity
- Resource isolation - Each test runs in its own Pod with defined CPU/memory limits
- Parallel execution capabilities - Can run multiple Jobs concurrently across cluster nodes
- Built-in K8s networking - Direct access to Services, ConfigMaps, and Secrets without additional configuration
- RBAC integration - Fine-grained permissions using ServiceAccounts and Role-based access control
- Automatic cleanup - Pods terminate after completion, freeing cluster resources
- Cluster-aware scheduling - Tests can target specific nodes, zones, or resource availability
Cons
- Native logging is available via kubectl logs, but lacks centralized reporting or dashboards unless integrated with external tools.
- Basic retries are supported via backoffLimit, but orchestrating complex flows still requires custom scripting.
- Manual artifact collection and limited workflow orchestration compared to dedicated testing frameworks.
Option 2: Helm Test Hooks
Helm test hooks integrate tests directly into the Helm release lifecycle, making them useful for post-deployment validation across multiple phases including pre-install, post-install, pre-upgrade, pre-rollback, and pre-delete. For simple use cases, you can even sequence tests using Helm hook weights. But for complex orchestration or multi-step flows, Helm alone might not be enough.
When to Use
- Teams using Helm-based deployments.
- Running compliance/security checks post-deployment.
- Database schema validation after migrations.
- Keeping tests tightly coupled to your Helm releases.
apiVersion: v1
kind: Pod
metadata:
  name: "{{ .Release.Name }}-smoke-test"
  annotations:
    "helm.sh/hook": test
spec:
  containers:
  - name: smoke-check
    image: curlimages/curl
    command: ["curl", "-f", "http://my-service/health"]
  restartPolicy: Never
Pros
- Built into your Helm release lifecycle.
- Simple for chart-managed apps with chart templating allowing environment-specific test configuration.
- No need for external tooling with GitOps-friendly declarative approach.
Cons
- Limited orchestration and reporting capabilities - the actual test complexity depends on what you implement in the test containers.
- Supports basic ordering via hook weights but lacks advanced orchestration, parallelism, or detailed reporting.
- No built-in retry logic.
- No test result persistence.
Option 3: Test Orchestration with Testkube
For teams that want coded, automated, scalable, Kubernetes-native testing, Testkube is built for it. It is not just a test runner but a full orchestration of tests inside Kubernetes.
Why Choose Testkube?
- Control every test using Kubernetes Custom Resources (CRDs).
- Convert existing tools like Postman, k6, Cypress, Playwright, or custom scripts into Kubernetes-native tests and manage them as first-class Kubernetes objects.
- Trigger test execution using CI/CD pipelines, GitOps workflows, or API calls.
- Centralize results, logs, and artifacts.
- Manage and visualize tests by using the optional web dashboard.
Core Testkube Concepts
- Tests and TestSuites: Use CRDs to define individual tests or group them into TestSuites for collective execution.
- Executors: Plug-ins that manage how each type of test operates within your cluster.
- Triggers: Automatically execute tests in response to events such as deployments, scheduled intervals, GitOps changes, or API calls.
- Artifacts: Results and logs are collected and kept for examination.
- Namespaces/Clusters: Test-specific scoping is supported by namespace, multi-namespace, or multi-cluster (Pro mode).
- Agents: Agents are linked to a central control plane in Pro mode and linked distributed groups.
Example Test CRD (Postman Collection)
apiVersion: testworkflows.testkube.io/v1
kind: TestWorkflow
metadata:
  name: postman-api-tests
spec:
  content:
    git:
      uri: https://github.com/example/api-tests
      paths:
        - postman-collection.json
  steps:
    - name: run-postman-tests
      run:
        image: postman/newman:6-alpine
        args: ["run", "postman-collection.json"]
Trigger the Test Using CLI
testkube run testworkflow <name>Unified Results + Dashboards
Testkube surfaces logs, artifacts, and execution history through the CLI (optionally) and via its dashboard. For teams needing cluster-wide insights or historical trends, the dashboard in Pro helps centralize it all.

Pros
- Kubernetes-native CRD management of tests.
- Supports all major test types (functional, performance, chaos, API tests).
- Automates triggers from GitHub Actions, GitOps tools, or APIs.
- Centralizes logs, artifacts, and execution history.
- Scales across multiple clusters with RBAC, teams, and dashboards (Pro).
Cons
- Testkube supports many popular tools, but you might need to write a custom executor for highly specialized frameworks.
- Managing tests as Kubernetes resources is powerful, but has a learning curve for those new to CRDs or orchestration.
Best Practices for Kubernetes-Native Container Testing
Building a reliable test setup? Follow these principles:
1. Use Isolated Namespaces or Ephemeral Clusters
Avoid running tests in shared environments. Use isolated Kubernetes namespaces for scoped test runs, or spin up ephemeral clusters using tools like Kind, k3d, or Cluster API. This prevents interference with production workloads and ensures test data is fully disposable after execution.
2. Automate Tests via CI/CD Pipelines
Manual testing doesn’t scale and is prone to human error. Integrate container tests into your CI/CD pipelines to ensure consistent execution on every commit, pull request, or deployment. This enables faster feedback loops and reduces the risk of untested changes reaching production.
3. Respect Security Boundaries (RBAC, Secrets, Network Policies)
Test with the same RBAC roles, service accounts, and network policies used in production. Misconfigured permissions or missing secrets won’t show up until runtime if your tests ignore them. Validate access restrictions and error handling under realistic security constraints.
4. Simulate Resource Constraints
Configure Kubernetes to enforce limits on CPU, memory, and ephemeral storage. Run tests with production-like resource requests/limits and observe behavior under quota pressure. This reveals issues like OOMKilled pods, throttling, or startup failures under tight constraints.
5. Monitor Test Pods and Cluster Events
Monitor test pods and Kubernetes-related events throughout the execution process. This will assist you as early as possible in identifying failures due to resource restrictions, scheduling, or RBAC misconfiguration.
6. Run Tests in Parallel to Save Time
There is no point in running sequential tests when the cluster can do more. Running several tests simultaneously accelerates feedback cycles and utilizes your cluster's capacity more rationally.
7. Clean Up After Each Test Run
Always delete Jobs, volumes, secrets, and other resources left over after your tests are finished.
Real-World Example: Testkube Running API Tests in Kubernetes
Let's say you have both Postman and k6 API test suites and want to validate your services after every deployment inside the cluster itself, not just in CI. In this example, we'll walk through how to automate both types of tests using Testkube, ensuring they run in a production-like Kubernetes environment and surface failures early.
Here's how you'd set it up step by step:
Step 1: Install Testkube
To get started, install Testkube in your Kubernetes. Here is an official installation guide.
Step 2: Define k6 and Postman API Tests via CRDs
Use TestWorkflow CRDs to fetch and run both your k6 scripts and Postman collections within the cluster. Here are examples of both:
k6 Load Test Example
This k6 test performs HTTP GET requests to test.k6.io to validate basic connectivity, response times, and server availability under load:
apiVersion: testworkflows.testkube.io/v1
kind: TestWorkflow
metadata:
  name: k6-load-test
  namespace: testkube
spec:
  content:
    files:
      - path: /data/example.js
        content: |-
          import http from 'k6/http'
          export default function () {
            http.get('https://test.k6.io')
          }
  steps:
    - name: run-k6
      workingDir: /data
      run:
        image: grafana/k6:0.49.0
        args: ["run", "example.js"]
      artifacts:
        paths:
- k6-test-report.htmlPostman API Test Example
This Postman collection validates API endpoints by testing HTTP status codes, response structure, and data integrity across multiple API calls:
apiVersion: testworkflows.testkube.io/v1
kind: TestWorkflow
metadata:
  name: postman-api-tests
  namespace: testkube
spec:
  content:
    git:
      uri: https://github.com/example/api-tests
      paths:
        - postman-collection.json
  steps:
    - name: run-postman-tests
      run:
        image: postman/newman:6-alpine
        args: ["run", "postman-collection.json"]
      artifacts:
        paths:
          - newman-report.html
Both configurations fetch test definitions, execute them in pods, and archive HTML reports for analysis.
Step 3: Execute the Workflows
Run them via the CLI:
#!/bin/bash

# Run k6 load testing workflow
testkube workflow run k6-load-test

# Run Postman API testing workflow
testkube workflow run postman-api-tests
Or trigger execution from the Testkube dashboard by selecting your workflows and clicking "Run Now."
Step 4: Access Logs, Artifacts, and Execution History
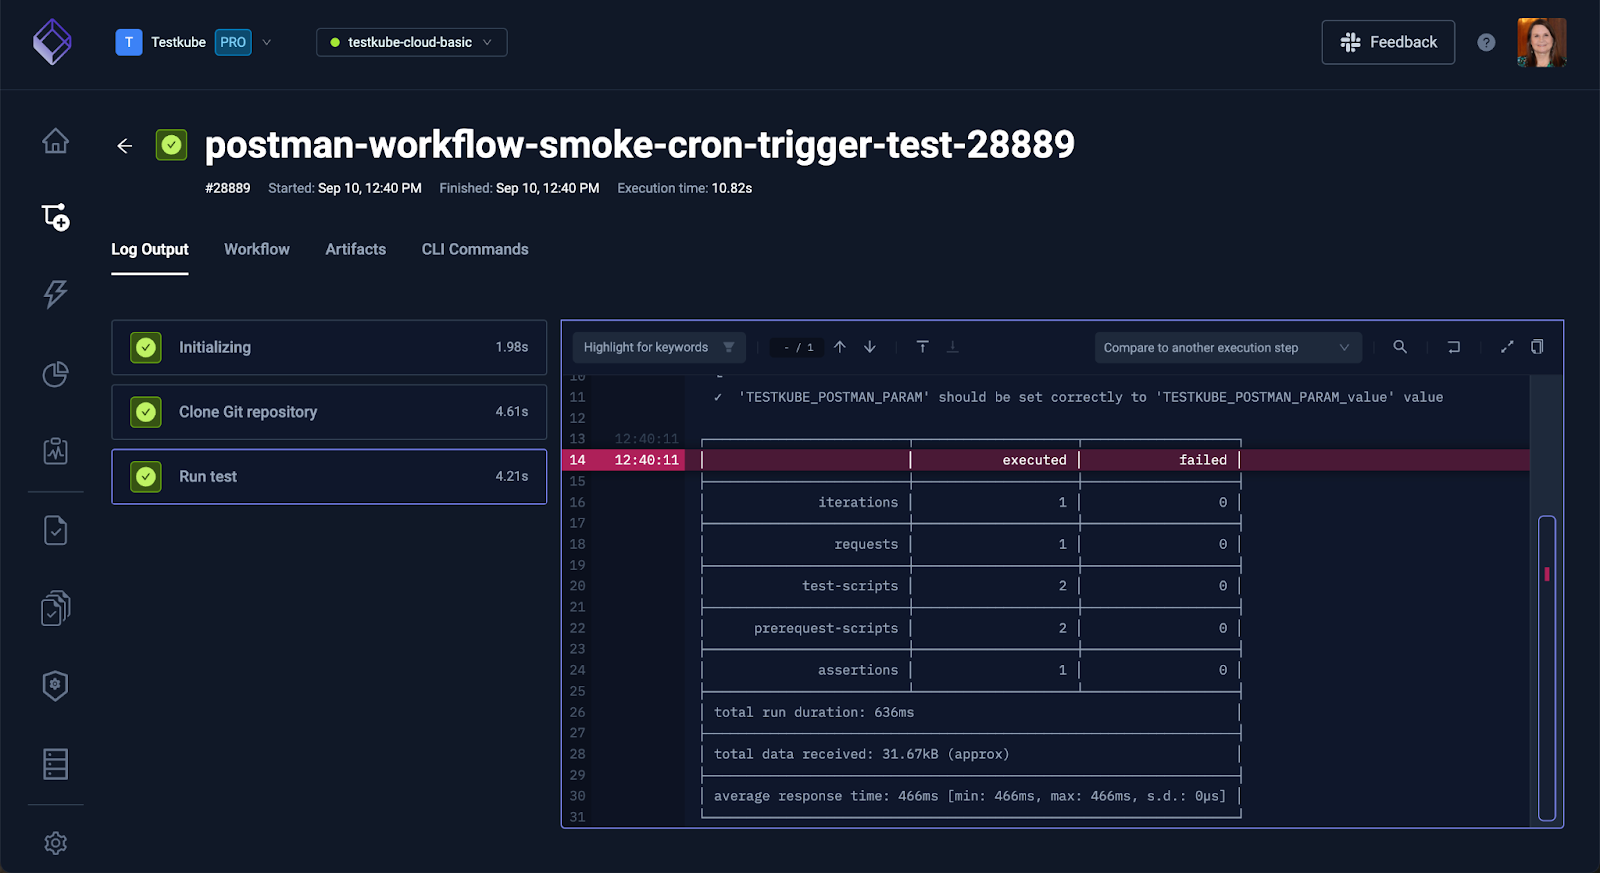
Instead of digging through pod logs manually (we've all been there), Testkube collects everything for you: logs, reports, and test artifacts. Execution logs can be viewed in real time through the Dashboard or CLI. Test results like Postman or k6 reports are saved as artifacts for easy analysis later.
Testkube also archives the history of your test runs with useful data so that you can know when tests were executed, the duration taken, and whether they passed or failed. This lets you avoid manually collecting logs or crafting custom reporting scripts.
Why Does It Matter?
Rather than struggling with raw curl scripts or requiring you to deploy your k6 pods manually, Testkube allows you to handle your tests as first-class Kubernetes objects. The unified, scalable experience of in-cluster testing is provided with CRDs, CLI, and dashboard. Built-in logs, artifacts, and execution tracking are included with no additional glue required.
Testkube Open Source vs Testkube Pro: Which Do You Need?
Testkube Open Source works well for small teams working inside a single cluster and managing tests through CLI or pipelines. However, if your team spans multiple environments or you require centralised reporting, Open Source can quickly feel limiting. Pro version gives you centralized control, dashboards, and multi-cluster management that scripting can't.
Top Tools for Container Testing in Kubernetes
Each tool serves specific testing use cases in your Kubernetes container testing strategy:
- Testkube: Test orchestrator for managing and executing various test types across Kubernetes clusters with CRD-based management, dashboards, and multi-cluster support.
- k6: Performance testing tool for load and stress testing containerized applications inside Kubernetes pods.
- Helm test: Lifecycle testing tool for simple post-deployment validation tied to Helm releases.
- LitmusChaos: Chaos testing tool for resilience validation and failure scenario testing.
Conclusion
If you value reliability (and fewer 3 AM incidents), your tests must live where your app does in Kubernetes. Local tests help, but Kubernetes-native testing tools like Testkube catch the messy, real-world issues before your users do.
Combining functional tests with performance testing and chaos engineering builds real confidence in your system’s reliability, whether you're running simple Helm-based checks or managing complex, multi-cluster test suites.
FAQs


About Testkube
Testkube is a cloud-native continuous testing platform for Kubernetes. It runs tests directly in your clusters, works with any CI/CD system, and supports every testing tool your team uses. By removing CI/CD bottlenecks, Testkube helps teams ship faster with confidence.
Explore the sandbox to see Testkube in action.


