.webp)


Table of Contents
Executive Summary
We all have seen the revolution that cloud native has brought to application development. It has fundamentally changed how organizations build, package, and deploy applications but the complexity of ensuring application quality across environments continues to escalate.
Helm is one tool that has established itself as the de facto standard for Kubernetes application packaging and deployment. Still, organizations have yet to fully capitalize on Helm’s potential for standardizing and automating testing procedures.
In this blog post, we’ll examine integrating Testkube with Helm to create a unified approach to application development and quality assurance.
Understanding Helm
As the official “package manager for Kubernetes,” Helm enables developers to define, install, and upgrade applications through charts—packaged collections of pre-configured Kubernetes resources. These charts are templates customized through values files, allowing you to configure environment variables while maintaining consistency.
By abstracting away the complexity of raw Kubernetes yaml files, Helm allows teams to manage the application lifecycle more efficiently, track version history, and roll back to previous versions when necessary. This has allowed teams to create standardized deployments across multiple environments.
Testing your Helm Deployments
While Helm’s capabilities for application packaging and deployment are widely recognized, its testing potential remains largely unexplored. Implementing a robust testing approach for your Helm-deployed applications ensures they work as intended before promotion to production environments. Helm allows you to use the same templating, versioning, and dependency management features to create consistent, reproducible testing environments. This allows teams to treat tests as first-class citizens in their cloud native environment.
- Consistency across environments: Helm allows test configurations to be templated and parametrized, like application charts, ensuring tests run identically across development, staging, and production environments.
- Version Control for Test Configurations: It allows you to track changes to test setups over time with the same versioning as application deployments.
- Simplified Rollbacks: When new approaches prove problematic, you can easily revert to previous test configurations, maintaining testing integrity alongside application versioning.
- Integration with CI/CD Pipelines: Leverage existing Helm-based workflows to incorporate automated testing as part of the deployment process
What is Testkube?
While Helm provides an excellent foundation for packaging and potentially managing tests, Testkube elevates cloud native testing by offering a dedicated, cloud native test execution framework. Building upon the packaging and versioning capabilities discussed in the previous section, Testkube takes a specialized approach to testing that complements Helm's strengths by offering:
- Kubernetes-Native Testing Architecture: Testkube runs tests directly in your cluster, leveraging the same infrastructure used for your applications. This ensures that tests accurately reflect real-world conditions.
- Multi-Framework Support: It seamlessly integrates with popular testing frameworks like Postman, K6, Cypress, and JMeter, providing flexibility without requiring complex configuration.
- Declarative Test Management: Define tests as Kubernetes custom resources that can be version-controlled alongside Helm charts, creating a unified approach to both application deployment and testing.
By integrating Testkube with Helm, teams can create a powerful synergy that addresses application packaging and testing needs within Kubernetes environments. By combining Helm's robust templating and versioning capabilities with Testkube's specialized testing framework, organizations can establish a unified approach to cloud-native deployment and quality assurance.
Integrating Testkube With Helm
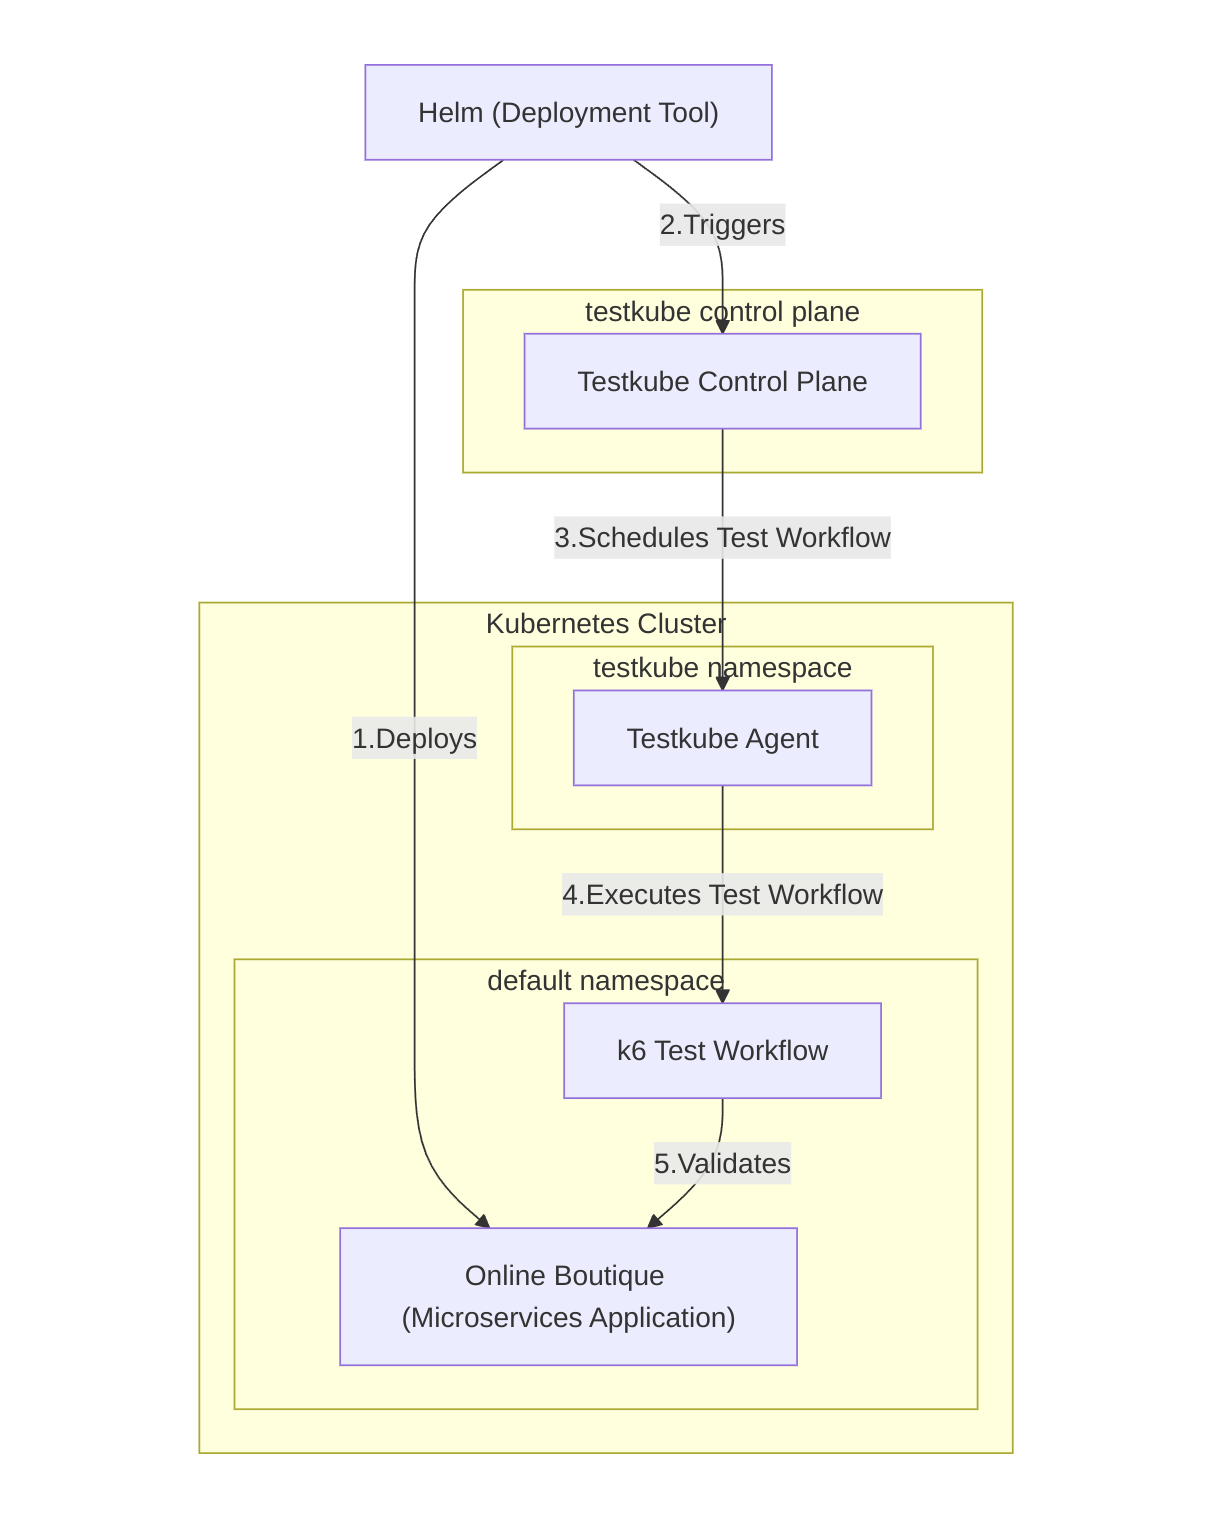
To better understand the synergies, we’ll do a hands-on demo of integrating Testkube with Helm. We’ll use the online boutique microservices application. Create a k6 Test Workflow that will validate one service of the application. We’ll use Helm to deploy the application to the cluster and execute the k6 Test Workflow to validate our application.
The application is deployed in the default namespace, and Testkube is installed in its own testkube namespace. We have configured the Testkube agent to execute Test Workflows using a different namespace.
Prerequisites
- Kubernetes cluster - For this demo, we'll be using a local Minikube cluster, but any Kubernetes cluster will work.
- Helm - Installed and configured on your local machine with access to your cluster.
- Testkube account - Sign up for a Testkube account to access the testing platform.
- Testkube agent - Properly configured and running on your Kubernetes cluster.
- Testkube credentials - Have your API Token, Organization ID, and Environment ID ready for configuration.
- kubectl - Configured with access to your Kubernetes cluster for verification and troubleshooting
To create the API token, refer to our API Token document. To find the Org ID and environment IDs, go to your Testkube Dashboard and click Settings from the menu bar.
Once you meet the prerequisites, you can start a target Kubernetes cluster using a Testkube agent setup. You also need to clone the online boutique microservices application as we need to add a Test Workflow to the helm charts.
Creating k6 Test Workflow
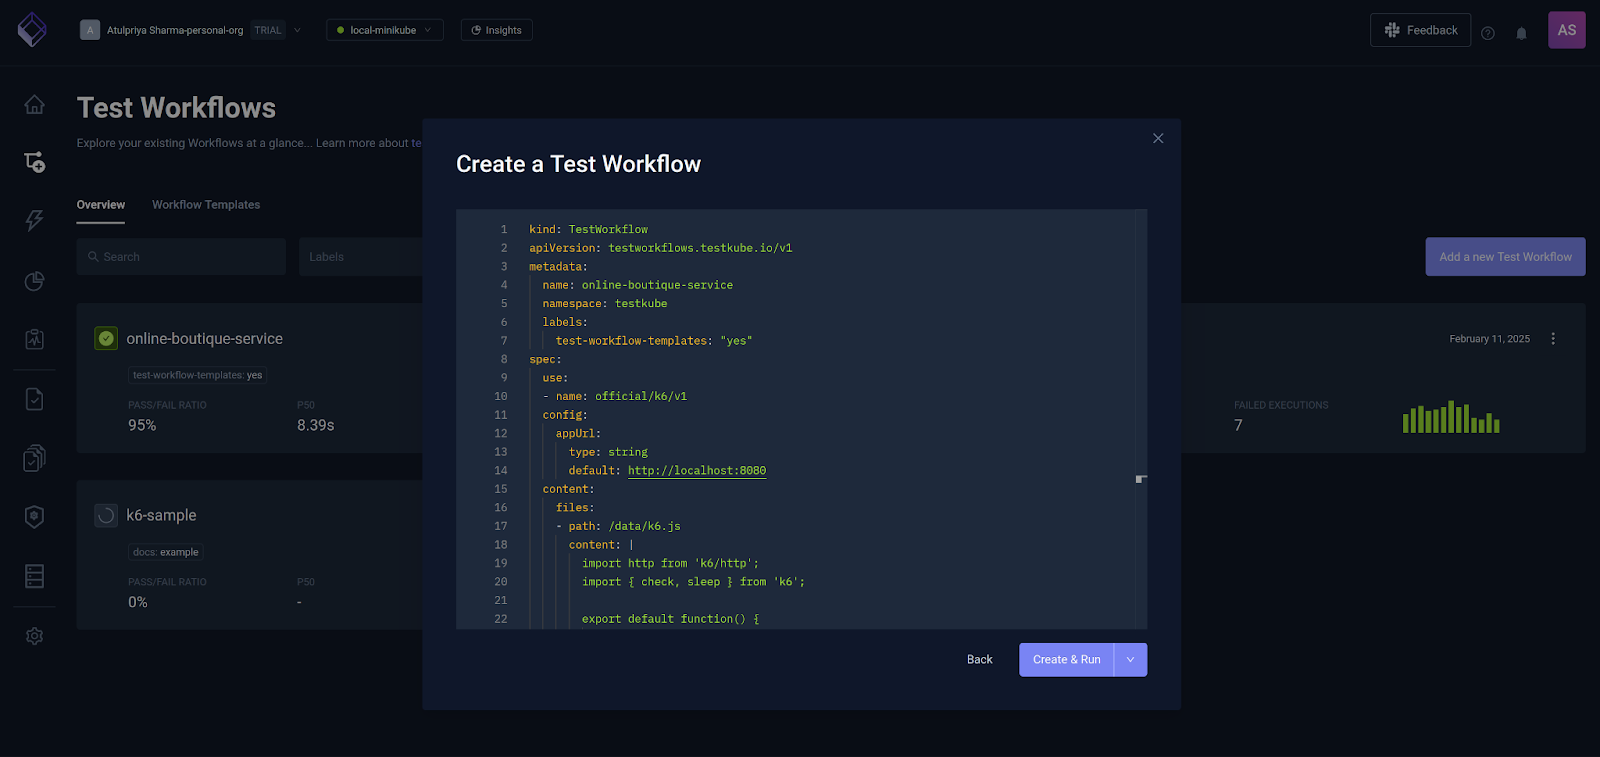
The Online boutique microservices application has many microservices, but we’ll focus on the ‘frontend’ service, which is responsible for the application's front end. The k6 Test Workflow that we’ll create will validate the homepage and loading of the frontend service. You can refer to our guide on creating a Test Workflow to create a Test Workflow.
This K6 Test Workflow checks the frontend service's status to HTTP 200. The response time is under 1000ms, and the body contains the text “online boutique.”
Once the Test Workflow is created, you can add it to Testkube through the dashboard and click on the Create button to save it, or you can use the Testkube CLI to create a Test Workflow.
Creating a Helm Test
After you’ve created the k6 Test Workflow, the next step is to create a helm test. To do that, you must create a new folder called tests inside the templates folder and add a test.yaml - /helm-charts/templates/tests/test.yaml.
The above file:
- Creates a Kubernetes job that we can execute using helm test command.
- Add a helm.sh/hook: test annotation, which is mandatory to execute the helm test.
- Add secrets for Testkube tokens and IDs to set the Testkube context.
- We’ll use the Testkube CLI to execute the online-boutique-service Test Workflow.
- Save the result and share the output based on the result.
Deploying and Testing the App
Now that the file is created and saved, you can install the Online Boutique Microservices application.
You can validate the application by navigating to the URL of the frontend or frontend-external service.

You can execute the test using the helm test command.
While the test executes, you can use the kubectl logs command to check the status of the job.
You can validate this by visiting the Testkube dashboard and checking the status of the Test Workflow.
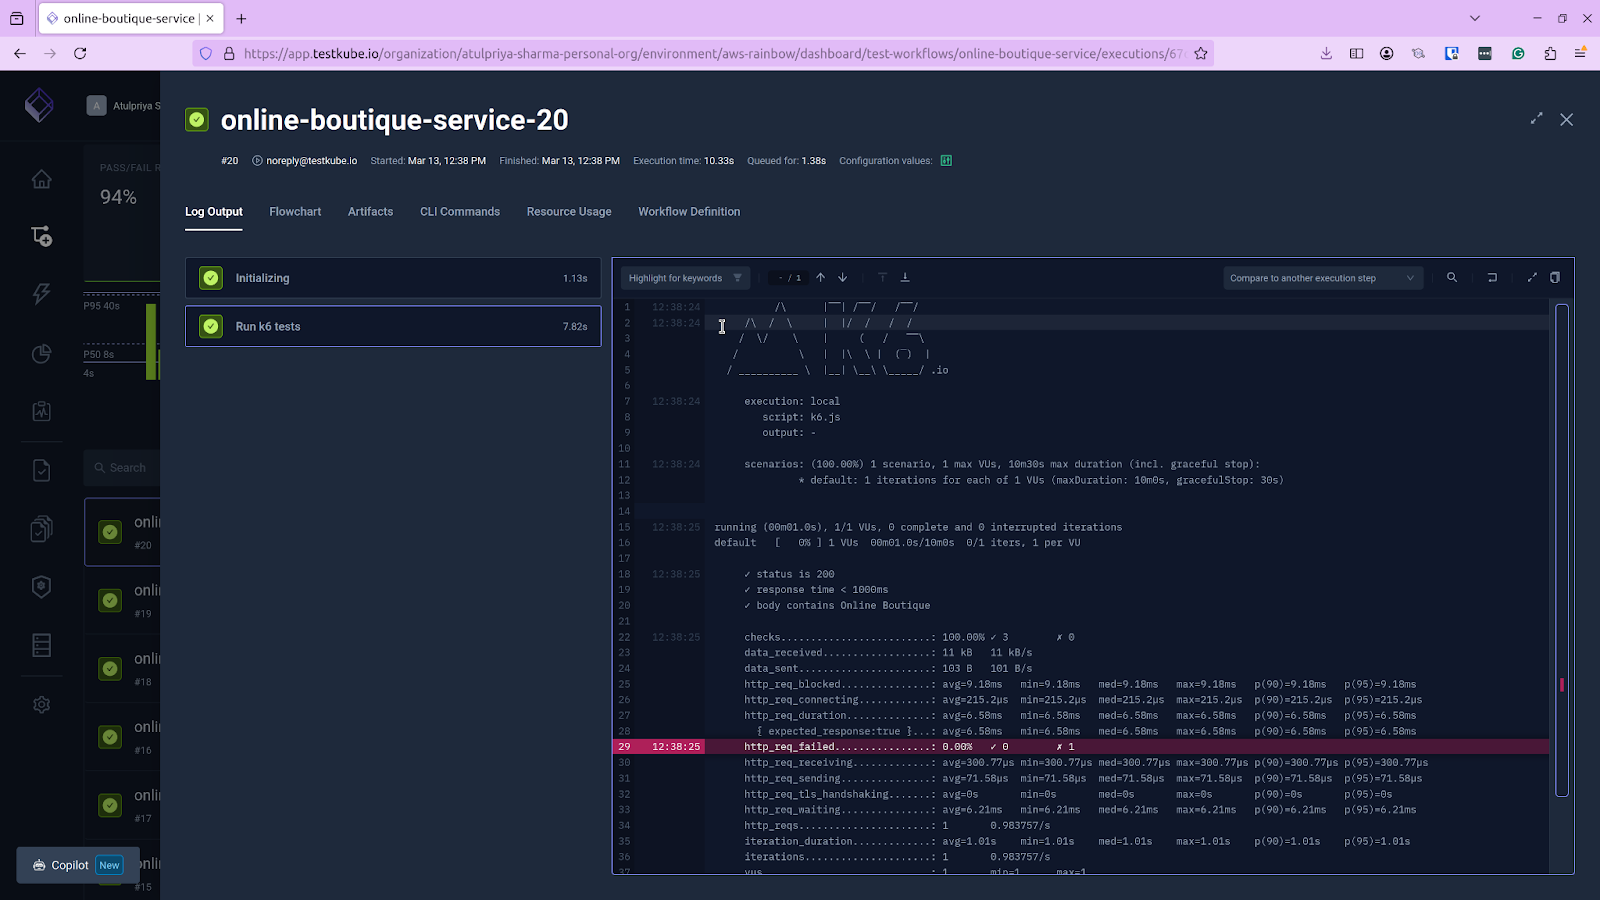
With Testkube and Helm successfully integrated, you now have a powerful framework for cloud native testing that leverages the best of both technologies. This approach streamlines your testing process and ensures consistency and reliability across your deployment pipeline.
Get Started with Testkube and Helm
In this post, we saw how this combination leverages Helm's powerful packaging and templating capabilities alongside Testkube's testing framework to create a comprehensive solution for quality assurance in Kubernetes environments.
For architects and technical decision-makers, this integration streamlines workflows by treating both application deployment and testing as version-controlled, declarative resources within the same ecosystem. By adopting this approach, organizations can achieve greater consistency across environments, faster feedback cycles, and improved confidence in their cloud-native applications.
Get started today and discover how Testkube can transform your testing strategy. You can also join our Slack community to start a conversation or read Testkube documentation to see how Testkube can enhance your testing workflow, ensuring seamless, efficient, and automated testing within the Kubernetes environments.
About Testkube
Testkube is a cloud-native continuous testing platform for Kubernetes. It runs tests directly in your clusters, works with any CI/CD system, and supports every testing tool your team uses. By removing CI/CD bottlenecks, Testkube helps teams ship faster with confidence.
Explore the sandbox to see Testkube in action.