


Table of Contents
Start your free trial.
Start your free trial.

Start your free trial.


Table of Contents
Executive Summary
Gone are the days of simple, standalone apps. Today's applications are complex, distributed systems spanning multiple environments and sometimes even different geographies. Ensuring every component works seamlessly is more crucial than ever, highlighting the indispensable role of comprehensive testing.
However, managing and monitoring the myriad of tests across various modules and environments poses a significant challenge. Enter Testkube, a tool not only for centralizing test metrics for enhanced observability but also for integrating these metrics into your existing systems for real-time insights.
This tutorial will guide you through setting up a Zapier webhook in Testkube to funnel test data directly to Zapier, allowing you to automatically generate and send detailed email alerts via Gmail. Stay tuned for a streamlined approach to keeping tabs on your tests.
Webhooks in Testkube
Think of a doorbell: it alerts you to someone's presence without needing to watch the door constantly. Webhooks serve a similar purpose in the digital realm, acting as notifications that prompt action or relay information between different applications when specific events occur.
Testkube leverages webhooks to inform you about test activities. Whether a test succeeds, fails, or triggers another significant event, Testkube can notify other systems in real-time, enhancing your testing workflow's responsiveness and integration.
Key Components of a Webhook Trigger in Testkube:
- Events: These are the specific occurrences within Testkube you wish to monitor, such as "test-start" or "test-fail". Selecting relevant events allows for targeted notifications.
- Source: Indicates the origin of the event, whether it's an individual test or a collection of tests within a TestSuite.
- Destination: The webhook endpoint or the digital address to which Testkube sends the notification.
Advantages of Implementing Webhooks
- Instant Alerts: Stay informed with real-time notifications about your tests' outcomes, enabling immediate action.
- Automated Workflows: Trigger specific actions based on test results, such as sending detailed emails after a failure, streamlining your response mechanism.
- Seamless Integration: Webhooks facilitate communication between Testkube and various tools or services like Slack for messaging or Grafana for monitoring, effortlessly fitting into your existing workflows.
By utilizing webhooks within Testkube, you can significantly enhance test observability and automation, making your testing processes more efficient and integrated.
Integrating Testkube With Zapier
Zapier is a tool that automates tasks in apps like Gmail and Slack, serving as a connector to streamline workflows without coding. At its core, Zapier uses "Zaps," automated workflows that link your apps and services. Each Zap has a "Trigger," an event in one app that starts the workflow, and an "Action," a subsequent automated task in another app.
For instance, by setting up a Zapier webhook trigger with Testkube, you can automate an email alert for every failed test case, simplifying how you monitor and respond to testing outcomes. Let's delve into this application next.
Creating a Zap
The first step is to create a Zap. We will create a Zap with a webhook as a trigger and Gmail as an action. This will give us a webhook endpoint that we will use to configure a webhook in Testkube.
Creating a Zap is pretty straightforward, and Zapier gives you multiple options to create a Zap: using AI Zap builder, Pre-built Zap templates, and blank Zaps. In this case, we will create a blank Zap and configure a webhook.
You can follow these steps to create a Zap and configure a webhook to trigger a Zap.
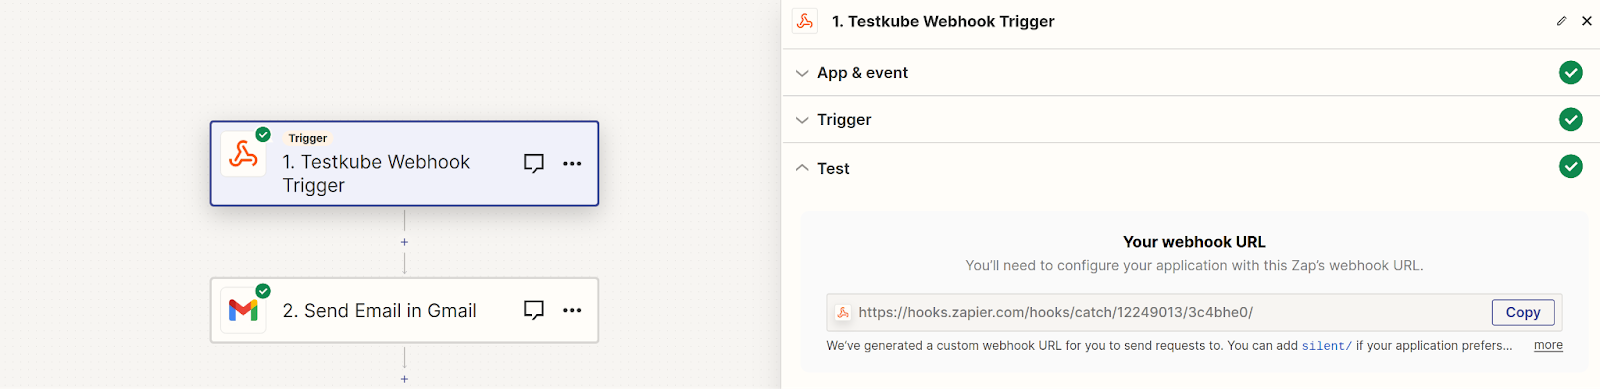
At this point, Zapier will give you a webhook URL, using which you’ll create a webhook in Testkube.
Creating a Testkube Webhook
Creating a webhook trigger in Testkube is easy. You can create Webhooks using the dashboard as well as the CLI. We’ll be using the dashboard to show you how it works.
Using Dashboard
We’ll set up a webhook for Zapier using the dashboard. This webhook will trigger on the test-end-failure event and send the data to the Zapier webhook endpoint that we configured in the previous step.
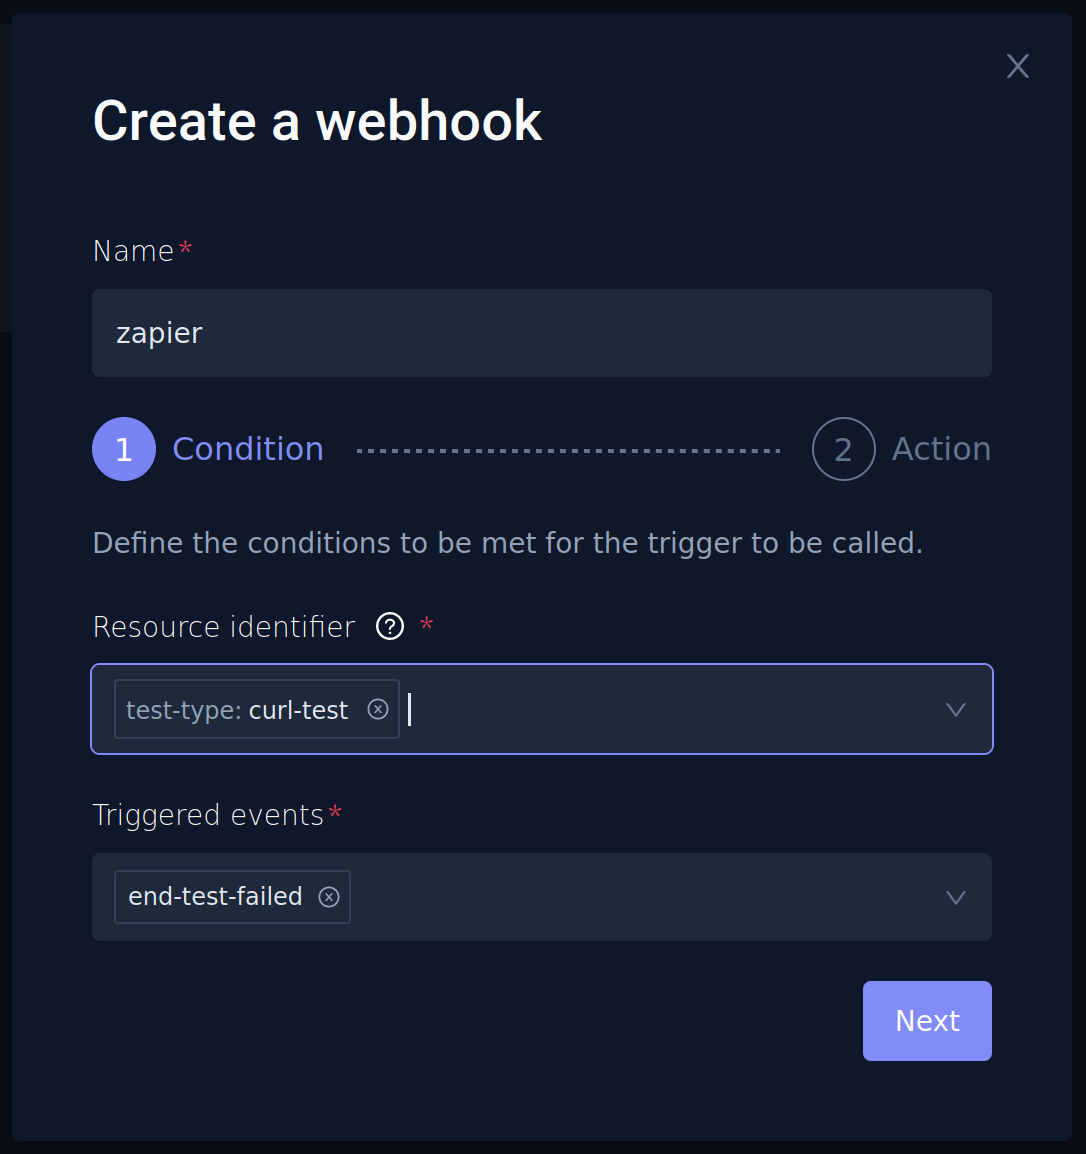
Navigate to the webhooks section and “Create a new webhook.”
- Provide a name for your webhook.
- Choose the “Resource Identifier” as any test or executor on which you want the webhook to trigger. In this case, we will use a simple curl test. You can find the test in this repo - we’ve changed the HTTP code in the test so that it fails.
- For “Triggered events”, choose end-test-failed, which basically means it will trigger when the chosen Pytest fails.
On the next screen, provide the Zapier webhook endpoint URL you generated while setting up Zapier integration. Now, we have a successfully configured Zapier webhook.

Now, when you execute the curl test and when it fails in the Zapier dashboard, you’ll see the Testkube records. At this point, you’ve successfully configured Testkube Webhook to send data whenever the curl test fails.
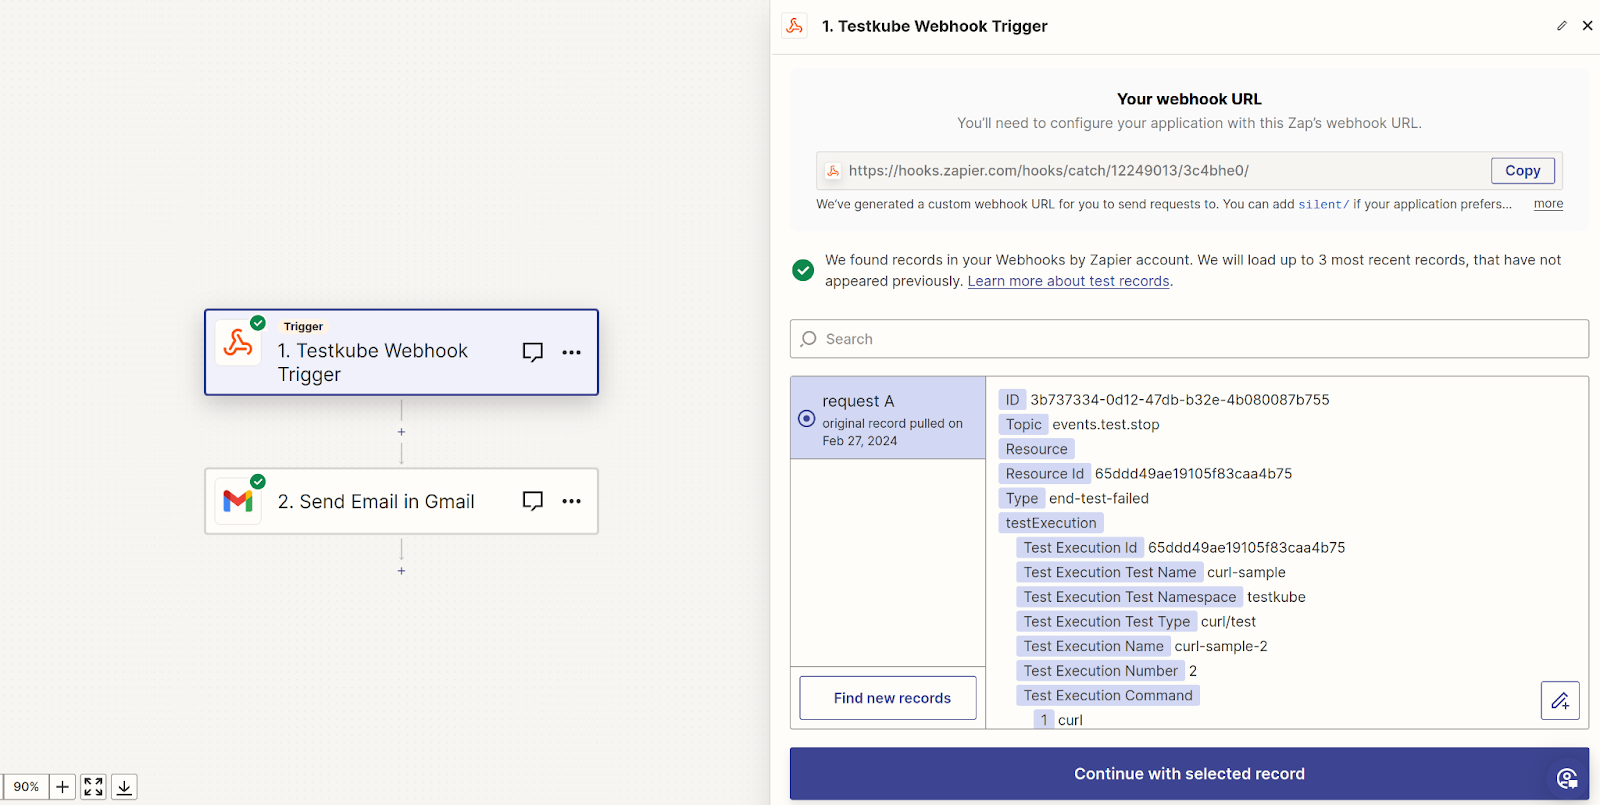
Click on “Continue with selected record button” to configure the action, in this case, Gmail.
Configuring Gmail
In the action field, choose Gmail and configure your Gmail account. It uses the familiar Google Sign-In, so you simply need to choose your account, provide Zapier the necessary permissions, and your Gmail account will be configured within a few seconds.
Based on the test data that Zapier received, it allows us to insert variables In the various fields. Using those, we’ll configure the following:
- To: Email address of where the mail will be sent to.
- Subject: Provide the subject of the email. We’ll provide “Test Name <Status>”
- Body: Here, we include details like the Test name, Start Time, Duration, and Logs - a link to the test execution.
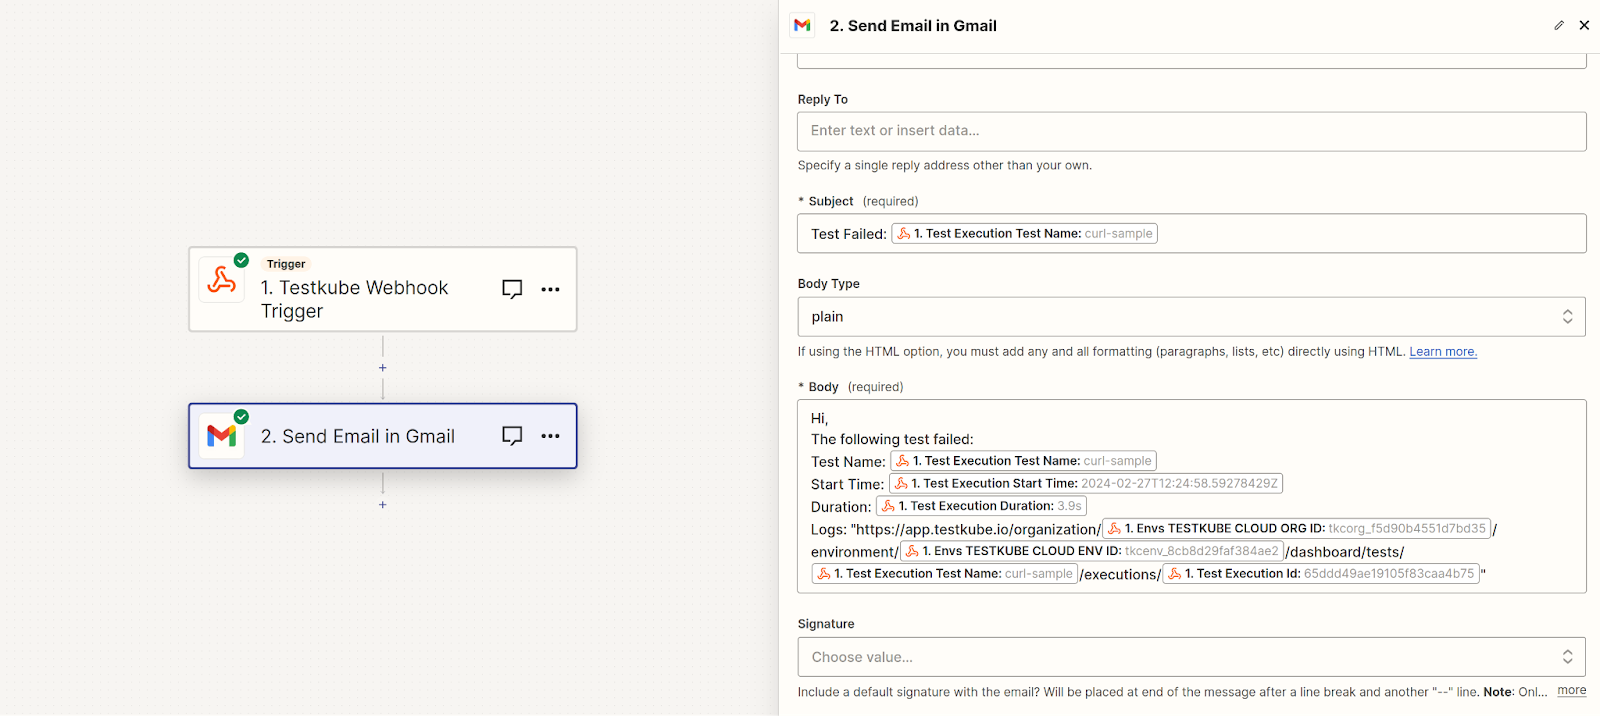
With this setup, you should have a Zap like the one above. We have configured the email body with details like the test name, start time, duration, and logs, which is the URL for the test execution log.
Testing the Webhook
Now that we have configured the webhook for Zapier, it’s time to test it. To do that, simply run the curl test.
When the test fails, you’ll see your Zap trigger and the associated action being performed. In this case, it will trigger an email to Gmail.
Based on our configuration, below is the mail we received after the Zap was executed successfully.

That’s about it. Creating a webhook in Testkube and integrating it with Zapier to send emails using Gmail is so simple.
In fact, using Zapier you can have endless possibilities as it has integration with virtually every tool and service that you know of. So you can set up a webhook in Testkube and configure Zapier to:
- Send test status into an Excel sheet
- Create an issue on GitHub
- Make an entry about the test failure in Notion
- Send a notification to your team on Slack
- And much more.
Closing Thoughts
To sum it up, enabling webhooks in Testkube elevates the testing process by offering real-time alerts to various test events. This not only streamlines your testing workflow but also enhances the reliability and efficiency of your testing strategy.
By integrating Testkube with Zapier, you unlock a world of endless possibilities. It allows you to connect Testkube to virtually any service you can think of.
We invite you to explore the power of Testkube and try Webhooks. Join our community on Slack to share insights, seek help, and connect with fellow developers.
About Testkube
Testkube is the open testing platform for AI-driven engineering teams. It runs tests directly in your Kubernetes clusters, works with any CI/CD system, and supports every testing tool your team uses. By removing CI/CD bottlenecks, Testkube helps teams ship faster with confidence.
Get Started with a trial to see Testkube in action.


.png)